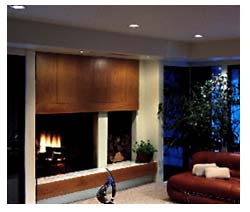
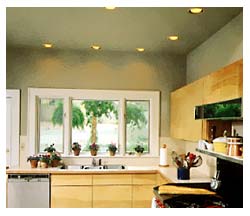
 Any place you want good lighting and an uncluttered look, recessed lights will do the trick. Brighten dark corners, highlight art or turn your dining room table into a dramatic setting. Unlike track lights, recessed lights are inconspicuous until you turn them on. If they're your only source of built-in light in a room, allow one fixture for every 25 square feet of floor space. For good ambient lighting, use floodlight reflector bulbs. Spotlight reflector bulbs are a good choice for precise accent lighting.
Nowadays, there are an incredible number of recessed lighting styles, available in both low voltage (small but bright halogen bulb) and line voltage (traditional reflector bulb) verions.
|
 Do It Yourself or Hire a Pro? Installing recessed fixtures isn't difficult. If you have dropped ceilings or access from above�from the attic, for example�that's easiest of all. The job is a bit trickier when you don't have access, but fortunately, most manufacturers offer special "remodeling" fixtures, also called "cut-in cans." They're rated for safe contact with insulation (indicated by the letters "IC"), and they're the best kind to install from below, whether there's insulation or not. The other major consideration is proximity to power. If there's already a ceiling box where you want your light, simply disconnect the wires from the box and reattach them to the cut-in can. (Cut-in cans come prewired to their own junction boxes.) As you'll see below, you simply cut a circular hole in the ceiling, attach the lead wires to the junction box and slide the fixture up into the ceiling until the fixture's mounting clips catch. With a power source in the ceiling and a switch in the wall, you're ready to proceed. If there's no electrical outlet handy, you may want to hire an electrician to run wire to the new fixture. But first have a look at How to Fish Electrical Cables. With a little spunk, you can save a bundle and have the satisfaction of doing it yourself.
|
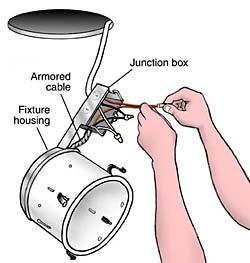 Safety Buy an insulation-contact (IC) rated fixture. When insulation touches an improperly rated recessed light, fire can result. If you run cable into a new junction box and from there to the new light, the junction box must be in an accessible place (usually the attic or basement) and not covered with drywall or the like. Step by Step 1. Cut an opening and wire the light. Turn off the power. Use the electronic stud finder to locate ceiling joists. Trace the outline of the fixture onto the ceiling. Then, with a tarp beneath, use a drywall saw to cut the opening (or enlarge an existing opening) for the recessed light between the joists. A jigsaw with a plaster-cutting blade will make the job easier, but be careful not to cut through existing cables hidden in the ceiling. Another handy tool, especially if you're putting in several recessed lights, is a drywall circle cutter. It's precise and easy to use. Insert the electrical cable into the fixture's junction box and fasten it with a cable clamp. Strip the wires as needed, then splice them to the fixture wires with twist-on wire connectors. Connect the fixture's black wire to the black house wire, then white to white and ground to ground (green or bare wire). Stuff the wires into the box and fasten its cover.
|
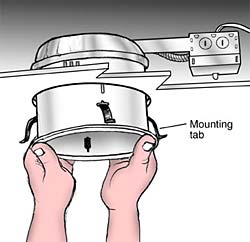 2. Install the fixture housing. Rotate the fixture housing into place in the ceiling until the mounting tabs engage the ceiling and the fixture is secure. Because the housing and its integral junction box are lightweight, there's no need to secure the junction box to a joist.
|
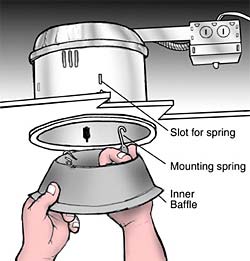 3. Install inner baffle and trim. Once the housing clips are snug, attach the inner baffle and any other trim to the fixture housing, according to manufacturer's instructions. The baffle shown is typical of recessed fixtures: it attaches with springs. Install the bulb, restore power and enjoy your new light.
|
Tools & Materials: | |
| Stud finder |
| Recessed lighting fixture |
| Drywall saw, |
| Tarp |
| jigsaw |
| Cable clamp |
| drywall circle cutter |
| Twist-on wire connectors |
| Adjustable wire stripper |
| Long-nose pliers |
| Screwdriver |
|
 Installing Track Lighting Installing Track Lighting
Track lights are a convenient and versatile way to provide
task or accent lighting�lighting directed to shine on a specific
area or subject you want to highlight. Once the tracks are installed, adjustable
fixtures may be installed or removed from the track with a simple twist. No
additional wiring is necessary. This flexibility allows you to achieve the mood
or presentation you desire by simply pointing the light where you want it. Later,
you can change the presentation by redirecting the light, or by adding or removing
fixtures.
You don't have to be an electrician to install track lights.
Many homeowners are afraid to tackle electrical projects�and rightly so;
improperly handled, electricity poses electrocution and fire hazards. But the
truth is that simple jobs like installing track lights are easy and safe if
you follow a few simple rules. And don't forget to always follow the manufacturer's
instructions.
Basic Electrical Overview
If Your House Has Aluminum Wiring
Just What is a Pigtail?
Installing Track Lighting
Determine and Layout Your
Track Location
Make the Electrical Connections
Install the Track and Fixtures
Basic
Electrical Overview
The most basic principles of the wiring in your home are simple. The following
is elementary information which every homeowner can benefit from.
In contemporary wiring, individual wires run in a sheathed cable.
"Two-wire with ground" and "three-wire with ground" cables
are available. Two-wire with ground cables have a black wire, a white wire and
an uninsulated ground. Three-wire with ground cables (used when installing three-way
and four-way switches) have a black wire, a white wire, a red wire and an uninsulated
ground. Older houses may have "knob and tube" wiring�a two-wire
system. With this system, individual wires are insulated with white or black
treated fabric.
Regardless of the type of wiring in your home, the white wire
is usually the neutral wire, the black wire is "hot," and the exposed
copper wires are ground wires. The white wire is sometimes used as a hot wire
because some wiring installations require it. In this case, the white wire should
be coded black with paint or electrical tape. Note, however, that it is possible
that whoever did the wiring may nott have coded the wire. If a red wire is present,
it should also be hot.
If only a single cable enters the box (or one set of black and
white wires), the fixture is at the end of the circuit. This is usually, but
not always, the situation with ceiling light fixtures. If two cables enter the
box (or two sets of black and white wires in older "knob and tube"
installations), the fixture is in the middle of a circuit. A third cable (or
set of black and white wires) may also enter the fixture, depending upon the
installation. The placement of the fixture within the circuit affects how it
is wired.
If
Your House Has Aluminum Wiring
It is easy to tell if your home has aluminum wiring--the metal under the insulation
is almost white instead of copper colored. Aluminum and copper wires should
be connected with a wire connector specifically rated for this purpose. Otherwise,
copper and aluminum will react with each other, possibly leading to a loose
connection and creating a fire hazard.
 Just
What is a Pigtail? (You'll need to know this later.) Just
What is a Pigtail? (You'll need to know this later.)
"Pigtail" leads are short wires which are connected to terminals on
receptacles or switches, and which are then connected to the home wiring by
the use of "wire nuts." Codes in some areas require that pigtails
be used on all standard receptacle connections since, with this installation,
one faulty terminal connection will not shut down an entire circuit. In any
case, when more than one wire must be connected to a single terminal, pigtails
should always be used.
Installing
Track Lighting
Some track lighting systems have a cord which can simply be plugged into an
existing outlet. These systems require no electrical wiring, but must be located
near the outlet. Another drawback with this system is the electrical wire which,
unless hidden somehow, can be seen running to the outlet. The second type of
system provides a more professional looking installation with no exposed wires,
but requires that a few electrical connections be made at a "junction box"(an
electrical box in the ceiling or wall) during installation of the track. If
no junction box is available along the proposed path of the lighting track,
you'll need to install one or have it installed by an electrician. This will
involve extending a circuit from an unswitched wall outlet to the newly placed
junction box. A switch is installed in the circuit between the outlet and junction
box to provide on/off control of the track lights. This how-to assumes that
a junction box is already available.
Before removing the old light fixture, be sure to observe the
first rule of electrical work�Turn off the power to the circuit you plan
to work on! Do this at the service panel (breaker box), and check the circuit
to make sure it is off. Inexpensive circuit testers are available that are,
essentially, a light with two probes designed to handle house current. They
are very useful for testing ground and hot wires, as well as for determining
whether a light fixture is carrying current. Once the circuit has been turned
off at the breaker and has been checked, there is no need to fear working with
the wiring on that particular circuit.
 Determine
and Layout Your Track Location Determine
and Layout Your Track Location
- This decision may be influenced by the location of an existing
junction box as well as by the object or area you're wishing to highlight.
You are not limited to just a straight track; fittings are available which
allow you to form T's or angles, for example. Just make sure that the fittings
you'll need are offered by the manufacturer of the track light system you
plan to purchase.
- Mark along the ceiling to indicate the placement of the track.
You can assure that the track runs parallel to a wall by measuring out from
each end of the proposed track placement. The two measurements should be equal.
- Do not place fixtures within six inches of curtains or other
flammable materials.
�
Make
the Electrical Connections
- Before removing the old light fixture, be sure to observe
the first rule of electrical work�Turn off the power to the circuit you
plan to work on! Do this at the service panel (breaker box), and check the
circuit to make sure it is off. Inexpensive circuit testers are available
that are, essentially, a light with two probes designed to handle house current.
They are very useful for testing ground and hot wires, as well as for determining
whether a light fixture is carrying current. Once the circuit has been turned
off at the breaker and has been checked, there is no need to fear working
with the wiring on that particular circuit.
 Remove the existing
light fixture from the junction box you plan to use. Your new lighting track
will be wired the same as the previous fixture. (After all, the old fixture
worked. You are simply replacing it with something more functional and attractive.
There is no need to reinvent the circuit.) Most of the time you'll simply
be connecting white wires to white wires (or a silver screw terminal), and
black wires to black (or a brass colored screw terminal). If several wires
are involved, however, or if the wiring seems more complicated and perhaps
even includes a red wire, take note of the connections before you disconnect
them. Make yourself a sketch of how the fixture is wired (index the sketch
by wire color) or mark the wires themselves with masking tape and a pencil
so you will know how to put them back Remove the existing
light fixture from the junction box you plan to use. Your new lighting track
will be wired the same as the previous fixture. (After all, the old fixture
worked. You are simply replacing it with something more functional and attractive.
There is no need to reinvent the circuit.) Most of the time you'll simply
be connecting white wires to white wires (or a silver screw terminal), and
black wires to black (or a brass colored screw terminal). If several wires
are involved, however, or if the wiring seems more complicated and perhaps
even includes a red wire, take note of the connections before you disconnect
them. Make yourself a sketch of how the fixture is wired (index the sketch
by wire color) or mark the wires themselves with masking tape and a pencil
so you will know how to put them back
- Depending on the track lighting system you have purchased,
electrical connections to the track may be made in one of two ways. Either
you'll make the connection by joining wires with plastic connectors often
called "wire nuts," or you'll screw the wires directly to terminals
located on the track connector. For screw terminal connections with multiple
wires, it will be necessary to first attach pigtails to the track terminals,
then attach the wires to the pigtails with wire connectors. Install
the connector by twisting it onto the wires.
- If the new fixture includes a ground wire (bare or green
insulated wire), it should be connected to any other ground wires that may
already be in place, and to grounding screws in metal electrical boxes when
metal boxes are used to support the fixture.
�
Install
the Track and Fixtures
- Tuck any circuit and fixture wires into the junction box,
and install the mounting plate firmly to the box.
- Snap the track into place on the junction box, following
the instructions provided by the manufacturer, and align the track with your
positioning marks. Once in position, tighten the track locking screws on the
mounting plate.
 Secure the track along
its length with either toggle bolts or screws. Toggle bolts must be used in
areas where access to the ceiling joists is not possible. Screws installed
into drywall or plaster simply will not hold. Screws should be used whenever
possible, however, if they can be located in areas where they will extend
into the joist above the frame. Secure the track along
its length with either toggle bolts or screws. Toggle bolts must be used in
areas where access to the ceiling joists is not possible. Screws installed
into drywall or plaster simply will not hold. Screws should be used whenever
possible, however, if they can be located in areas where they will extend
into the joist above the frame.
- Attach any angle, T, or straight fittings along with additional
track sections to achieve the track layout you desire. Also insert any end
pieces at the ends of the completed track.
- Attach the electrical adapter to the track by inserting it
into the track and twisting it. Then install the cover over the adapter/mounting
plate assembly.
- Insert the fixtures into the track and twist them to secure.
- Install the appropriate bulbs for the fixture. Install only
bulbs recommended by the manufacturer, and follow all of the manufacturer's
safety guidelines since, as with any light fixture, you must not to exceed
the established wattage limits.
- Turn on the current and test the lights. If they fail to
work, turn off and test the current once more and double check your work for
incomplete connections.
|