Research and background
Green Pendelton wool from stash
Blue linen lining (~3.5 m @ 20 kr) 70 kr
Silk for picadils (0.15 m @ 200 kr) 30 kr
Total: 100 kr
Inspirational pictures and design
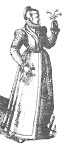
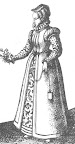 Basically, I am looking at the ladies depicted in the map series Civitates Orbis Terrarum. Most closely the following ladies from a panel of five on the map to "Nonesuch Palace". I found these delightful ladies on Jane Stockton's most excellent site.
From Lady 1, I get the specific idea for sleeves. From Lady 5 I get the specific idea for collar. From both I see I need a suit of ruffs, and some means to close the bodice securely. I intend to take inspiration from Arnold's Patterns of Fashion and The Tudor Tailor and add points all down the front for closure, as well as hooks and eyes on the bodice. The front of the skirt will lie smoothly, while the back will be pleated.
For decoration I intend to use guards of black wool, possibly pinked, along the front opening, around the hem, and a few other guards down the front and back of the bodice. It will all depend on how much wool is in my stash suitable for the purpose. I was also given some scraps of gold silk which I will use to create a picadil edge around the collar, sleeve ends and down the front opening of the gown for a little more detailing.
Pattern
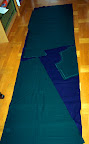
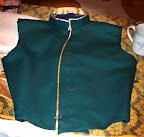
 As far as pattern goes, I basically reused my doublet bodice, and the trusty Alcega petticoat. I could have extended the back panel on the skirt for more fullness in the eventual pleating, but decided to keep it simple and not indulge in conspicuous consumption of fabric. It was at this point that I realized that what I am doing here is re-creating my blue linen doublet bodice kirtle, and I must say I am pleased with that, because it means 1) I got it right for that dress, and 2) I will like the end result of this project since I adore the line and look of the doublet bodice kirtle. The picture shows how I used the shell wool (green) to cut out the blue linen lining. For the bodice I also cut out interlining in the same blue linen and mounted the shell to interlining before assembling the bodice.
Picadils
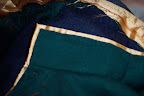
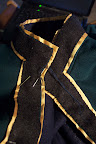
 December 2, 2006: Unscheduled Updates - I was given small leftovers from Her Excellency Viscountess Helwig's gold silk lining fabric to use as picadils on this project of mine. It goes a surprisingly long way. I folded the silk double on grain and pinned it to the inside of the collar. Stitching it into place was a case of foreshortened backstitching using silk sewing thread which from the outside looks like topstitching - and that is basically what it is. This progress did show me that my preferred method for making the skirt up will not work at all and I must re-think it before I can proceed. Once it is all stitched into place I will go back and cut the silk at intervals, about a centimetre I think, to make the solid line into tabs.
December 15, 2006: Skirt attachment and more silk - With the new plan of attack for the skirt worked out I got to work on that after coming as far as I could on stitching the silk in place on the bodice.
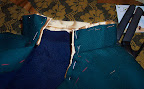
 The plan was to stitch the skirt right sides together along the waist, leaving the last 20 cm open. I also basted the front edges together at the correct distance and then turned the skirt the right way out. To keep the layers neat I topstitched along the waistline of the skirt, and then all around the pocket which was inserted in the side seam of the lining. Then I went ahead and whipstitched the skirt into the waistline of the bodice using buttonhole floss. The back panel is cartridge pleated to the bodice while the front is left smooth. Around 8 cm of the front I folded the lining of the skirt down to only catch the shell fabric to the bodice, leaving enough room to insert the silk and stitch that into place before finishing off the skirt.
 At this point I was able to cut down the extra silk I bought into strips, fold it double and insert it in the front edge of the skirt. It was a matter of preparing the silk edging and then unpicking the basting stitches keeping the shell and lining layers together at the front. Once I had one side stitched into place I pinned the lining to the correct distance and tried it on. At this point I have the other side of the edging pinned into place as well. In the overall timeline of this outfit, the only things not started yet are the sleeves and the guards.
January 10, 2007 - I had big plans for finishing this off over christmas, of course no such thing happened. But I have stitched down all the silk along the front edge. Last Saturday (Jan 6th) I also cut out flatlining and a more fitted lining for my sleeves out of the blue linen. I have done up the seam to about elbow length on the shell layer and am now pausing to gather my thoughts, as the assembly of the sleeves and their attachment to the bodice is not a simple thing. I want them sewn into the armscye, but the dual layer with a padded roll in between will take some consideration to look good in the end.
Sleeves
February 12, 2007 - When is there ever no problems with the sleeves? I have not ever been 100% happy with any pair of sleeves I have set into a dress, with the exception of the big Tudor Court Gown, so I told myself I would not be happy with good enough. This turned out to be a good resolution to hold to, as I had been exceptionally stupid in cutting out my sleeves. I had decided, for unknown reasons, to ignore the grain of fabric when cutting them out, and therefore one edge was the selvedge of my fabric. My first assembly of the sleeves showed me exactly why that was a Very Bad Idea. Besides pulling in strange directions, I also found that the sleeves were much too big, fitting two of my arms inside them comfortably.
Taking a step back, I regrouped, took in some advice, and checked my pattern against The Tudor Tailor. The sleeves I wanted are commonly called mutton, or mutton chop sleeves, and the pattern is basically a pair of straight sleeves, with the curve at the top of the sleeve exaggerated so it can be gathered and possibly padded for that full, puffed up look (see above, Civitates Lady 1). My pattern was essentially correct, but much too large and on an odd angle of bias. I decided to simply cut off a wedge of fabric, widest at the top, narrowing at the cuff to get some bias stretch in the formerly selvedge edge, and also remove excess width in the sleeve.
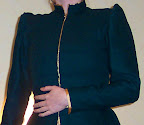 After doing this and again stitching up the seam, folding in seam allowance at the sleeve-head and assembling it onto the bodice I could try it on. At this point I had also caught the small shoulder roll inside the sleeve to help pad the mutton chop. As I could now try them on properly, I could also measure the length of the sleeves, and what had seemed like a ridiculously overlong sleeve, turned out to be just right. The gathering and roll at the top of the sleeve eats up the extra length. With the length marked I could also finish off the cuffs with the picadil silk edging, leaving an opening in the sleeve seam of about 5 cm which I will close with a pair of hooks and eyes.
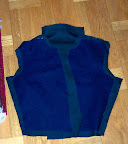
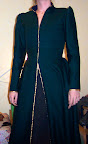 Now, with the sleeves set in, I could finally add the lining on the bodice and do something about front closing. In previous pictures I pinned the front closed at the waistline, but with the addition of hooks and eyes down the front, doubled in opposite direction at the waistline, I had a means of closure and could try the gown properly, and it fits like a dream.
So then I started experimenting with placement of the wool guards. I basted them in place in a few configurations and asked for advice. I like the look of diagonal guards on the front from the shoulder, but found no documentation of that style, so for the front I have decided to keep it simple with a guard around the collar, down the front of the gown and around the hem. As for the back, I rather like the shaping added by the diagonal from the armpit down to the waistline, so I shall go with that in the back. I am as yet undecided on a guard around the cuffs, but if I want to be consistent, then all edges with picadils will have guarding as well.
Guarding
 March 29, 2007 - Another step closer to the end. I decided finally on configuration for the guarding on this gown. A simple lap around the hem, a stripe down either side of the front opening, around the collar and around the cuffs. I decided against slashing the guards to display the gold silk in the background, in favour of adding a second picadil edge on the inside of the guard. Adding the silk on the inside of the guards will help with the contrasts as the black wool blended rather too well against the dark green of the gown. Now there is a clear line of demarcation, and another touch of bling for very little effort.
I did not want to draw as much attention to the back of the gown, so the diagonals from the armpit to the waistline have remained plain black wool with no other decoration. I like how this subtle touch helps create the illusion of a narrow waist.
April 20, 2007: All finished now - I had only one task over Easter, and that was to finish this dress completely, and I did. Before Easter I had added all the guards, save the band around the hem. This was because the hem was not finalised until that time. I finally did pull myself together and finished the hem separately for shell and lining fabric. The lining I folded up twice out towards the shell, and the shell was folded up twice in toward the lining. In order to keep track of the skirt I also tacked the two layers together at two points along the hem.
With the hem finished I then only had the guard to add using silk sewing thread. Unfortunately I could not find any black silk thread at home, but since the stitching is well night invisible I used the green sewing silk that matches the wool fabric. And to keep the look cohesive I also added the silk picadil to the upper edge of the hem guard. With this done the gown itself was finished, and I wore it at Drachenwald Spring Crown Tournament feeling quite comfortable (aside from the hot sun) and quite dressed up. I am, however, missing the suite of ruffs for a completely finished look. I am also missing any good photos of me in the gown. My goal now is to have the ruff and cuffs finished in time for Double Wars on May 12th, and I shall see about bringing back photos of the finished outfit.
Result
May 23, 2007: Back from a fantastic event - I had forethought enough to arrange for pictures of me in my finished gown. I must say, I seem to have shrunk away a little bit, and so the kirtle does not provide all the support I need. But in the end I feel quite happy with the entire look. I did not manage to finish the suit of ruffs in time, unfortunately. Perhaps another day. In any case, here we are.


Photo Gallery
For images I may not have linked in the diary, close-ups and overviews et cetera please have a look at the photo gallery.