![]()

Cutting Out From Picures
The Freehand
tool ![]() is used to cut round an object.
Use the Smart Edge or Point to Point selection. You need to click many
times appropriate places along an objects edge to place points.
is used to cut round an object.
Use the Smart Edge or Point to Point selection. You need to click many
times appropriate places along an objects edge to place points.
Open your pic in PSP 7.
Choose the
Zoom tool ![]() from the Tool palette on the left and click
your pic several times until the object fills your screen, but all of it
can still be seen.
from the Tool palette on the left and click
your pic several times until the object fills your screen, but all of it
can still be seen.
Pick the
Freehand tool ![]() from the Tool palette on the left to
bring up your Tool Options as below
from the Tool palette on the left to
bring up your Tool Options as below
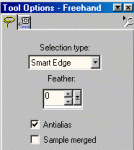
Choose a starting point on your object and slowly click around trying to keep as close to the edge as possible, you will see as you go a dotted line showing where the cut will be made, if its the wrong place go back and start again, its takes a bit of practice. Do not worry if its not exact, and its better to make this selection bigger than your object rather than smaller.
When you have gone right round your object either double click or right click to close it and you will then see the marching ants around it..select edit from the top menu and copy, then edit and paste as a new image.
Your object will now be on a transparent background

As you can see this is not brilliant but don't worry you can tidy it up a bit
Select the zoom
![]() from the left hand
tool bar and magnify the pic so its easy to see
from the left hand
tool bar and magnify the pic so its easy to see
Select the eraser from the left hand
tools ![]() and (you can change the size of the
eraser from your tool options) and carefully just rub out the extra bits to tidy
it up.
and (you can change the size of the
eraser from your tool options) and carefully just rub out the extra bits to tidy
it up.
If you are going to put this on a backround its not too important
Heres the tidied up image

If you want to save with a transparent background you must save as a .gif image
Go to File - Export - GIF Optimizer make sure existing image or layer transparency is ticked. You will see in the 2nd window that the pic has a checkered background denoting that it is transparent, name it and save!!!
