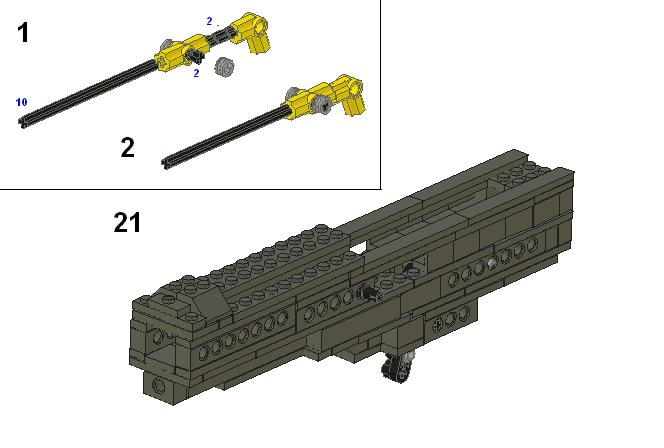
Lego Gun Chassis: page 2. Sorry for a long loading time, but it prints better.

Hosted by www.Geocities.ws

Hosted by www.Geocities.ws

That piece you built in step 21fits into the gun assembly as shown, with the axle inside the 1x2 beam. This is the firing pin, the critical part of the gun. I suggest you secure the axle to the connector bricks in yellow with some piece of removable putty, such as Handi-Tack. If you don't, the number 10 axle will sometimes shoot out of the gun due to the force exerted on the firing pin.

I also suggest putting a piece of tape on the top of the last connector, since it will help reduce friction and wear on that piece. (If it seems confusing to you now, you can find out what I mean when you cock the completed gun.)

Note: I have had instances where pieces began to crack due to the violent and forceful nature of the firing pin.

Be warned! These pieces will crack over time.

The pic on the left shows where the rubber band goes to secure the firing pin to the barrel opening. This rubber band will easily wear out, so keep crappy expendable ones handy.

Step 23: the cocking mechanism! These will likely break after prolonged use, so make sure these parts are expendable or replaceable. They also endure lost of friction, wearing out the brick faces.

Top piece is the part that keeps the firing pin in place when cocked, so make sure this piece is as secure as possible. Also will wear out quickly unless tape is placed under the protruding third of the 2x6 plate.


Step 26: the rubber band for the trigger. This can be a good one, since this piece has not suffered any wear on my gun. I suggest the red rubber band from the Lego Technic 9v motor pack, 8720. The next step just serves to protect it from being touched when fired.

1