Simple Data Input
|
Simple Data Input |
In Lesson 2, you saw that you could use the Response object and its Write() method to display values in a web page. As opposed to simply presenting values, in some cases you may want to request values from the user. This is mostly done by displaying controls to the user who can click them, type in them, or select values from them. When the user has finished preparing values, he or she can send them back to you. From your browser, you can then either store the values submitted by the user, or you can process them in a calculation or a similar operation. Before requesting values from the user, you should first create a form using HTML tags. You can then populate the form with the necessary controls for the task at hand.
To create a web page that can present controls to the user, HTML provides the <form> tag. Based on this, to create a form, you start its section with <form> and closes it with <form>. Here is an example: <html> <head> <title>Active Server Pages Tutorials - Lesson 3: Simple Data Input/Output</title> </head> <body> <h1>Lesson 3: Simple Data Input/Output</h1> <p>The purpose of this lesson is to introduce various means of interacting with a visitor using either simple text or visual objects referred to as controls (or web controls, as opposed to Windows Controls).</p> <form></form> </body> </html> Between the <form> and the </form> tags, you can create a form as necessary and as appealing as you want. Here is an example: <html>
<head>
<title>Active Server Pages Tutorials - Lesson 3: Simple Data Input/Output</title>
</head>
<body>
<h1>Lesson 3: Simple Data Input/Output</h1>
<p>The purpose of this lesson is to introduce various means of
interacting with a visitor using either simple text or visual objects
referred to as controls (or web controls, as opposed to Windows
Controls).</p>
<form>
<table border="0" width="320">
<tr>
<td width="80">First Name:</td>
<td><input type="text" name="txtFirstName" size="10"></td>
</tr>
<tr>
<td width="80">Last Name:</td>
<td><input type="text" name="txtLastName" size="10">
<input type="submit" value="Submit it">
</td>
</tr>
</table>
</form>
</body>
</html>
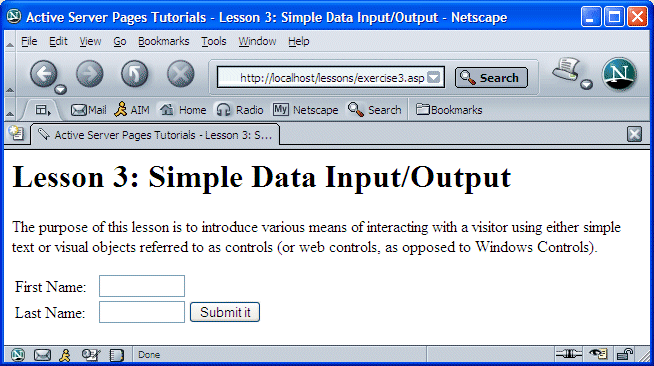
This would produce: |
|
Notice that the form on this page is equipped with a button. This also indicates that the user is supposed to provide some information and click this button. |
|
|
<%@ Language="VBScript" %>
<html>
<head>
<title>Geometry: The Square</title>
</head>
<body>
<h1>Geometric Figures: The Square</h1>
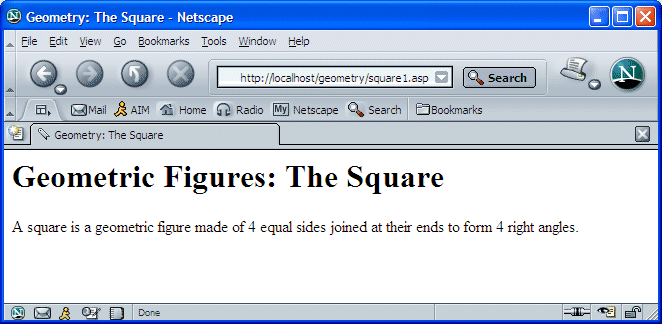
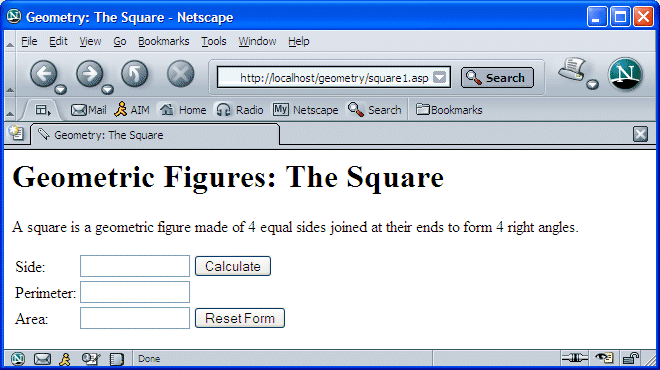
<p>A square is a geometric figure made of 4 equal sides joined at their ends to
form 4 right angles.</p>
<form>
<table border="0" width="316">
<tr>
<td width="109">Side:</td>
<td width="52"><input type="text" name="txtSide" size="14"></td>
<td width="135"><input type="submit" value="Calculate" name="btnCalculate"></td>
</tr>
<tr>
<td width="109">Perimeter:</td>
<td width="52"><input type="text" name="txtPerimeter" size="14"></td>
<td width="135"></td>
</tr>
<tr>
<td width="109">Area:</td>
<td width="52"><input type="text" name="txtArea" size="14"></td>
<td width="135"><input type="reset" value="Reset Form" name="btnReset"></td>
</tr>
</table>
</form>
</body>
</html>
|
|
The Method Used to Send Data |
|
When the user clicks the final button (the button used to collect information from the form and send it), it is assumed that the information on the form is sent to you (actually to the server, but you are in charge of it). HTML allows you to specify how this information would be sent. To support this, the <form> tag is equipped with an attribute called method. This attribute can be assigned one of two values:
|
|
|
|
Taking Action |
|
Once the information from a form reaches the server, it must be processed. In other words, you must specify how this information would be dealt with. This is usually done by specifying the file that includes the code used to process the sent information. A regular file in this case would have the .asp extension. In reality, this doesn't have to be a separate file: you can use the same web page that collects information from the user, include the code used to process that information, and let the page deal with its own code. To specify the file used to process information from a form, the <form> tag is equipped with an attribute called action. You can then assign the name of the file to this attribute, as a string. This can be done as follows: <form action="FileName" method="post"> As mentioned already, the FileName factor can be the same name as the web page. Here is an example from a web page named exercise3.asp: <html>
<head>
<title>Active Server Pages Tutorials - Lesson 3: Simple Data Input/Output</title>
</head>
<body>
<h1>Lesson 3: Simple Data Input/Output</h1>
<p>The purpose of this lesson is to introduce various means of
interacting with a visitor using either simple text or visual objects
referred to as controls (or web controls, as opposed to Windows
Controls).</p>
<form action="exercise3.asp" method="post">
<table border="0" width="320">
<tr>
<td width="80">First Name:</td>
<td><input type="text" name="txtFirstName" size="10"></td>
</tr>
<tr>
<td width="80">Last Name:</td>
<td><input type="text" name="txtLastName" size="10">
<input type="submit" value="Submit it">
</td>
</tr>
</table>
</form>
</body>
</html>
|
|
|
|
Value Request |
|
A Request From a Form |
|
As mentioned already, after a user has finished preparing values in a form, he or she can send them to you. To allow you to get values from the user, the IIS library is equipped with an object called Request. When a form is created on a web page, that form becomes a property of the Request object. The objects that are part of the form constitute a collection and each object of the form becomes a member of this collection. To access an object of this collection, you can pass it to the Request.Form property (this can be referred to as an indexed property because each object can be access using its index). For example, you can pass the name of a control, as a string, as argument. If you use the Request.Form property to access a control, the information should be collected using the POST value of the METHOD attribute of the form. Based on this, to access any control on the form, you would type: Request.Form(Object).OptionalIndex.Count The object you need to access can be passed as the Object argument. For example, you can pass the name of a form's control as Object, but as a string. This can be done as follows: Request.Form("txtFirstName")
In future lessons, when we formally learn about arrays and collections, we will review what roles the OptionalIndex factor and the Count value play. For now, we will ignore them. |
|
|
<%@ Language="VBScript" %>
<html>
<head>
<title>Geometry: The Square</title>
</head>
<body>
<h1>Geometric Figures: The Square</h1>
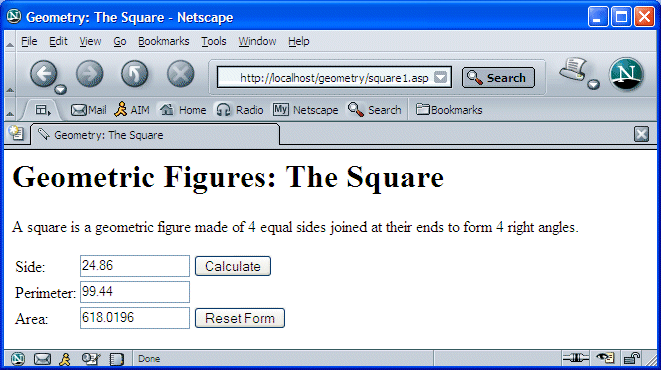
<p>A square is a geometric figure made of 4 equal sides joined at their ends to
form 4 right angles.</p>
<form action="square1.asp" method="post">
<table border="0" width="316">
<tr>
<td width="109">Side:</td>
<td width="52"><input type="text" name="txtSide" size="14"
value=<%= Request.Form("txtSide") %> >
</td>
<td width="135"><input type="submit" value="Calculate" name="btnCalculate"></td>
</tr>
<tr>
<td width="109">Perimeter:</td>
<td width="52"><input type="text" name="txtPerimeter" size="14"
value=<%= Request.Form("txtSide") * 4 %> >
</td>
<td width="135"></td>
</tr>
<tr>
<td width="109">Area:</td>
<td width="52"><input type="text" name="txtArea" size="14"
value=<%= Request.Form("txtSide") * Request.Form("txtSide") %> >
</td>
<td width="135"><input type="reset" value="Reset Form" name="btnReset"></td>
</tr>
</table>
</form>
</body>
</html>
|
|
A String Request |
|
Besides, or as opposed to, collecting values using the controls on a form, you can request a string. To support this, the Request object is equipped with QueryString, which also is a collection. This property allows you to get values either from a control or directly from the address bar of the browser. Remember, we mentioned that the GET value of the METHOD attribute of a form causes its information to be displayed in the address bar of the browser when that information is being sent: 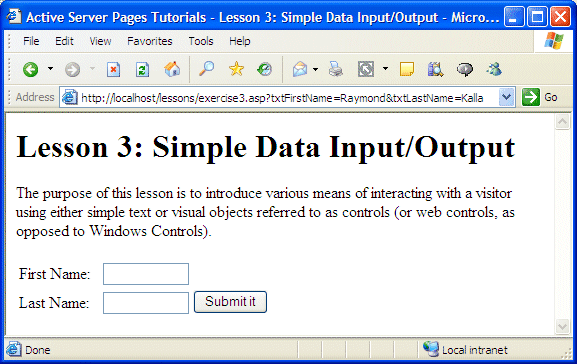 Notice that the section on the right side of the question mark includes parts using the formula Name=Value. This indicates that the section on the right side of the question mark is in fact a collection of strings. Each string in this collection can be produced to you by a call to the Request.QueryString property. The syntax of the Request.QueryString property is: Request.QueryString(Variable).OptionalIndex.Count The Variable parameter is the name of the string that you want to retrieve. It can be the name of a control passed as argument. Here is an example: Request.QueryString("txtFirstName")
It can also be the name of a variable (we will study or review variables in the next lesson). In future lessons, when we formally learn about arrays and collections, we will review what roles the OptionalIndex factor and the Count value play. This also means that, as opposed to the Request.Form collection that uses the POST value of the method attribute of a form, when using the Request.QueryString property, you should send values using GET. |
|
|
<%@ Language="VBScript" %>
<html>
<head>
<title>Geometry: The Circle</title>
</head>
<body>
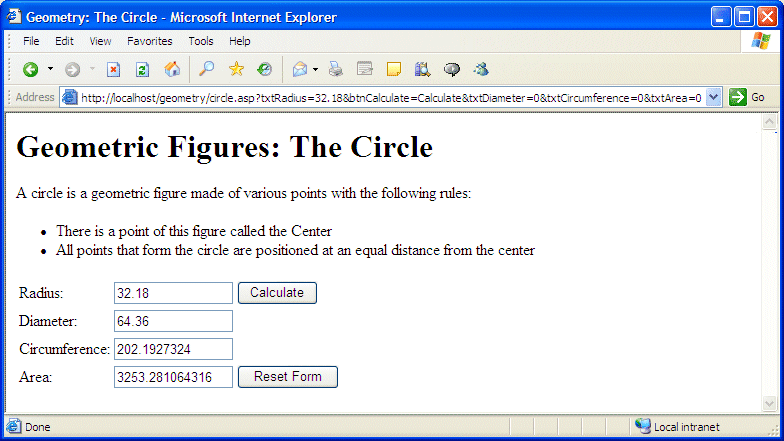
<h1>Geometric Figures: The Circle</h1>
<p>A circle is a geometric figure made of various points with the following
rules:</p>
<ul>
<li>There is a point of this figure called the Center</li>
<li>All points that form the circle are positioned at an equal distance from
the center</li>
</ul>
<form action="circle1.asp" method="get">
<table border="0" width="316">
<tr>
<td width="109">Radius:</td>
<td width="52"><input type="text" name="txtRadius" size="14"
value='<%= Request.QueryString("txtRadius") %>' >
</td>
<td width="135"><input type="submit" value="Calculate" name="btnCalculate"></td>
</tr>
<tr>
<td width="109">Diameter:</td>
<td width="52"><input type="text" name="txtDiameter" size="14"
value='<%= Request.QueryString("txtRadius") * 2 %>' >
</td>
<td width="135"></td>
</tr>
<tr>
<td width="109">Circumference:</td>
<td width="52"><input type="text" name="txtCircumference" size="14"
value='<%= Request.QueryString("txtRadius") * 2 * 3.14159 %>' >
</td>
<td width="135"></td>
</tr>
<tr>
<td width="109">Area:</td>
<td width="52"><input type="text" name="txtArea" size="14"
value='<%= Request.QueryString("txtRadius") * Request.QueryString("txtRadius") * 3.14159 %>' >
</td>
<td width="135"><input type="reset" value="Reset Form" name="btnReset"></td>
</tr>
</table>
</form>
</body>
</html>
|
|
If you are creating a processing intensive web application, you may have to spread the work or form processing on different files. This would allow you to divide tasks among appropriate objects. One of the ways you can do this consists of calling one page from another. For example, when the user has finished filling out a form, you may not need to display the results right away. You may want to hold or store the values on the server. In some other cases, you may want one file to analyze or evaluate the values of a form and, if they are valid, you can call another page to display the result. When introducing the <form> tag above, we saw that you could use its ACTION attribute to specify where the results of a form would go. If you want these results to be processed by a file other than the current one, you can use this attribute to provide the name of that other file. |
|
|
<%@ Language="VBScript" %>
<html>
<head>
<title>Geometry: The Sphere</title>
</head>
<body>
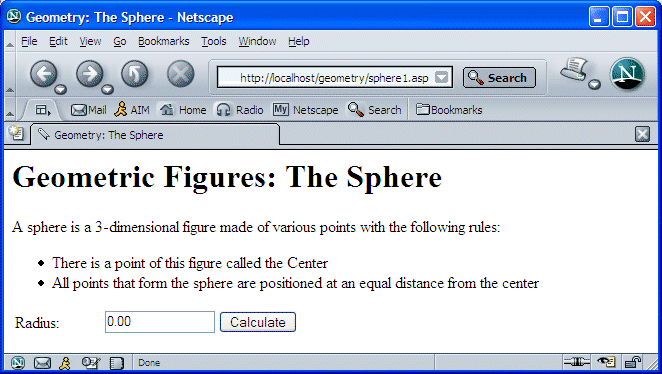
<h1>Geometric Figures: The Sphere</h1>
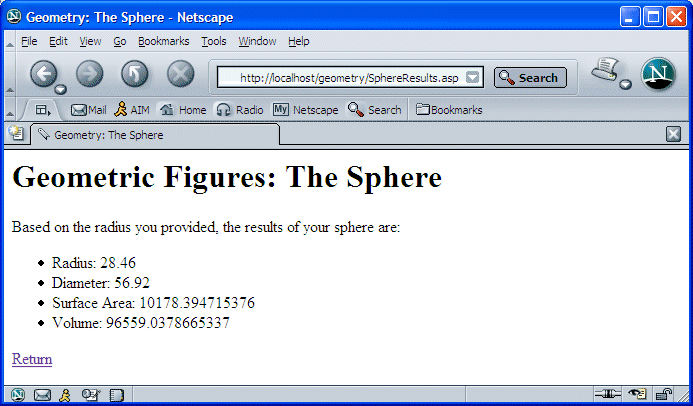
<p>Based on the radius you provided, the results of your sphere are:</p>
<ul>
<li>Radius: <% Response.Write(Request.Form("txtRadius")) %></li>
<li>Diameter: <% Response.Write(Request.Form("txtRadius") * 2) %></li>
<li>Surface Area: <% Response.Write(Request.Form("txtRadius") * _
Request.Form("txtRadius") * 4 * 3.14159) %></li>
<li>Volume: <% Response.Write(Request.Form("txtRadius") * _
Request.Form("txtRadius") * _
Request.Form("txtRadius") * 4 * 3.14159 / 3) %></li>
</ul>
<p><a href="sphere1.asp">Return</a></p>
</body>
</html>
|
<%@ Language="VBScript" %>
<html>

<head>

<title>Geometry: The Sphere</title>
</head>

<body>

<h1>Geometric Figures: The Sphere</h1>
<p>A sphere is a 3-dimensional figure made of various points with the following
rules:</p>

<ul>
  <li>There is a point of this figure called the Center</li>
  <li>All points that form the sphere are positioned at an equal distance from
    the center</li>
</ul>

<form action="SphereResults.asp" method="post">
  <table border="0" width="345">
    <tr>
      <td width="133">Radius:</td>
      <td width="57"><input type="text" name="txtRadius" size="14" value="0.00">
      </td>
      <td width="135"><input type="submit" value="Calculate" name="btnCalculate"></td>
    </tr>
    <tr>
      <td width="133">Diameter:</td>
      <td width="57"><input type="text" name="txtDiameter" size="14" value="0.00">
      </td>
      <td width="135"></td>
    </tr>
    <tr>
      <td width="133">Surface Area:</td>
      <td width="57"><input type="text" name="txtArea" size="14" value="0.00">
      </td>
      <td width="135"></td>
    </tr>
    <tr>
      <td width="133">Volume:</td>
      <td width="57"><input type="text" name="txtVolume" size="14" value="0.00">
      </td>
      <td width="135"><input type="reset" value="Reset Form" name="btnReset"></td>
    </tr>
  </table>
</form>

</body>

</html>
|
|
|
||
| Previous | Copyright � 2005 Susanta K Beura. | Next |
|
|
||