How to cross stitch
Let’s start by answering the first question most SCAdians ask, “Is it period?” The answer is, cross stitch as it is done today is NOT period. So, why should you bother learning cross stitch? Several reasons, first of which is cross stitch is a fairly easy stitch to learn which makes it a good starting-off stitch. Also, most modern patterns are designed for cross stitch. Lastly, it wouldn’t be the first time something non-period is used, you just have to remember it’s not, and document it as so. So, let’s move ahead with preparing your project.
Preparation
First thing to do is gather everything together. What you’ll need is:
- A pattern with a picture
- Embroidery fabric
- Embroidery thread or “floss”
- Needles
- Scissors
- A tension device such as a hoop, stretcher bars, or a scroll frame
- Other supplies as desired such as needle cases, pattern holders, floss bobbins to hold your floss, etc.
The first four items can be purchased together as a kit. There are no set rules about absolutely having to use a certain item or brand name for any of this. Use what comfortable for you and gives you the results you want.
Now, if you want a more period look there are some restrictions on materials used. The types of floss that are period are wool, linen, and silk. However not all of these are period to the same places, times, and economic classes. Also there is a limit to which colors are period. Of the two types of fabric normally used for embroidery, Aida (Fig. 1)
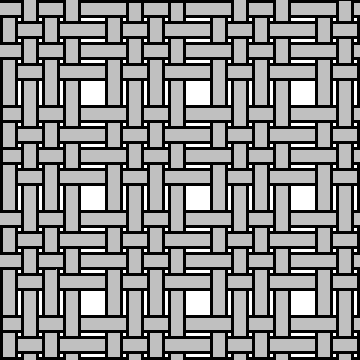
and evenweave (Fig. 2),
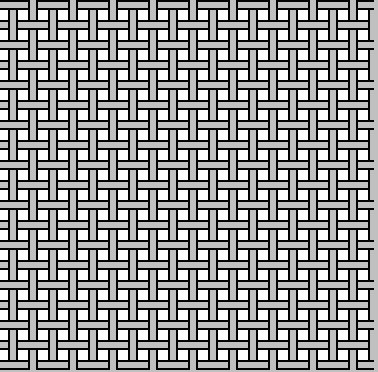
evenweave fabric is more period. Likewise linen is a more period fabric for embroidery. In essence all even weave fabric is regular cloth woven so there’s more space between each thread. A more period look can be achieved by using “antique White” or “Natural” colored cloth. These are both shades of pale yellowish-creme and tan that duplicates fabric’s color before the invention of chlorine bleach.
Now that you’ve gotten everything together it’s time to set up your project. First thing that’s helpful to do is make a copy of the pattern. Most patterns suffer much abuse before a project’s done. Having a working copy insures the original is still readable. Next you need to separate the different colors of floss. It is helpful is you have something to keep each color separate, but again, what you use is up to you. Be sure to separate the colors in natural light, which distorts the colors less, especially in a larger or more detailed kit where colors can look similar to one another. Now is the time if you want to change some of the colors to do so. Unless you’re trying to duplicate a period piece of embroidery, it’s all right to make the blond damsel a brunette or the brown dog a black one.
Next you need to find the centers for your pattern and fabric. Most patterns there’s some way of finding the center, usually there are some marks on the sides you can use to draw lines inward until you reach the center. Fold the fabric into fourths, where the two folds meet is the center. Now you know where on the fabric to start stitching and what is your starting stitch. Why do you do this? So your project is centered on the cloth and looks better when finished. If the center of the fabric is going to be covered by a stitch it helps to mark it with pencil so you don’t lose the spot.
Now attach your fabric to your tension device. There are pros & cons to each one, but it mostly depends on which is best for you. Hoops usually provide the best tension, but it’s easier for the fabric to get dirty in a hoop. Stretcher bars are pretty good for tension, but tend to mangle the edges of your fabric. Scroll frames provide the least tension, but they’re cleaner and do less damage to the cloth.
Stitching
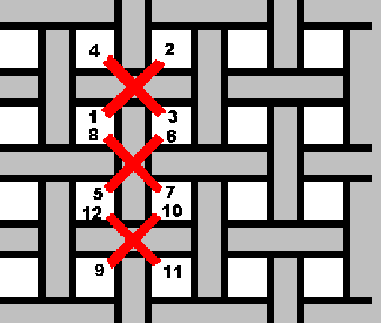
Now it’s time to start. Please refer to Fig. 3
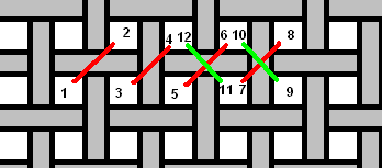
while reading. Each cross stitch is made of two separate diagonal stitches. Which diagonal you do first is up to you, just remember to do all the stitches the same way. Nothing brings down the look of a project like unmatched stitches. The technique illustrated in Fig. 3 shows the first stitch starting with the thread coming up through the fabric at 1, then going back down through 2 making one stitch (or half a cross stitch). Continue stitching following the numbers. When you reach the end of the line of the color you’re using then do the opposite stitch. As shown in Fig. 3, come up at 9 and go back down at 10. That’s one complete stitch. Continue making stitches until you’re back to where you started. Fig.4
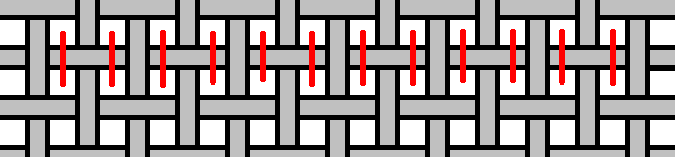
shows what the back of your fabric should look like.
If you’re doing cross stitch on evenweave fabric then normally you’ll be making your stitch over the area for four stitches instead of one. Fig. 5
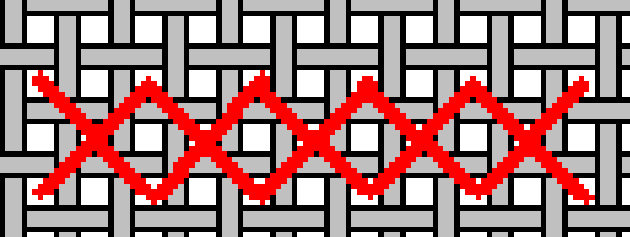
shows what this would look like.
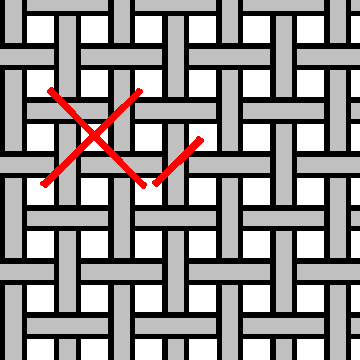
Fig. 3 illustrates what to do if you’re stitching a horizontal row. If you need to do a vertical column all you need to do is do each stitch and then move down until you reach the bottom as shown in Fig. 6.
Beginning and Ending
Now, before you run out and start stitching, let’s go over anchoring the beginning of a set of stitches and how to finish a set. When you first start a set of stitches you need to anchor the beginning to help maintain even tension and so the stitching won’t pull loose. To do this when you bring the floss up through the fabric the first time leave a one inch tail on the back of the fabric. Go back down at 2 as before. Now, before you come back up for the next stitch make sure the tail is positioned under the floss as in Fig.7

before you pull it taut. Continue doing this for 3-4 more stitches.
When the time comes and you have to finish a set of stitches you also have to anchor down the end. To do this, when you’re done with the last stitch just run the needle and thread under a few stitches on the backside of the fabric and snip the thread.
To do a half stitch on evenweave cloth just come up through the hole in the center you normally cover up with a stitch and go back down into the appropriate corner. See Fig 9.
A back stitch is done, on most patterns, when you see a dark line surrounding an object. To do a back stitch start by anchoring your floss and then do the first stitch as a simple straight stitch about three or four cross stitches long. Then for the next stitch move forward three or four cross stitches before coming up ahead of the last stitch and going back down in the same spot the last stitch ended. Continue to do this all the way the dark line on the pattern goes.
Conclusion
Now you’re all ready to go out and start stitching. A few words of advice, do a pattern you like and only do it once unless your bucking for a Pelican or a deep, intense loathing for the pattern. There is such a thing as too much of a good thing. Or, if you just want to completely go off the deep end, get any pattern from Teresa Wentzler. She does very beautiful work. It’s also very detailed and incredibly anal retentive. The best of all worlds, do one incredibly detailed project with several smaller, easier projects. That way when you get sick of the larger project instead of throwing it off a ten story building, you have something easier to turn to until you’re ready for the larger project again.
Happy Stitching!
Cross stitch related web sites
PCStitch
Micheal's
DMC
Lark books
Stefan's
Florilegium