This class will teach a basic form of card weaving, diagonals, with the student's body used in a back-strap loom.
Terms:
1. Warp threads: the long threads that go from start to end of your weaving.
2. Weft threads: the continuous thread that goes from right to left.
3. Shuttle: object that holds the weft thread, usually wood.
4. Beater: object used to pack down the weaving between each pass, can be combined with the shuttle.
5. Shed: the space between the upper and lower threads where you pass the shuttle through.
6. Pick: one pass of the shuttle.
7. Cards/Tablets: square cardboard cards with a hole near each corner.
8. Pack: all the cards you�re weaving with.
9. Selvage: the side edges of the woven piece.
A word (or two) on yarn.
You can weave with just about any kind of yarn you desire. However, the period yarns were made from wool, linen, or silk. To make your weaving easier, the following guidelines should be followed. 1. Use a yarn with only one ply. Multiple ply yarns tend to untwist during weaving. 2. Use a yarn that isn�t �fuzzy�. The fuzz will snag on itself during weaving and get pulled out, weakening the yarn. 3. Remember cost vs. appearance. Cotton is cheaper, but silk feels nicer. However silk trim on a field dress isn�t very practical. Also large or long projects tend to become cost prohibitive using silk or linen. 4. Can you buy enough of the yarn at one time to complete your project? Black yarn from two different companies never looks the same. 5. Try to stay away from yarns that are stretchy, any yarn that will stretch during warping makes it hard to maintain an even tension.
How to weave:
Set up
First you have to warp, or thread the warp threads through, your cards. Each card will have 4 warp threads for it, 2 light colored threads and 2 dark color threads. When you cut the individual threads, make certain to cut them much longer than you need, as the warp threads will shorten as they twist around themselves. Usually one or two cards on each side of the pack, or selvage cards are warped with a solid color to make a stable edge for the piece.
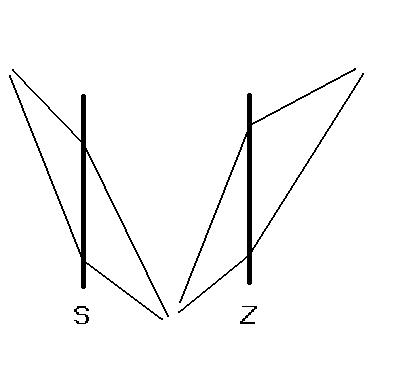
The direction the threads go through the cards is important. As shown on Fig. 1 there are two ways to warp the cards, called S and Z direction. S direction is when the warp threads go from the bottom right and through the holes in the cards to the top left. Z direction is the exact opposite, bottom left to top right. Another way to remember this is to look at the letters S and Z themselves. The direction the center part of the letter goes toward is how the warp threads will also go. All the threads for a single card must be S or Z or the card won�t turn. Your pack must be warped either all S, all Z, or alternating S then Z. DOUBLE CHECK YOUR WARP BEFORE YOU START.
For this type of weaving the cards will have dark threads in two adjoining holes such as the A and B holes, and two light threads in the opposite adjoining holes. Warp all your cards for this project in the S direction. When they�re all done, then tie all the threads on one end together in a big knot. Then tie the knotted end to an immovable object in front of you. Now comb out the warp threads by grasping the pack and sliding it toward the knot then toward the opposite end without going too far. Then tie a big knot in the untied end.
Now you need to set up your back-strap loom. Put on your belt and gather the rest of your tools around you. Now is the time to get a drink or go to the bathroom or forever hold your bladder. Now tie the other end to your belt in front of you and lean back or scootch back to tension your warp. If at this time you notice one of your warp threads is really loose, it�s because it�s longer than the rest. Untie the end toward you, untie the big knot and retie it so the thread is taut, then retie the warp to you.
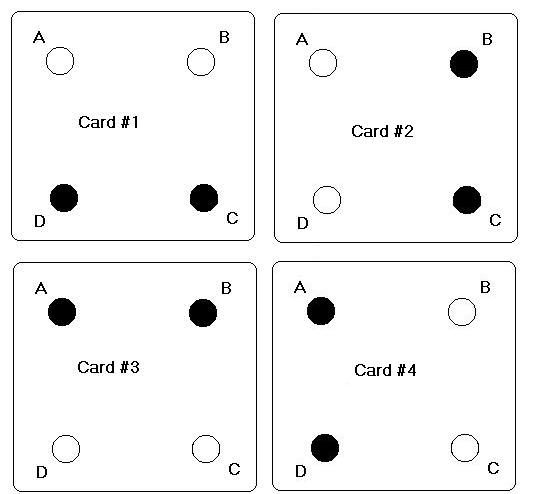
Now you need to position the individual cards prior to starting weaving. Start with the first card to the right of your selvage card(s) on the left side of your pack. This card needs to be turned so both of the two dark threads are on the bottom. The next card to the right needs to be turned so both of the dark threads are toward the opposite end of the weaving. The next card has both dark threads on the top, and the next card has both dark threads toward you as shown in Fig. 2. Continue this pattern all the way across the pack from left to right until you get to your selvage card(s) on the right side.
Weaving
Now insert your beater into the shed and pack down your weaving toward you. Pass the shuttle through your shed either left to right or right to left, it doesn�t matter which. Leave a three-inch tail of yarn that doesn�t get pulled through the shed. Now turn the pack � a turn either toward you or away from you. Pack down the weaving with your beater and then pass your shuttle again going the opposite direction. Now you need to take the tail that�s left from the first pick and pass it through the shed with the weft thread that�s already there. Snug the weaving by pulling on the weft thread and the tail so the weft threads are snug together side by side. Don�t pull too hard or your pattern will be crumpled up and too thin. Now turn the cards another � turn in the same direction as the previous turn. Pack, pass weft, pass tail, snug, and turn. Repeat for about 5 or 6 picks to establish a good base. You�ll begin to notice the pattern emerging from the weaving is diagonal lines either going left or right.
Now you get to experiment, see what directions the diagonals go if you turn the cards in the opposite direction. Or see what happens if you turn the cards equal turns towards and away. When the cards are threaded in the S direction results are right diagonals when the cards are turned away from you and left diagonals when they�re turned toward you. Equal turns toward and away results in zigzag diagonals.
Now let�s try making a diamond pattern. To do this divide your cards in half, left from right. Move one of the halves forward of the other. The pack on the right will be turned away from you and the left pack turned toward you. You�ll see an upside down chevron pattern after a few picks. Now turn both packs in the opposite direction you just turned them for an equal number of picks. Now you have a diamond pattern. Experiment with the number of turns you do, or with unequal number of turns. Or you can try dividing your packs down even further so you have four packs, two turning one direction, and two turning the opposite direction.
There is a specific way that changing the direction of the diagonal is done so it looks good, it�s often called Egyptian diagonals. When you�re weaving diagonals in one direction but need to change so they�re going the opposite you do the following. Before you do the regular � turn, take the two right hand cards (not including the selvage card(s)), and separate them from the rest of the pack. These cards will now be turned opposite of the rest of the pack for two picks. Then take the next two cards to the left of them and add them to the separated pack. Turn them opposite of the rest of the pack for two turns and so on until all the cards are in the new pack. The reverse can also be done to change the diagonal direction starting with the left side of the pack and going to the right.
If for some reason your weft thread should break during weaving or you run out of weft thread, there is a way to correct that. You take the unused weft thread and the end of the broken weft thread and pass them both through the shed you�re working on, leaving a small tail hanging out. Then on the next pick you pass the weft thread, the tail of the broken weft, and the tail of the new weft thread. This will make the row you�re working on slightly longer looking than the rest, but usually not enough to notice unless you�re looking for it.
Things to make your weaving experience easier
Knitting gages are wonderful things to have when weaving. Use your gage to measure the width of your work after every pass so the edges of your project will be nice and straight.
If you have an occasion when one warp thread or group of warp threads ends up being longer therefore looser than the rest, retying isn�t always necessary. If you take a three ounce or larger fishing weight and either tie it or use a S hook to attach it to that group of warp threads. It adds extra tension to that group, evening out the pack.
Something that really makes reading a pattern easier is if you use a metal sheet such as those used for embroidery patterns with magnetic strips to hold the pattern to the sheet and also to mark which row of weaving you�re working on.
When you first start a new project you�ll notice the item is wide but then starts to narrow down as you weave. This is natural, there�s no way for this not to happen. However, that doesn�t mean you have to live with it. If you weave a short distance and then cut your weft thread leaving a small gap. Restart the weaving after the small gap, this will eliminate the awkward beginning and also give you a sample of your project. Just remember to add extra to your warp length for this.