Notice: this will be taught with the presumption that the student already knows the basics of card weaving.
So, you’ve already mastered the basics of card weaving, and maybe even done some diagonal designs. Now you’re wondering how to weave free form designs and words. This class will teach how to do that with the double-faced weave technique. First a definition, some people call this technique double turn double weave, but according to Peter Collingwood it’s called double-faced weave. The difference between the technique I’m going to teach you and “double weave” is double-face weave has the cards on their edges and double weave has them on their points.
Before you begin
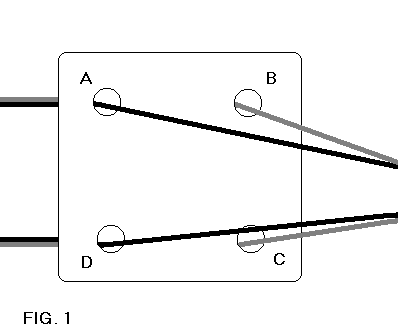
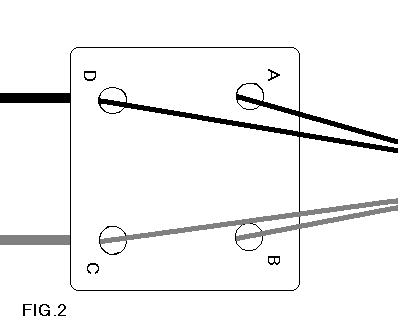
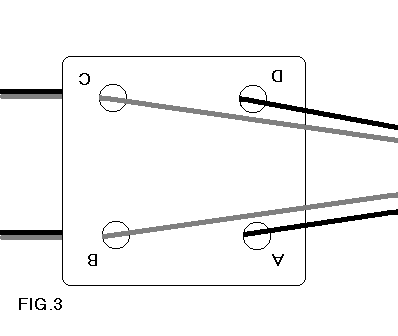
The most important part of double-faced weave is to graph your pattern before hand. You’ll need a good graphed pattern before you start so you can tell how the cards are to be turned at the right time. Something to note when you’re drafting your pattern is all double-faced weaves will show an elongation in the design when you’re finished. Figure 1-3 shows an explanation of why the elongation occurs. Figure 1 shows a side view of the cards prior to any turns. Figure 2 shows a side view of the cards after the first turn. Note that a black thread is on top. Figure 3 shows a side view of the cards after the second turn. Again, note that a black thread is on top still. Remember, what it’s trying to explain is every row of graphed pattern will equal two rows of weaving. When you do draft your pattern you may need to draft a very short, squatty version of the design you want, to take into account the elongation. Another way around this is to use embroidery programs such as PCStitch for Windows 5. This program allows you to set the grid with a longer vertical measurement than the horizontal measurement so each stitch looks like a rectangle instead of a square. When you use programs like this you can visualize the elongation before you ever have to weave a single row.
Preparing to Weave
You start with your cards warped S, Z, or alternating S and Z. The only difference is alternating S and Z will create small gaps in the weaving between every other warp thread. You must have your cards warped with two dark threads opposite two light threads in each card. All cards must start out with all the dark threads lined up either towards you or away from you with all your cards setting on an edge instead of on a point.
This brings up the question of “Do I want the dark threads toward me or away from me?” Which ever color starts in the toward you position will be the one that’s on the top of your piece as the background color if your beginning turns are away from you. If you begin with the background color away from you then the first turns need to be toward you. This is important if you have a pattern such as letters. When you weave letters, the backside isn’t fully reversible. In other words, the letters will be backwards on the back of your piece. Therefore, you need to start with the correct background color on top.
Weaving
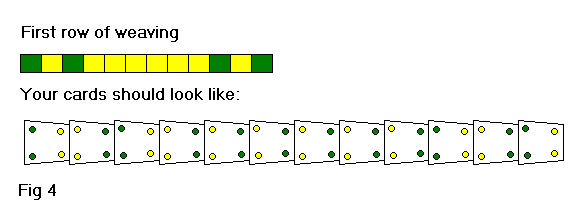
For double faced weave the pattern for turns are two forwards and two backwards. I have found it easiest to weave a few rows of plain weave to start to make a good base. This also helps you to check for mis-threaded cards. Now look at the first row of your pattern. You will need to turn the cards that will have the opposite color so that color is now in line with the background colors. See Figure 4. To do this you need to turn those individual cards two turns in the same direction you just got done turning them. For example, if you just got done weaving a row of forward turns then you would turn the cards that need a color change two turns forward again. Then you weave two rows just as you would normally. From here on, it’s just repeating what you’ve just done. Turn individual cards for the pattern in the same direction you just turned them. Then turn cards in the opposite direction for two picks. One warning about double-faced weave, if you have to pause while weaving, do it after you’ve finished a group of turns. If you stop weaving after the first turn when both dark threads are on top or bottom, you can’t tell which way you were supposed to turn to finish the group.
RESOURCES
Earth Guild
33 Haywood St
Ashville, NC 28801
1-800-327-8448
http://www.earthguild.com/
Unicorn Books and Crafts
1338 Ross St
Petaluma, CA 94954
1-800-289-9276