AIP4Plot.xls is an outgrowth of Lew's AutoPlot.xls light curve plotting spreadsheet. They share the plotting sheet and the graph. Because AIP4WIN produces a detailed output file, several worksheets are needed to massage the data for input into the form needed for AutoPlot.xls. This new workbook is called AIP4Plot.xls.
Disclaimer and CautionAlthough the files available for download were produced free of and checked for viruses, always check any file downloaded from the www for viruses or harmful code. The software available here, while believed correct and free of defects, is offered without any guarantee of accuracy or freedom from error. Use this software at your own risk.Lew wants any feedback - especially bug reports. E-mail Lew at Lew.(at).lewcook.com. Use the circled @ instead of the .(at)., of course. |  |
The first 2 sheets after the instruction sheets tell you a bit about the observing conditions. First is the sky brightness over the first 1200 observations. See how the position in the sky affects the sky brightness, as well as other factors - sunset or sunrise, moonlight, aurorae, clouds or nearby lights.
The next plot is the comparison star ADU values. See how passing clouds affect the data and if severe, use these as a guide to develop observation rejection criteria. The first 1200 observations are plotted.
Here's how to do it in some detail:
Open AIP4Plot.xls.
Next, SAVE the file under another name - so it won't be a read-only file anymore.
Click File, Save As, and type the star name (or some file name of your choosing).
Click Save.
Open the AIP4WIN photometry output text data file (photo.txt or the name you gave it) in Excel as an Excel spreadsheet. If it is not in a tab delineated format, make sure you open it as a fixed width column format.
Then copy and paste the data from the first line of data in column 1 (cell A:13 or something close to that) to column J in the last line of data. If you selected to get JD's in the output, don't copy them - this sheet will calculate it for you (again).
Paste this into the cell A:10 - the green one - and subsequently the data columns A-J of the Raw Data spreadsheet in AIP4Plot.xls.
Click on the tab for the Data Prep spreadsheet and type in the clock error and heliocentric corrections in the 2 yellow cells with orange borders.
Select image times convention used (exposure start or file save time).
The data - heliocentric Julian Dates, V-C and K-C magnitudes are listed in a colored table ready to be highlighted and copied to another sheet - the Analysis sheet.
Copy the data in the lavender colored cells O:10 to the last data line in the Q column.
Highlight the data and click EDIT, COPY.
Click on the Analysis sheet tab.
Click on cell B:6.
Click EDIT - Paste - Special - Values.
Next, edit out the bad data in columns B, C and D. Bad data results when a measurement is bad or a star was not found. These bad pieces of data will entirely confuse the plotting genie. Delete them all.
Look at the plot and chase down any bad data.
View the Graph by clicking on the Plot tab.
Download AIP4Plot.xls |
![]()
Here is a sample chart created using AutoPlot.xls which uses the same techniques as this spreadsheet:
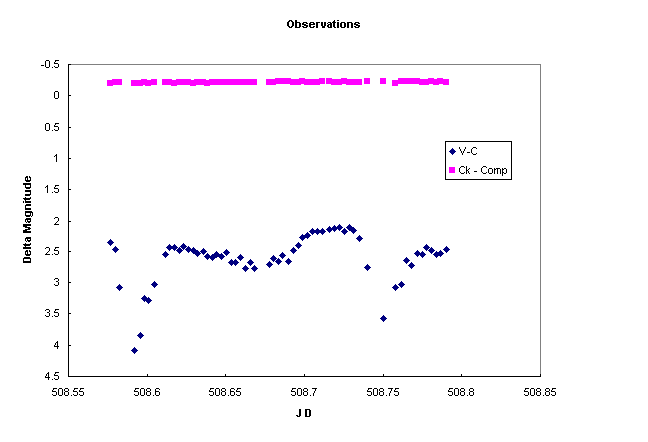
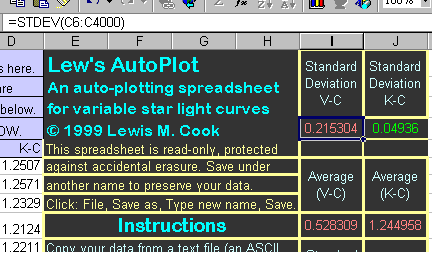
A special feature of AIP4Plot.xls (and Autoplot.xls) is an automatic calculation of the standard deviation of BOTH the variable minus Comparison (V-C) and checK minus Comparison stars (K-C) values and a calculation of their average values. Why perform a standard deviation calculation for a variable star? Well, why not? It will let you see if a star you thought was variable has a larger standard deviation than the check star you assume is not variable. Values larger than 0.10 for either of these will cause the text to appear in RED, otherwise the values are shown in GREEN.
Note: There are several precautions to be taken here.
First, the standard deviation found on constant stars will be greater for the fainter stars merely from simple photon counting statistics. Second, instrumental effects or even a single incorrect data point in the list will result in a higher number.
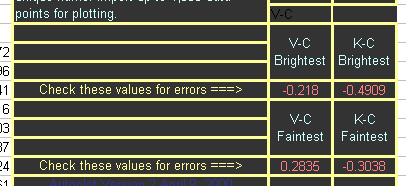
To help in the search of the values for outliers, the maximum and minimum values in each of the magnitude columns is shown below the spreadsheet cells where the standard deviation discussion is placed. Review your data if either the maximum or minimum values seems out of place. If a data point is aberrant, review the image to see if any defects exist. A cosmic ray or hot pixel will affected the star or sky value used for photometry. An airplane or satellite track can seriously impact the measurements! If a valid reason exists for excluding the data point, erase (delete) the values in the cells with the JD, V-C and K-C values which are bad. If only the K star of the image was affected by the image defect, delete the K-C value only. If the comparison star or variable was affected, delete all 3 values. The calculations ignore empty cell values, as does the plotting routine. Viewing the plot is another way to find errant data points. Refer back to the images for the possible reason for the bad data. Delete the data if the image is defective. To preserve scientific integrity, never delete an apparent discordant point without a valid reason. You may be throwing away an important discovery!
Other values are calculated on the analysis sheet. The standard deviation and averages of the K-C values for 5 sets of 100 points are shown as is the trend of the K-C values in magnitudes per day for the first 2000 points of data set. If you want more, the cells beneath the Analysis table are available for inserting the formulae.