 |
|
|
|
|
|
|
|
|
|
|
|
|
|
|
|
|
|
|
|
|
|
|
|
|
|
|
|
|
|
|
|
|
|
|
|
|
|
Tusken Page Two |
|
|
|

|
|
|
 |
|
|
|
|
|
Page One... |
|
|
|
|
|
|
|
|
|
|
|
|
|
|
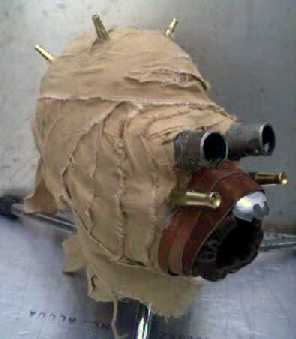
Welp, next thing I needed to make was a set of eye pipes. I searched hi-and-low for any "found" items that would serve the purpose and came up empty. My only criteria was they were to be of metal. I resigned myself to the fact that I would have to fabricate these myself. As the motor on my metal-lathe was burned-out, I had to forge these. This prevented them from being made of aluminum, as aluminum cannot be forged.
I obtained a metal pipe that fit the correct dimensions of the smallest outside diameter of the eye pipes. Then, I had to create a mandril, in this case a steel cone, to shape the pipe over in order to produce a tapered cylinder.
With a completed mandril mounted in the square hardie hole of one of my anvils, I proceeded to heat the pipe section to a working temperature. When hot enough, it was placed on the mandril and hammered until the pipe was forced over it and into the desired shape. Several heatings were necessary. |
|
|
|
 |
|
|
|
Pipe section beginning to be formed over mandril at high heat. |
|
|
|
|
|
With both eye pipes formed and cut to length, they were JB Welded then fiberglassed into place on the base mask.
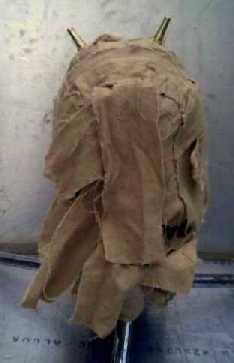
All parts now attached, the wrapping was the last major thing left to do. I dyed a piece of scrap canvas duck with RIT tan, cut/tore it into strips, then secured those strips in the window of my truck with most of their lengths trailing outside. A few miles on the freeway provided me with well-frayed strips of mask-wrappings. |
|
|
|
|
|
A bit of high-strength hot glue run as a bead along the edge of the fabric was enough to secure it to the mask in a somewhat "orderly-random" fashion. I allowed a few loose ends to add to the weathered look. I was also careful to ensure that the back could still be accessed and easily concealed at the same time. |
|
|
|
 |
|
|
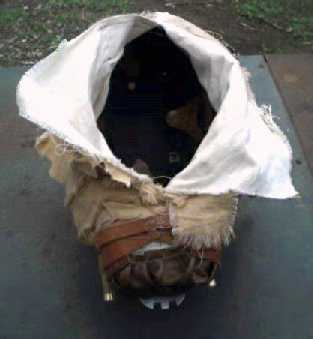
The access opening at the back of the mask |
|
|
|
 |
|
|
|
|
I need to add topical weathering later. |
|
|
F |
|
|
|
|
|
|
 |
|
|
|
|
I |
|
|
|
|
|
 |
|
|
|
|
|
|
N |
|
|
|
|
|
I |
|
|
|
|
|
S |
|
|
|
|
|
H |
|
|
|
|
|
E |
|
|
|
|
|
D |
|
|
|
|