|
|
|
|
|
|
|
|
Changing Color |
|
|
|
This tutorial examines a way to change the color of an object in a digital photo. It was inspired by a request posted to the digital-photo-editing discussion group. |
|
|
|
Here's a picture of a greyish Dodge Power Wagon. The object of the tutorial is to change the color of the Wagon to red, or for that matter any other color would do as well. |
|
|
|
 |
|
|
|
Notice that it is not easy to select the shell of the Wagon by using the magic wand, because part of it merges with the jeep besides it and the background. Selection by painting on it using a brush is possible but would be very tedious, so we are going to use a simple yet advanced technique. |
|
|
|
First we need a way to create a selection of the shell of the Wagon where the color change is to be applied. Using the technique of selection by Value (or luminosity) it is easy to make a selection of an area bounded by an object. |
|
|
|
We are going to create a black and white gradient which will capture the luminosity value of the enclosed object, so let us proceed carefully with the explanation.
In order to do that, we need to sample an area of the grey shell which is in the shadow region, somewhere below the door and near the wheels.
This will become our left boundary marker in the gradient.
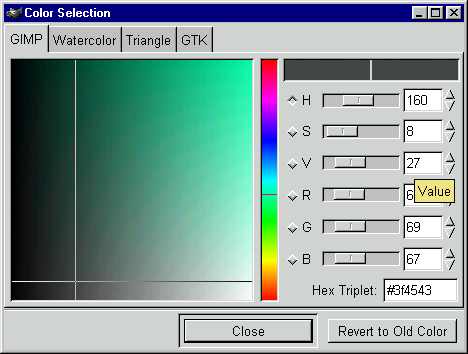
We use a color picker tool to sample this shadow region. The color is picked up as the foreground color. Click on the foreground color palette in Gimp Tool box to reveal the color selection window. |
|
|
|
 |
|
|
|
The number we are looking for is the Value number of the HSV triplet. Here it shows the shadow region has a value (or luminosity) of 27. Convert this to percentage, i.e. divide into 256 and we get a number of 0.105
|
|
|
|
We don't need to be exact with the numbers. Just a rough estimate will enable us to locate the left marker and make fine adjustments visually.
|
|
|
|
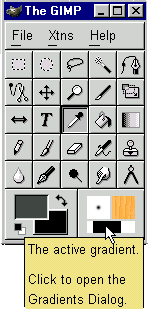
We are now ready to click on the gradient tool in the Gimp tool box to create a new custom gradient.
|
|
|
|
|
|
|
|
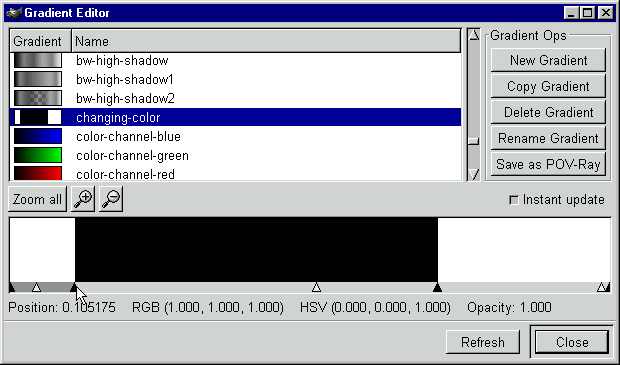
The gradient editor dialog window allows us to create a new gradient which consists of three segments. The middle segment is black and the other two white.
|
|
|
|
The left maker point of the black gradient is around 0.108 which includes the grey shadow region we sampled earlier.
The right marker is dragged to the right until the Wagon shell is sufficiently enclosed. This value is roughly 0.7128
You can download the gradient here if you wish to follow along with this tutorial.
|
|
|
|
Duplicate the image layer so that we will not alter the original image.
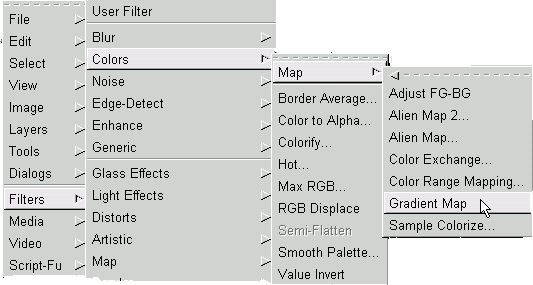
Navigate to Filters->Colors->Map->Gradient Map and click to apply the effect to the duplicate layer.
|
|
|
|
 |
|
|
|
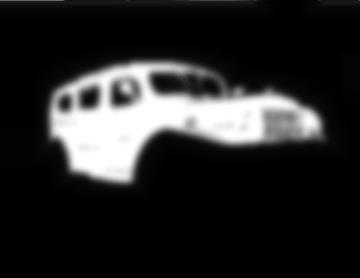
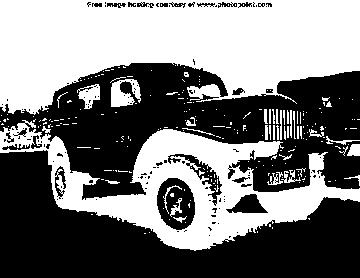
This is how the duplicate image layer looks like after applying the gradient map. Notice that all of the Wagon's shell has been selected and some.
|
|
|
|
 |
|
|
|
As you can see, the mask includes the intricate detail of the Wagon Shell, including the right side mirror.
The sky is completely gone, but the mask still needs a little trimming to take away the rover on the right, the
fence on the left, and the big wheels, license plate and grass area below. This is comparatively easy to do. Large areas of
the wheel and grass can be cut out by using the lasso tool and filling it with white using the bucket fill tool.
|
|
|
|
To cut away the more intricate areas of the fence, rover and wind-screen area, simply magnify the image layer and lower the opacity to 50% so that the original color layer below will shine through.
Using the lasso tool, cut out large areas outside the shell and fill it with white.
|
|
|
|
 |
|
|
|
Now the mask is finally ready. The shell of the Dodge Power Wagon is in perfect shape. To use this mask, we need to reverse the colors,
Image->Colors->Invert and then apply a couple of blurs by navigating to Filters->Blur->Blur... with 5 iterations using values of 9,5,3,2,1
|
|
|
|
|
|
|
|
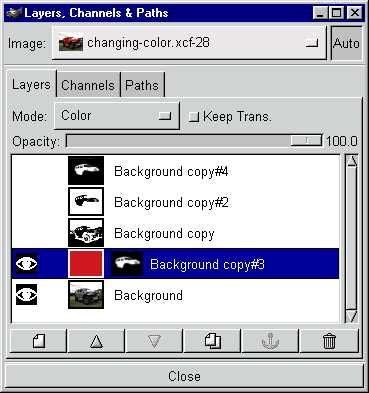
Create a new layer above the original layer, and fill it with red. Add a mask and copy and paste the blurred mask we have
just created to this layer. Finally change the layer blending mode to "Color".
|
|
|
|
The final image is a brand new red Dogde Power Wagon.
|
|
|
|
 |
|
|
|
Images created with 
Copyright by lasm ©2002
|
|
|
|
|
|