WAVING GRASS TUTORIAL

PREPARING
Open tube in PSP , not longer then 350 in height nor width.
Or resize to maximum of 350.
Duplicate (Shift-D) your tube
Close original (don�t save). We will work on image that is left
Chose two colors from the tube. A light color for the foreground and a darker color for the background.
BACKGROUND
File � New � New Image of 1450 x 400
Floodfill with the light color
Effects � Texture Effects � Blinds.
Use the following settings: Width: 30, Opacity 27, the Color is the dark background color
Layer � New rasterlayer
Go to toolbar and use �selection tool� settings (see arrow pointing left):

Then go to custom selection image (see arrow pointing to the right)
Use the following settings:
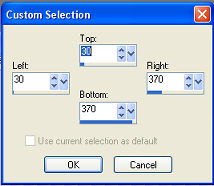
Floodfill selection with dark backgroundcolor
Effects � Texture Effects � Blinds. Use the same settings as before but now with your light foregroundcolor selected.
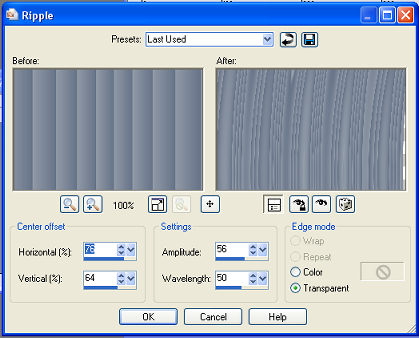
Effects � Distortion Effects � ripple with the following settings (see image):
Horizontal: 76
Vertical: 64
Amplitude: 56
Wavelength: 50
Transparant checked
Effects � Edge Effects � Erode
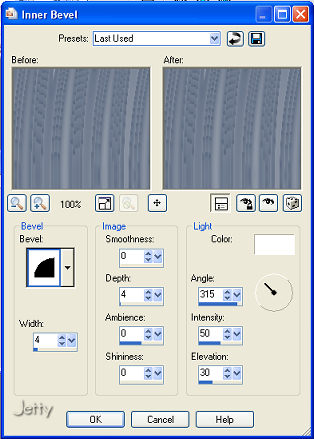
Effects � 3d effects � Inner Bevel: with the following settings (see image)
Selections � Select none
Effects � 3d effects � dropshadow: H/V: 4, Opacity 45, Blur: 15, Color Black, Shadow on new layer unchecked
Layers � Duplicate
Image � Resize � 75 % (bicubic), resize all layers UNCHECKED
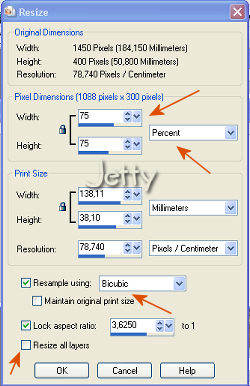
Image � Free Rotate with the following settings: right , 15, rotate single layer checked
With your mover tool move your smaller copy a bit below so that you have a nice creation and it doesn�t touch the edges.
Activate your second layer (bigger ripple creation)
Layers - Duplicate
Image � mirror
Move this copy to the left
Layers � Merge visible
Your background is now finished and ready for your tube
Activate your tube
Edit � Copy
Activate your background
Edit � Paste as a new Layer
With your mover tool move tube to the left and place it neatly in the middle of the �waving grass�.
Effects � 3d effects � Dropshadow: use same settings as before
Add new layer and add your watermark (optional)
Layers � Merge � Merge all
Export as Jpeg image with a compression of 20
LETTER CREATOR
In Letter Creator open your background in body
Tile your background image in body
Put your credits in Footer, don�t forget the artists and maker of the tuturial and mention yourself.
Save your letter in Finish.
I hope you enjoyed making this letter. I would love to see the results. You can mail them to me at:
[email protected]
My tutorials can be found in my groupfiles:
http://groups.yahoo.com/group/cuteIMlettersandtagsbyJetty
or on my webpage:
http://www.geocities.com/ladyluna37/
With many thanks to the brilliant women who have given me lessons in PSP and Incredimail letters. Many of the things I learnt have been used by me in creating my letters. Any resemblance with other tutorials is purely coincidental. Many thanks as well for my testers. Great job ladies...
You are free to share my tutorials. If you want to use them for lessons or a groupshare please ask me and please awknowledge it as my tutorial.
Hugs
Jetty