SEAMLESS PAINTING TUTORIAL

SKILLS/LEVEL
Beginner with basic knowledge of PSP, Letter Creator and filters
NEEDED
- PSP
- Letter Creator
- Tube of your choice: light or medium colors, not so dark
- Filter Factory C: Tile Mix
- Filter Factory D: Vortex
http://www.fleursauvage.be/utilitaire/filtres/filtres.htm
PREPARING
- Chose tube: height maximum: 380 pixels or resize to maximum 380
- Duplicate(shift-D)your tube and close out original
- Chose a light color from the tube for your foregroundcolor box
- Edit - Copy
- Minimize tube
BACKGROUND TILE
- File - New image: 200 x 200 px.
- Selections � Select all
- Edit � Paste into Selection
- Selections � Select none
- Layers � New layer (raster)
- Floodfill layer with light foreground color
- Layers � arrange � send to bottom
- Layers � Merge � Merge visible
- Effects � Image effects � Seamless tiling (default)
- Effects: Filter Factory C: Tile Mix: settings:

Mixing: 72, Radius: 230
- Filters: Filter Factory D: Vortex: Settings
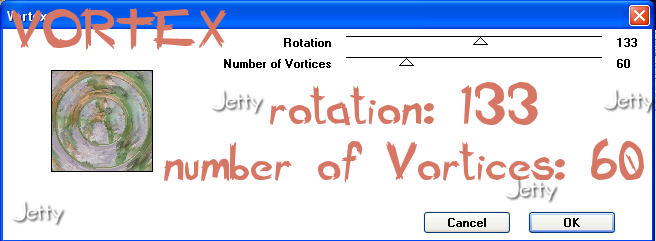
Rotation: 133, Number of Vortices: 60
- Effects � Image effects � Seamless tiling: default
- Your background tile is now ready
- Minimize
BACKGROUND
- File � New Image (1280 x 400, transparent)
- Go to your material pallet and put your background color
(box) to pattern
- Chose your settings: angle 0, scale 100,
- Chose your background tile as pattern
- Floodfill the Background with your pattern
- Optional: Effects � Image effects � Seamless tiling:
default(should not be necessary)
- Layers � New raster layer
- Floodfill with your foregroundcolor (materialbox)
- Lower the opacity of your layer to 60 - 90
You should be able to see the tile through it. I chose 75 / 81
- Layers � Merge � Merge all (flatten)
- Go to your toolbar and chose selections

Settings: selection type: rectangle, Mode: add, Feather: 0
Anti-Alias checked
- First we note the width of the tube. Count 50 to it.
- Start at in the left top corner at 20 from top. 20 to the right
and 20 down is the startpoint. The endpoint will be 380 down
and to the right: the new number of the width (tube width + 50).
For instance. If your tube is 280 width. Then the endpoint of
the rectangle will be 380 down x 330 right.
I used a border of 20 each time, but for a smaller painting you
might prefer a border of 30 and add 40 instead of 50.
- Layers � New raster layer
- Floodfill with your pattern (still in background box)
- Effects � 3d Effects � Inner bevel: with these settings:

Bevel: 2, Width: 4, Smoothness: 0, Depth: 4, Ambience: 0
Shininess: 0, Angle: 315, Intensity: 50, Elevation: 30
- Effects � 3d effects � Dropshadow: with these settings:
Horizontal & Vertical: 4, Opacity: 55, Blur: 15
- Repeat Dropshadow but now with Horizontal and
Vertical -4.
- Selections � Select none
- Edit � Paste as a new layer
- Move with your mover tool to the left end in the square.
- Effects � 3d Effects: Dropshadow with these settings:
horizontal & vertical: 4, opacity: 65, blur: 12, black
- Layers � new raster layer: add your watermark
- Layers � Merge � Merge all (flatten)
FINISHING
- File � Export � JPEG Optimizer (between 22-26)
- In Letter Creator open your background in Body
- Tile in your Body
- Chose matching color for the text, chose margins
- Don�t forget your credits in your footer
- Finish
Another example:

I hope you will have fun doing this tutorial.
Please show me your results as I love seeing my tutorials
used and I love seeing nice letters. So please do.
My email is: [email protected]
Please give credit to me in your tutorials. Best to put a
link to my group:
http://groups.yahoo.com/group/IMtutorialsbyJetty
or to my homepage:
http://www.geocities.com/ladyluna37/index.htm
If you want to use this tutorial groupswise or include
it in lessons please ask my permission.
I probably won�t refuse but I would like to hear when
it is used.
If there is any resemblance to another tutorial by another
author, it is purely coincidental.
Thanks to the women who have thought me more about Paint
Shop Pro and Incredimail and to the women who test for me.
Without you I couldn�t have done it.
Hugs
Jetty