QUEEN OF HEARTS TUTORIAL

SKILLS/LEVEL
Beginner with basic knowledge of PSP, Letter Creator and filters
NEEDED
tube of your choice
PSP & Letter Creator
Texturizer plugin: http://www.designsbyjoy.net/Starting-n-PSP/Texture.htm
PREPARING
Chose tube: height maximum: 380 pixels or resize to maximum 380
Duplicate(shift-D)your tube
Close out original
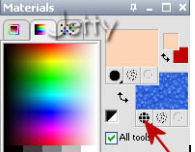
Chose a light color from the tube for your foregroundcolor box in your materialbox
Chose a darker color for your background color.
Edit - Copy
Minimize tube
BACKGROUND TILE
File � New Image: 200 x 200
In your materials box in your background box chose gradient

In your materials propriety box chose foreground-background gradient with the following settings: angle 90, repeats: 1, radial style, not inverted
Floodfill the image with gradient
Change the gradient in the backgroundbox back to the color
Swap colors for the foreground and background boxes in your material box. Foreground color will be background and vice versa. One click on the rounded black arrow between the small color boxes to swap them.

Go to your toolbox and select the preset shapes. Chose a heart form. Draw a heart shape. This shape will be in the colors you have in your materialbox. You can swap those again if you want.

Now draw your heart shape. I started at the left top corner at 30 - 170. In another example I used 45 - 155. My advice: play with the size
Layers � Merge � Merge visible
Effects � Image effects � Seamless tiling at default
Your background pattern is now ready
Minimize
BACKGROUND
File � New Image (transparent) of 1450 x 400
Chose in your materials box for pattern
Select here your newly made background pattern: angle 0, scale: 100
Floodfill your background with this pattern
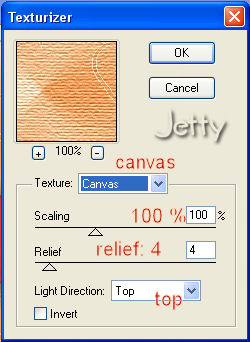
Optional if you like a texture: Effects � Texture � Texturizer: settings:
canvas, scale of 100 %, relief of 4 and direction: top
Edit � Paste � Paste as a new layer
Move your tube to the left
Effects � 3deffects � Dropshadow : Horizontal & Vertical: 4, Opacity: 45, Blur: 15
Optional: go to backgroundlayer and lower opacity to make it more text friendly
Add new rasterlayer
Put your Watermark
Layers � Merge � Merge all (flatten)
LETTER CREATOR
Export with a compression of 20
Open in your body, tile
Aknowledge credits in Footer
Finish letter
I hope you enjoyed making this letter. I would love to see the results. You can mail them to me at:
[email protected]
My tutorials can be found in my groupfiles:
http:\\groups.yahoo.com\group\cuteIMlettersandtagsbyJetty
With thanks to the brilliant women who have given me lessons in PSP and Incredimail letters. Many of the things I learnt have been used by me in creating my letters.
Any resemblance to other tutorials is purely coincidental. Special thanks to my testers...
You are free to share my tutorials. If you want to use them for lessons or a groupshare please ask me and please awknowledge it as my tutorial.
Hugs
Jetty