LIFE IS A MAZE TUTORIAL
This tutorial has three levels, which show through the
three variations. Choose the level which fits you best or
if you like challenges choose a more advanced variation
and you can always go back to another level if it is
necessary! I hope you�ll enjoy this tutorial.
If you haven�t activated your rulers please activate now.
View � Rulers
NEEDED:
- PSP
- Letter Creator
- Tube of your choice
- Optional: Life is a Maze Selection.
If you haven't got one go to the group files
members of the IMtutorialsgroupbyJetty go here
members of the creatorscommunity go here
Or email me at [email protected]
- Filter/Plugin: VM Experimental: Mighty Maze
- Filter/Plugin: Simple: Quick Tile
http://www.lunasdatter.dk/test_linkportal_filtre.htm
LEVEL:
Beginner with basic knowledge of paint shop pro, letter
creator and filters. But also an advanced and intermediate
level
PREPARING
- Open tube, height maximum: 350 px
- Duplicate tube (Shift D)and close original
- Choose a light colour from tube and select it as foreground
colour in the material box
- Choose a darker colour from tube and select it as background
colour in the material box
- Edit - Copy
- Minimize copy of tube
BACKGROUND TILE
- File � New Image (400x400, transparent)
- Selections � Select all
- Edit � Paste - Paste into Selection
- Selections � Select none
- Layers � New layer (raster)
- Floodfill layer with light foreground color
- Layers � Arrange � Send to bottom
- Layers � Merge � Merge visible
- Effects � Image effects � Seamless tiling: default
- Adjust � Blur � Gaussian Blur: radius of 20:
- Effects � VM Experimental � Mighty Maze: settings

Random Seed: 0, Red, Green and Blue: 255, Zoom: 10
- Effects � Simple � Quick Tile
- Layers � New raster layer
- Floodfill (Flood Fill tool in your toolbox) your new layer
with your light fore ground colour
- Lower opacity of top layer (50 � 80). Mine: 69 and 75.
- Layers � Merge � Merge all (flatten)
- Your background tile is now ready, minimize. You
will need it later
BACKGROUND
- File � New Image (1280 x 400, transparent)
- Go to your material pallet and put your background color
(box) to pattern
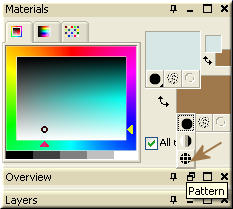
- Click once to oen your Material Properties box.
- Choose your settings: angle 0, scale 100,
- Choose your background tile as pattern
- Flood fill the Background with your pattern
- Choose one of the 3 variations for making a Maze Selection
VARIATION ONE FOR BEGINNERS
- Open the selection I included or go and find it in my groups
files or on my homepage
- Selections � Load/Save Selection � Save Selection to
disk.
- Selections � Load/Save Selection � Load Selection from Disk
And choose the life is a maze selection.
VARIATION TWO FOR ADVANCED BEGINNERS:
- View � Rulers (if the rulers aren�t activated yet)
- Choose Freehand Selection in your toolbox and use the
settings of the image.

Point to Point type, Replace Mode, Feather: 0, Smoothing: 0
And Anti-Alias checked.
- Then click the following points.
POINT TO POINT EXPLANATION:
The points are in number combinations of two. The first number
of each set is the horizontal spot. The second number is the
vertical spot.
250 � 30 means 250 on the horizontal line and 30 on the
vertical line. In your image you now have a horizontal and a
vertical ruler. You will put your points in the image with the help
of these rulers. If the first point you want to make is 120-20 then
it means that you first go to 120 on the horizontal ruler. On
exactly 120 you will get a white small stripe. Then go down
(but the horizontal distance must be kept), so only move vertically
on the vertical line. When you reach 20 there you will notice that
a stripe will alight white on the stripe of 20 exactly on the vertical
ruler. If the 120 horizontal is as well still alight you can click once
with your left mouse button. If it isn't anymore on the right spot try
to find it. You then can continue to the next spot. Look again for
the horizontal distance and when that is found and white alight
then go down to the new vertical spot. If you have the exact spot
(white both on the horizontal and the vertical ruler) click again.
Do not click in between as you might add a point to your selection
which you don't need! Continue with making these points until
you reach again the starting point. Double click on it and your
selection is ready.
These are the points, walk through them vertically
30-30
250-30
250-50
180-50
180-70
220-70
220-150
280-150
280-100
250-100
250-80
300-80
300-170
200-170
200-90
160-90
160-50
130-50
130-130
160-130
160-200
300-200
300-300
170-300
170-240
230-240
230-260
190-260
190-280
280-280
280-220
140-220
140-150
110-150
110-50
90-50
90-170
120-170
120-240
50-240
50-350
70-350
70-280
120-280
120-350
300-350
300-370
100-370
100-300
90-300
90-370
30-370
30-220
100-220
100-190
70-190
70-50
50-50
50-150
30-150
30-30
- Then double click to activate the selection
VARIATION THREE FOR INTERMEDIATES:
You can also chose to make a Maze selection of your own.
- Chose Freehand Selection in your toolbox
- In your presets box chose these settings:
Selection: Point to Point type, Replace Mode, Feather: 0,
Smoothing: 0 and Anti-Alias checked.
- Now put the points on spots you like and make it look like a maze.
All variations continue here:
- In your material box change your foreground color to gradient.
- In your material properties box use these settings:
Foreground-Background, Angle: 45 and Repeats: 3, Invert
Not checked. Lineair Style.
- Layers � New raster layer
- Floodfill your selection with your gradient
- Selections � Select None
- Effects � 3d Effects � Inner bevel: with these settings:
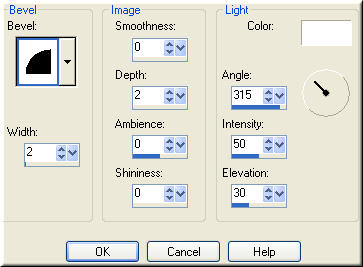
Bevel: 2, Width: 2, Smoothness: 0, Depth: 2, Ambience: 0
Shininess: 0, Angle: 315, Intensity: 50 and Elevation: 30
- Effects � 3d Effects � Drop Shadow: these settings:
Vertical & Horizontal: 4, Opacity: 45, Blur: 10
- Repeat Dropshadow with Vertical & Horizontal: -4
- Edit � Paste � Paste as New Layer
- With your mover tool (toolbox) move your tube to the left
- Position your tube nicely in front of the maze
- Effects � 3d Effects - Dropshadow: these settings:
Vertical & Horizontal: 4, Opacity: 45, Blur: 10
- Layers � New raster layer
- Add your watermark
- Layers � Merge � Merge all (flatten)
- File � Export � JPEG Optimizer: Compression of 24
FINISHING
- Open Letter Creator
- In your Body open your background
- In your body tile
- Choose matching color for text, choose margins
- In your Footer mention your credits
- Finish
Another example:
Last example:

I hope you enjoyed making this letter. I would love to see the results.
You can reach me at:
[email protected]
Please put a link to my group:
http://groups.yahoo.com/group/IMtutorialsbyJetty
Or to my website if you have gotten this tutorial through
creatorscommunity:
http://www.geocities.com/ladyluna37/index.htm
My tutorials can be found in my groupfiles.
http://groups.yahoo.com/group/IMtutorialsbyJetty
or after a while at the earlier mentioned homepage.
With thanks to the brilliant women who have given me
lessons in PSP and Incredimail.
Many things I learnt have been used by me in creating.
Any resemblance with other
tutorials is purely coincidental.
And special thanks my testers for their testing.
You are free to share my tutorials. If you want to use them
for lessons
or a groupshare please ask me and please
acknowledge it as my tutorial.
Hugs
Jetty