FUR ON THE CARPET TUTORIAL
LEVEL
Advanced Beginner
NEEDED
PSP, Letter Creator and a Tube
PREPARING:
- Open a tube (maximum height must be 380, maximum width
must be 260). Or resize the tube
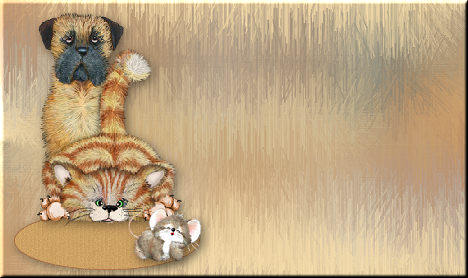
- For the carpet effect use an animal or person or object
that can be standing on a carpet on the floor.
- Duplicate tube (Shift � D)
- Select two colors of your tube: a light color for the
background, a dark color for the foreground
- Close original (don�t save).
- Edit - Copy
BACKGROUND IMAGE
- File � New Image: 1450 x 400, transparant.
- Selections � Select all
- Edit � Paste into Selection
- Selections � select none
- Layers � New Raster Layer
- Floodfill with your background (light) color
- Layers � Arrange � Move down
- Layers � Merge � Merge all (flatten)
- Effects � Image Effects - Seamless tile at default
- Adjust � Blur � Gaussian Blur with radius 25

- Effects � Texture Effects � Fur: settings:
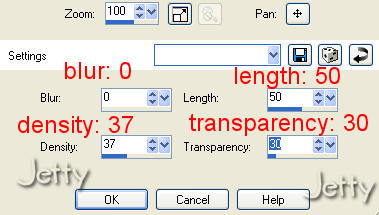
settings: Blur: 0, Length: 50, Density: 37 and
Transparency: 30
- Optional: Effects � Edge Effects - Enhance.
- Lower opacity (for better contrast with text).
I chose for 84, in another letter I didn't lower it.
Look what is best for you.
Layers � promote to raster layer before you can
lower the opacity.
- Effects � Image Effects� Seamless Tiling: default
- Optional: if you lowered Opacity: Layers � Merge �
Merge all
- In your toolbar with the preset shapes chose Ellipse
- For Mode chose for an Ellipse shape
- In your Materialbox: your foreground color must still
be the dark color you chose before and the background the
lighter color.
- Now you are going to draw an ellipse.
Your startpoint must be around 20 width and 300 below.
You continue to draw until width 280 � 300 and
height 360 - 380.
You now must have a colored Ellipse with a dark edge.
You can skip �Optional� if your ellipse form has an edge.
Please continue with step 26!
If you don�t have the edge now, please follow �Optional�.
OPTIONAL:
- Selections � Select all
- Selections � Float
- Selections � Modify � Contract: 3 px
- Selections � Invert
- Selections � Float
- Floodfill selection with the dark foregroundcolor
(floodfill tool in toolbox)
- Selections � Select none
- Close visibility of background layer (click on eye)
(activate ellipse or edge layer)
- Layers - Merge - Merge visible
- Make your background layer visible again (eye)
- Skip step 26 and continue with step 27.
- Layers � Convert to Raster Layer
- Effects � Texture Effects � Blinds with these settings:

settings: Width: 5, Opacity: 25, Color: dark color you
chose before, Light from left/top
- Adjust � Add/remove noise � Add noise:
Gaussian between 15-20, monochrome
(Depends on the contrast and darkness of both colors)
- Add a dropshadow to your liking
Mine is: Horizontal/Vertical: 4. Opacity: 55, Blur: 15
- Layers � Merge � Merge visible
- Edit � Paste � Paste as a new layer
- With mover tool move tube to the left
- Add a dropshadow to your liking, same as before
- Layers � new raster layer. Add your watermark.
- Layers � Merge � Merge all (flatten)
FINISHING
- File � Export: JPEG Optimize with compression of 25
- In Letter Creator in your Body open your background
- Tile in your body
- In your Footer mention your credits
- Finish
Another Example:

I hope you will have fun doing this tutorial.
Please show me your results as I love seeing my tutorials
used and I love seeing nice letters. So please do.
My email is: [email protected]
Please give credit to me in your tutorials. Best to put a
link to my group:
http://groups.yahoo.com/group/cuteIMlettersandtagsbyJetty
or to my homepage:
http://www.geocities.com/ladyluna37/index.htm
If you want to use this tutorial groupswise or include
it in lessons please ask my permission.
I probably won�t refuse but I would like to hear when
it is used.
If there is any resemblance to another tutorial by another
author, it is purely coincidental.
Thanks to the women who have thought me more about Paint
Shop Pro and Incredimail and to the women who test for me.
Without you I couldn�t have done it.
Hugs
Jetty