ROUNDABOUT PATTERN TUTORIAL
PREPARING
Open tube in PSP (longer then width), not bigger then 450 in height.
Or resize to height of maximum 450.
Duplicate (Shift-D) your tube.
Close original (don�t save). We will work on image that is left
BACKGROUND PATTERN
File - New Image of 500 � 500, raster background, transparant
Activate your tube image
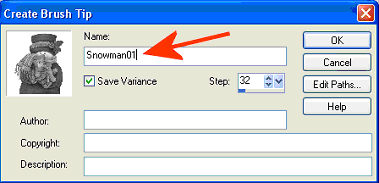
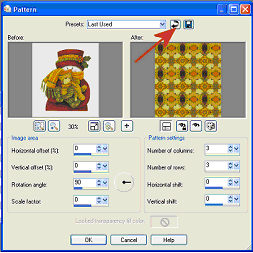
File � export, chose �custom brush�, give name you can find back easily, at default settings.
In your material box chose (preferably clear/bright) foregroundcolor out of tube.
Chose for backgroundcolor lighter matching color or white.
Go to the new image (500 � 500) you just created and select brush you made
Height of no more then 450 steps 32

Put brush once in middle of image
Effects � Image Effects � Seamless tiling at default
Add new Raster layer
Floodfill new layer with the lighter color in your background box or white
Layers � arrange � send to bottom
Layers � merge � Merge visible
Put opacity of merged image between 30 � 60 to your liking
Layers � Merge � Merge all (flatten)
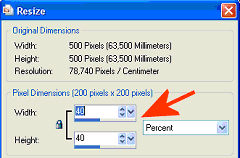
Image � Resize to 40 %
This is your background pattern, minimize
BACKGROUND
New image 1450 � 400
Change your foregroundbox in the materialbox
to pattern
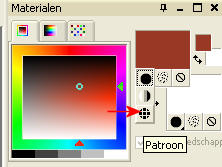
Chose your earlier made background pattern
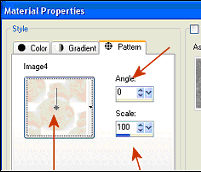
Fill your background with pattern, angle = 0, scale = 100
After filling with pattern, minimize your background
TUBE IMAGE
Activate your tube image
Image- Canvas Size � both width and height: 500, placing in center
Layers � Duplicate
Make copy of layer invisible by clicking on the eye
Layers - new raster layer
Fill with light background color or backgroundpattern you chose earlier
Layers � arrange - send to bottom
Layers � Merge - Merge visible
Effects � Reflections Effect � Pattern at default
Layers � Load/Save Mask from Disk- Load Mask from Disk
Search for Mask080 and load with the following settings:
Source Luminance is checked, Fit to Canvas is checked and Hide all mask.
Then Load.
Delete Masklayer and answer yes
Optional: if you find your pattern too busy you can always
chose for another solution of a one-colored filling: Select all � Float � Floodfill with your dark or light color � select none. If you are happy with the pattern you should skip this step.
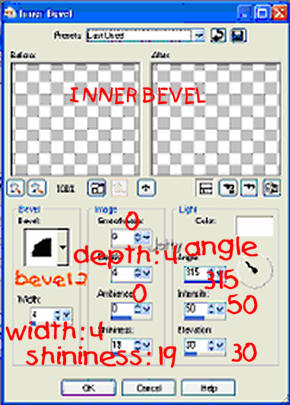
Effects � 3D effects � Inner Bevel. I used the following settings:
bevel 2, width: 4, smoothness 0, depth 4, Ambience 0, Shininess: 19
angle 315 , Intensity: 50, Elevation 30
Make toplayer visible (eye) and activate
With moving tool move your tubeimage to a spot you like
Layers � Merge � Merge visible
Image � Resize to a height-width of 400.
Edit � Copy
FINISHING
Activate background
Edit � Paste as a new layer
With mover tool move image to the left
Effects � 3d effects - Add drop shadow: Vertical: 4, horizontal: 4,
Opacity: 45, Blur: 15, color black. Shadow on new layer NOT checked. Or add
a dropshadow after your choice.
Add new layer and add your watermark (optional)
Layers � Merge � Merge all
Export as Jpg image with a compression of 20
LETTER CREATOR
In Letter Creator opem your background in body
Tile your background image in body
Put your credits in Footer, don�t forget the artists and maker of the tuturial and mention yourself.
Save your letter in Finish.
I hope you enjoyed making this letter. I would love to see the results. You can mail them to me at:
[email protected]
My tutorials can be found in my groupfiles:
http:\\groups.yahoo.com\group\cuteIMlettersandtagsbyJetty
With many thanks to the brilliant women who have given me lessons in PSP and Incredimail letters. Many of the things I learnt have been used by me in creating my letters. Any resemblance with other tutorials is purely coincidental.
You are free to share my tutorials. If you want to use them for lessons or a groupshare please ask me and please awknowledge it as my tutorial.
Hugs
Jetty