Go to your material pallet and put your background color
(box) to pattern
Chose your settings: angle 0, scale 100,
Chose your background tile as pattern
Floodfill the Background with your pattern
Optional: Effects � Image effects � Seamless tiling: default
(should not be necessary)
Layers � New raster layer
Floodfill with your foreground color (material box)
Lower the opacity of your layer to 40 - 80
You should be able to see the tile through it.
I chose for: 56 and once 71. Try it out.
Layers � Merge � Merge all (flatten)
Layers � New raster layer
Go to your toolbar and chose selections
Settings: selection type: circle, Mode: add, Feather: 0
Anti-Alias checked
Start in the top-left corner at 0. Draw a circle until 300
down and 300 to the right.
Floodfill with your darker background color (floodfill tool)
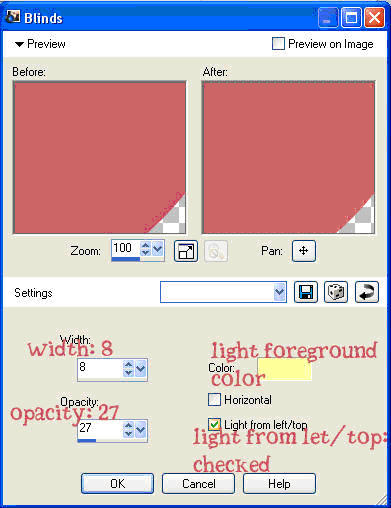
Effects � Texture Effects: Blinds: with these settings:
Settings: Width: 8, Opacity: 27, color: light foreground color
Light from left/top: checked
Selection � Select none
Effects � 3d Effects � Inner bevel: with these settings:
Bevel: 2, Width: 4, Smoothness: 40, Depth: 4, Ambience: 0
Shininess: 0, Angle: 315, Intensity: 50, Elevation: 30
Edit � Paste as a new layer
Move with your mover tool to the left end
Make bottom layer invisible (click on eye)
The tube layer should still be activated
Layers � Merge � Merge Visible
Effects � 3dEffects � dropshadow: to your likings
I used: horizontal & vertical: 4, opacity: 55, blur: 15, black
Make bottom layer visible again (click eye)
Layers � new raster layer: add your watermark
Layers � Merge � Merge all (flatten)
FINISHING
File � Export � JPEG Optimizer (between 22-26)
In Letter Creator open your background in Body
Tile in your Body
Chose matching color for the text, chose margins
Don�t forget your credits in your footer
Finish
Another example:
I hope you will have fun doing this tutorial.
Please show me your results as I love seeing my tutorials
used and I love seeing nice letters. So please do.
My email is: [email protected]
Please give credit to me in your tutorials. Best to put a
link to my group:
http://groups.yahoo.com/group/IMtutorialsbyJetty
or to my homepage:
http://www.geocities.com/ladyluna37/index.htm
If you want to use this tutorial groupswise or include
it in lessons please ask my permission.
I probably won�t refuse but I would like to hear when
it is used.
If there is any resemblance to another tutorial by another
author, it is purely coincidental.
Thanks to the women who have thought me more about Paint
Shop Pro and Incredimail and to the women who test for me.
Without you I couldn�t have done it.