I LOVE CHRISTMAS TUTORIAL
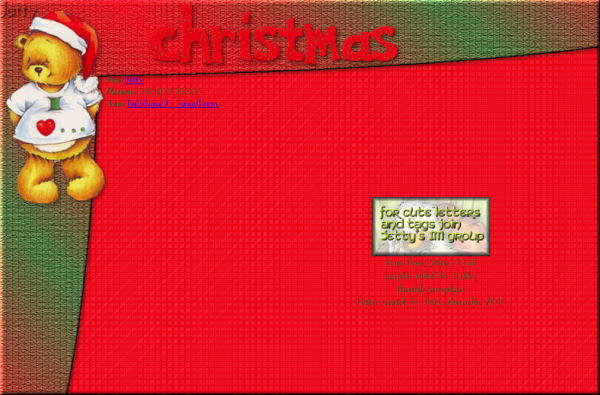
A tutorial which is very suitable for Christmas letters, but can of
course be used well for any tube or kind of letter.
NEEDED:
- Tube: height no more then 400
- PSP, Incredimail, Letter Creator, Animation Shop
- Plugin: Penta: Dots and cross
http://www.pentacom.jp/pentacom/products.html
download the garbage collection
- Plugin: L&K Landsiteofwonder: Paris
http://www.siteofwonders.com/filtersl_k.html
- Plugin: Texture � Texturizer
http://www.psp-stuff.nl/index.php?option=com_content&task=view&id=10&Itemid=14
LEVEL:
Intermediate for the animation part. Some knowledge of PSP
and Animation Shop is necessary.
Advanced beginner for the part without the animation.
PREPARING
- Open your tube
- Select a light color for your foreground color (materialbox)
- Select a darker color for your background color
- Duplicate your tube (shift-D)
- Edit � Copy
- Close the original tube
- Minimize your copy of the tube
BACKGROUND
- File �New Image: 1280 x 900, transparent
- Floodfill with your foreground color
- Effects � L & K Landsiteofwonders - Paris:

Control 0: 30, Control 1: 118, Control 2: 27, Control 3: 0,
Control 4: 103, Control 5: 97, Control 6: 70, Control 7: 143
- Effects � Penta.com: Dot and cross: these settings

Amount: 68. Cross distance: 18 and Cross width: 2
- In your toolbox choose your selection tool: Selection

- In your presets box choose: Ellipse as Selection Type,
Mode: replace, Feather: 0 and Anti Alias not checked
- If your rulers aren�t showing: View � rulers
- Now we are going to draw the borders: Startingpoint:
0 horizontal and 0 vertical (0-0). Drag to: horizontal: 1280 and
Vertical 220 (1280-200). Then we start again at the startingpoint:
0-0 and push the Shift button during this process to the endpoint:
Horizontal: 200 � vertical: 900 (200-900)
- Layers � New raster layer
- In your foregroundbox put your color to gradient:

- In your material properties box choose these settings:

Foreground-background, Angle: 45, Repeats: 3. Lineair style
- Flood fill with your gradient with your flood fill tool (toolbar)
- Selections � Select none
- Effects � Texture � texturizer: these settings:
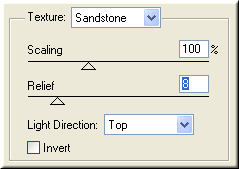
Texture: Sandstone, Scaling: 100, Relief: 8, Light Direction: Top
- Effects � Penta � Dot and cross: same settings
- Effects � 3d effects � Inner bevel: these settings:

Bevel: 2, Width: 4, Smoothness: 0. Depth: 4, Ambience: 0.
Shininess: 0. Angle: 315, Intensity: 50, Elevation: 30
- Effects � 3d effects � Dropshadow: Vertical & Horizon-
tal: 3, Opacity: 40, Blur: 10 and Color: black
- Effects � 3d effects � Dropshadow: Vertical & Horizon-
tal: -3, Opacity: 40, Blur: 10 and Color: black
- Edit � Paste � Paste as new layer
- With your mover tool move your tube to the top left corner
- Effects � 3d effects � Dropshadow: Vertical & Horizon-
tal: 3, Opacity: 40, Blur: 10 and Color: black
- Layers � New raster layer
- Add your watermark
- Layers � Merge � Merge All (Flatten)
If you like the letter like this and don�t want your letter to
Be animated: File � Export � JPEG Optimizer: compression
of 22.
And contine with point: 83. For the animated part continue
here:
ADDING TEXT
- In your toolbox activate your text tool and choose a nice
Font, create as vector, size: 72, stroke width: 1,0
- Choose contrasting colors in your material box, perhaps a
Gradient for background. Use your creativity
- Write your text
- Layers � Convert to raster layer
- Selections � Select all
- Selections � Float
- Selections � Defloat
- Effects � 3d effects � Dropshadow: Vertical & Horizontal: 3,
Opacity: 40, Blur: 10 and Color: black
- Layers � Duplicate
- Layers � Duplicate
- Activate your Raster 1 layer
- Effects � Xero � Sparkles: with these settings

Choose your own colors: Sparkle style: Stars_1, Distribution:
Uniform, Density: 50, Maximum: 1000, Vary brightness: 80.
Vary colour: 36, Use highlight, Antialias and make tileable:
Checked. You don�t see the sparkles unless you lock the
visibility of the other layers.
- Activate your Copy of raster 1 layer
- Effects � Xero � Sparkles: with the same settings, only
Change �Density� to 75.
- Activate your Copy (2) of raster 1 layer
- Effects � Xero � Sparkles: with the same settings, only
Change �Density� to 100.
- Selections � Select none
- Activate your background layer
- OPTIONAL: only when you want a part of the
background or tube animated:
With your freehand selection tool: 'point to point' you can
select a part of the background you would like to see
animated.
- Layers � Duplicate
- Layers � Duplicate
- Activate your background layer
IF YOU DON�T WANT A PART OF THE BACKGROUND
OR TUBE ANIMATED YOU NEED TO CONTINUE HERE
IF NOT YOU CAN CONTINUE AT POINT 60:
- Effects � Xero � Sparkles: with these settings
Choose your own colors: Sparkle style: Stars_1, Distribution:
Uniform, Density: 50, Maximum: 1000, Vary brightness: 80.
Vary colour: 36, Use highlight, Antialias and make tileable:
checked.
You don�t see the sparkles unless you lock the visibility of
the other layers.
- Activate your Copy of background layer
- Effects � Xero � Sparkles: with the same settings, only
change �Density� to 75.
- Activate your Copy (2) of background layer
- Effects � Xero � Sparkles: with the same settings, only
change �Density� to 100.
- Selections � Select none
CONTINUE HERE WHEN YOU SKIPPED THE BACKGROUND /
TUBE ANIMATION PART:
- Activate your background layer
- Lock the visibility of the copies of the background and the
Copy of Raster 1 layer and Copy (2) of raster 1 layer
- Layers � Merge � Merge visible
- Lock the visibility of this layer
- Unlock the visibility of your Copy of background and your
Copy of Raster 1 layer
- Activate the copy of the background
- Layers � Merge � Merge visible
- Lock the visibility of this layer
- Unlock the visibility of the Copy (2) of background and the
Copy (2) of Raster 1
- Activate your Copy (2) of background
- Layers � Merge � Merge Visible
- Unlock the visibility of all three layers
- File � Save as a PSP 7 compatible file
NEEDED:
- Open your animation shop
- File � Animation wizard
- Same size as the first image frame checked, next
- Transparent checked, next
- Upper left corner of the frame, With the canvas
color: checked, next
- Yes, repeat the animation indefinitely checked, how
long: 10 seconds, next
- Add your just saved three layered file, next
- Finish
- View � Animation
- File � Save as: save as a gif image. You can go for
next several times and then Finish.
FINISHING
- Open you Letter Creator
- In your Body open your background
- Do NOT Tile in your body
- In your Footer mention your credits
- Finish
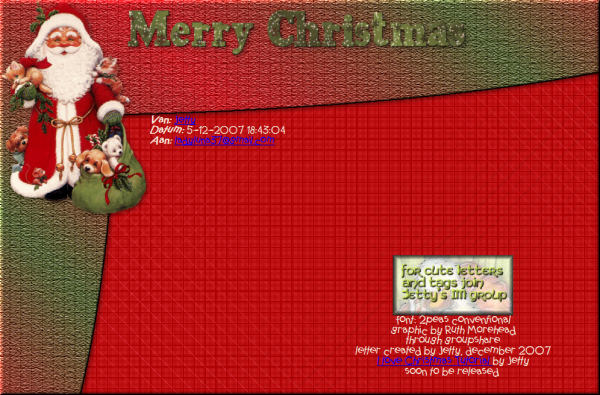
Another example:
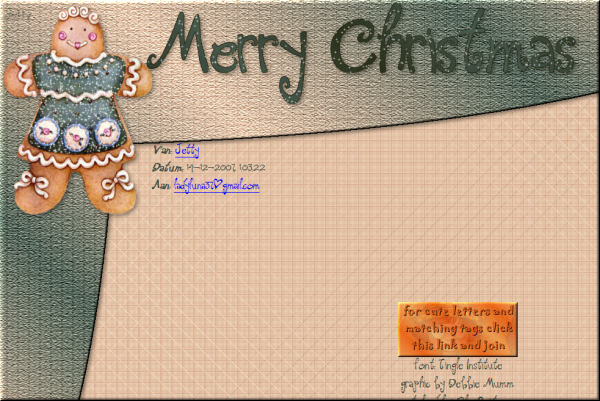
And the last example:
I hope you enjoyed making this letter. I would love to see the results.
You can reach me at:
[email protected]
Please put a link to my group:
http://groups.yahoo.com/group/IMtutorialsbyJetty
Or to my website if you have gotten this tutorial through
creatorscommunity:
http://www.geocities.com/ladyluna37/index.htm
My tutorials can be found in my groupfiles.
http://groups.yahoo.com/group/IMtutorialsbyJetty
or after a while at the earlier mentioned homepage.
With thanks to the brilliant women who have given me
lessons in PSP and Incredimail.
Many things I learnt have been used by me in creating.
And special thanks my testers for their testing.
Any resemblance with other tutorials is purely coincidental.
You are free to share my tutorials. If you want to use them
for lessons
or a groupshare please ask me and please
acknowledge it as my
tutorial.
Hugs
Jetty