
| Here is the Porthole animation we'll be making. It's not extremely hard just repetitive in using the deformation tool. I obtained the porthole tubes through a yahoo group a long time ago, so I do not know who the original maker of these tubes are but if you know please contact me so that I can give credit where credit is due. Please allow time for the graphics on this page to load, theres quite a few screenshots. |
| You will need : I used PSP 7 for this one. : Port Hole tubes. : Picture of your choice for the scenery behind the porthole. : SuperBlade pro (optional). Lwbrass preset I used, here. Its called Brass, 3rd one down I think. : Font of your choice. Make sure you have enough room on your canvas to work on, 500 x 500 should be plenty. 1. Copy and paste the port hole.tub to your canvas. Make sure you have both layers with the top part of the port hole nicely centred, or, duplicate the tub so that you don't overwrite it, then change the canvas size to 500 x 500. Name the bottom part of the port hole as BottomPort and your top part of it as TopPort if you'd like, this is easier to recognize the layers. For now you can resize the port hole if you'd like, or do it later, its entirely up to you. I have resized mine 80% for now, I'll resize again later on when we actually make the animation. 2. Now paste your picture you'd like to use onto your canvas as a new layer, rename it picture if you want. Move it around with the mover tool to get it where you think it looks best within the port hole itself. The picture layer has to be below the porthole layers, so drag it down under them if it isn't already. This is how mine is so far  3. Crop the picture to size so that it fits in the porthole. I did this by adding a new layer with the preset shape tool. Click on the preset shapes, make sure ellipse is checked, vector is checked, line width doesn't matter, have your fill colour whatever colour, it doesnt matter either. Null out stroke colour. Draw a circle to the same size as your porthole, create as raster layer, it should look like this, 
then select all, select-float, invert selection, make the 'picture' layer active, then press delete, select none. Delete the last layer we just made (vector) as we no longer need it now. There should no 'picture' outside of the porthole, like this.. 
4. Now to add text, if you so wish, such as name, holiday, saying, etc. Add new layer, name it text (stops confusion if layers are named). I chose to have my name on a curve, it all depends on yourself tho, so if you just want your text in a straight line then that's pretty straight forward. X out the 'top port' for now, null out background fill color. Choose the preset shapes tool, ellipse, the settings here don't really make much difference but you have to make sure that 'create as vector' is checked. Draw a circle within the porthole to the size you want. Move it around if its not quite in the right position, adjust the size etc if wanted. When you have it the way you want then your set to add the text. Select your text tool, in order for the text to follow the shape of your arch move the mouse over the vector shape until a little 'A' with an arch under it shows then click mouse, write your text, applying the settings you want, I used these settings. 
While still selected add the colour, bevel, SBP etc that you want. I used SBP with the lwbrass preset. Select none, when asked if you want to defloat to nearest layer say yes. Your text should now be on its own layer. You can delete the vector layer now as we no longer need it. Add drop shadow to text layer. This is entirely up to you what you wish to use, I'm just giving suggestions 
5. Now its time to merge some layers so that you can animate very soon. Before this tho, you can add a drop shadow to the bottonport layer if you wish but if you want a transparent porthole at the end its best not to add a dropshadow. I added one and used the same as before except changed to blur to 8.3 . Now X out the topport layer and merge visible the remaining layers. You should have two layers now, merged and topPort! Nothing has to be done to this first layer, so just export it as jpg(or gif if you want transparent) giving it a name, such as frame1. Ok, this time, again make sure 'topPort' is active and click on the deformation tool, hold ctrl and move top right corner up a fraction, then the middle right square in a little way, apply and sharpen. Export to jpeg naming it frame 2. Heres my deformation that I did. 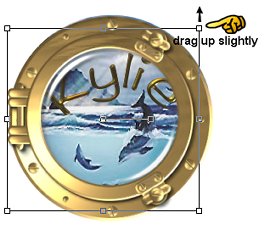
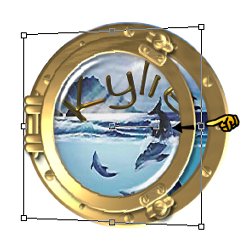
Repeat deformation but move it in a little more than before, sharpen. Export as jpeg, name as frame 3. Again repeat the deformation and move in a little more than the last time, sharpen and export as frame 4. Keep repeating the deformation until you have the port door open as far as you want it, always moving in more than the layer before. Remember to Sharpen after each deformation. For my porthole I will end up with 6 exported jpg's, it will depend on how much you deform yours with how many you end up with. It's just the same technique until you get to the last one. Now, you'll notice how the last frame is looking rather THIN and not very nice, well to fix this I added another layer, not needing to be named unless you want to. Using the freehand tool (the lasso looking one) - point to point, feather=0, antialis checked. Follow around the porthole door edge, like so. 
Flood fill with white, I used a gold/brass SBP preset (lwbrass again) on it. Deselect. (For people who don't have SBP can select a colour from the porthole with the dropper tool, #947844 is a good colour, then floodfill the selection with that colour, then add a slight bevel such as below then continuing as normal from there on�) 
Make sure this layer (flood filled white) is below 'topport' layer. 
If you want, X out the bottom layer(merged)and merge visible the port door and new layer. Export to jpeg naming as frame 6 (or however many deformations you did) That's the last of the images to be made. I have 6 images ready for animation shop. Now, onto animating. View your animation if you wish. You'll notice it's opening fast and doesn't look realistcally good, so, now we adjust the frame rate. Select frame 6 (click on it) and change the frame properties to 250, ok. (if you had more than 6 jpgs then whatever your last image is then you click on that frame, so if you had 7 or 8 jpgs, then those are the frame numbers you click on to change, then the last frame). Then select the last frame and change that to 250 aswell.(or change both frame 6 and last frame at the same time by clicking on frame 6 and holding the ctrl key then clicking on the last frame.) View the animation again and you'll see that it looks better with it pausing. Now you can crop and resize it so that it's not quite as big. I cropped mine to be rid of all that extra white background and resized 80%. I saved mine with these optimisations, 
But you can save it with whatever settings you like, its all up to you how you want it to turn out. And that's it, we are finished, hurray. Thank you for trying this tutorial and I hope that I explained my steps clearly and you were able to understand everything. |
| |
| Created December 15, 2002. Copyright � 2002 Kylie D, all rights reserved. All Graphics, Layout or Content on this page may not be copied or used without the expressed written permission of the Author. |