Animated Celestial Clock
Page 3
ok. now we have our clock and we're ready to animate.
First we need to get out layers straightened out.
On layer #1, your background layer, go ahead and flood fill it with whatever background you're going to use.
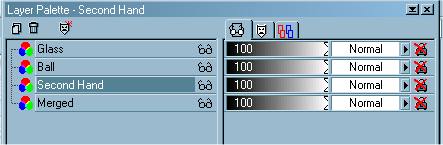
Turn off the visability of your Ball layer, Second hand layer and the glass layer.
Merge visable and then turn all of your layers back on.
Your layer pallette should look like this:
Now we need to resize our image so it's not so big.
I resized mine to 75%. Make sure resize all layers is checked.
Effects<Sharpen<Sharpen
Activate your second hand layer. It should now be highlighted like the layer pallette above.
Shift D 17 times. Yes, I know but this is how we're going to animate our second hand <G>
Minimize all images except for one.
Save this image as Clock 1 and close that window.
Now open another image.
Click on Image<Rotate to the right 20 degrees.
You will have to take your mover tool and move your second hand back to the center.
Now sharpen<sharpen.
Save this image as Clock 2.
Now continue to open each image, rotating your second hand an additional 20 degrees each time. ie... 20, 40, 60, 80.. etc. and don't forget to sharpen it each time.
By the time you get to the last one you should be rotating it 340 degrees.
Save this last image as Clock 18.
Now open animation shop.
First we need to make sure we have Animation Shop set up correctly.
Click on File<Properties<General and make sure your settings are as follows:

The reason for this is so you can save your images from PSP in PSP format and once you do your animation and if there's something that you want to add change, you can still open them up in PSP and work on them without having to do the whole thing over.
OK, now that that's over with, let's get started with our animation.
Click on the Animation Wizzard button in the upper right-hand corner.
Click on "Same size as the first image frame" and click next.
Click on "Transparent" and click next.
Click on "Upper left corner of the frame and with canvas color" and click next.
Click "yes" and repeat the animation indefinately and for how long-put 150.
Add image.
Add your clock 1, 2, 3 and so on until you have all 18 images saved.
Click on Next and then finish.
To view your animation, click on View<Animation. These buttons are up top.
You should see something like this.

I hope you have enjoyed this tutorial and had as much fun making your clock as I did. If you have any questions, please contact me. I'll be more than happy to help.
This tutorial was written by Tina of ©KreationzByTina (2000-2002)
For my other tutorials, click here