Jan 25, 2003
|
| |
Well, LTRC was kind of a big disappointment for me, especially for Bella.
Dropping the weight really was tough, and I learned a couple of valuable
lessons. For one thing cheap Walmart cutting boards are NOT made of UHMW,
but are in fact some other type of polyethylene which can actually shatter
as it did at 3 p.m. the day before I had to drive down to the competition.
I got the bot together just under the wire. I suffered an 0-2 defeat at
the hands of Control Freak and Lenins Tomb.
In any case the biggest thing LTRC taught me was that I need to make this
thing faster. That great big giant arena made an already slow bot look
a whole lot slower, and gave others the room they needed to get around
me and get the better of me. So when I got home and finally got around
to looking at the bot again, speed was my first priority.
Having a quick look at the old CAD files made one thing painfully clear,
I had been laboring under the impression that I had built in about 3/8"
of offset into the cams. Had this been the case the bot should have been
a lot faster, as my calculations indicated, and I had merely chalked it
up to a lack of traction or something. In fact the actual offset of the
cams as they were built was 1/8"! Ahah! We have a winner.
|
 |
Trying to design a new series of cams was gonna
be tricky. I had pushed my tool set pretty far with the last build and now
I had less money to spend on tools, how was I gonna accomplish this? The
main problem with the old ones was that to put in any more offset the shaft
that the cams were riding on would protrude through the sides of the cam.
The first thing I thought of was to take a huge hunk of Al and turn it down
to make the shaft. But I lack a 4 jaw chuck (this is what you would use
to make offset things like camshafts) so that plan was out the window. In
addition to that because of the increased offset it would be hard to get
the legs on the shaft.
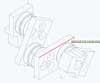
One day it finally hit me. Triangles. Equilateral triangles have a 60 degree
angle at each corner and have three equal length sides. By making bars with
three holes at each end I could turn them in relation to each other 120
degrees and bolt them together giving me the needed offset. In between the
bars would go rollers which act as the ball bearings inner race. And since
each bar bolts on separately the legs are easier to assemble then ever before.
On the left is the Solidworks drawing of the new cam. They were nice enough
to give me a free copy of their excellent software. It's much easier to
use than Autocad for 3d stuff, and it makes weight calculations of assemblies
real easy. If you are a bot builder and are interested in being getting
your own free copy click here. |
 |
I figured that the 6061 Aluminum I had been working with wouldn't
be strong enough, so I picked up some 7075 for Mymetalconnection
at Jr's recommendation. Good
stuff, about twice as strong as 6061 with minuscule weight increase. As
a consequence it's a lot tougher, and I spent over an hour using Kirstin's
fathers horizontal bandsaw to rough cut the blanks. Seen here are the parts
squared and drilled. I used my favorite sticker paper technique to put center
marks for the holes and then started drilling. |
 |
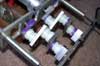
Here are the above parts test assembled with the corresponding
8-32 screws. I found these hardened steel dowel pins at McMaster. 3/8"x1"
long for these but they have a whole lot of sizes, worth considering if
you need relatively short hardened axles and don't feel a whole lot like
cutting grinding and chamfering the ends of hardened steel rod. |
 |
I turned the nylon (used my brain this time no more UHMW for
the lathe) inner bearing races and test fitted two of the cams together.
The allen wrenches in this shot are just to hold in the outer bar until
I make new longer supports. The cams are functionally done in this shot,
but I'm gonna remove some more unneeded material from em to save weight.
|
Feb 5, 2003
|
 |
I reworked the lexan feet and bolted the whole thing together.
Apparently lexan varies a bit in thickness so I had to cut a couple more
shims to get everything to work right. Also made up the remaining support
arms to hold the end bars on. This is the bot as I tested it with the 12v
pack I had lying around. Performance is good, certainly not the fastest
bot out there but much better than before. |
 |
Here's a close up of the foot assembly. All that's left to
be done is to take off a bit of excess weight from some of the Al components
and bond on the "traction strips". |
 |
Over the last weekend I drove out to Jr's
place where he and Justin let me use the teams mill. Thanks a bunch guys!
It was so cool to actually be able to machine the parts that I wanted to
make without having to constantly fight the limits of my tools. |
 |
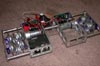
This is the result of the above milling machine, nicely aligned
parts that all fit together precisely. Quite critical when you are trying
to spin a big hunk of steel at several thousand RPM with minimal vibration.
The parts are made of UHMW, and they are fastened together with Al corner
blocks and 10-32 screws. Quite solid, and as previously mentioned, everything
lined up exactly and the weapon shaft spins real well. |
Feb 16, 2003
|
 |
Home stretch now, that last 10% of the bot that takes 90%
of the time. I bonded on the "traction strips" with some Loctite
black max, a superglue specially designed for gluing rubber to lexan. Note
that scale reading ~1.5 pounds per leg! Good thing I didn't decide to go
with 4 leg drive... |
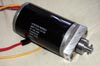 |
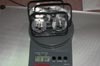
The new weapon motor, Attwood Mobile. It offers me many advantages, lower
weight than the EV, thinner and longer so it fits between the frame rails.
Best of all you can see in this picture that it easily face mounts with
two screws. You can also see the drive adapter I cobbled together so that
there is a cross pin like the EV.
|
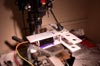 |
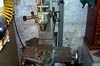
Here we are all bolted up to the drill press table for the
weapons test. I would have tried to take a picture with the blade in motion
but I only have two hands. It's pretty scary, and these tests were only
done at 12v, the full voltage should be really damaging! |
 |
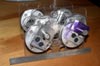
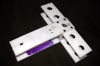
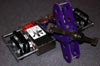
The edges of the nicely milled parts needed to be rounded
for less friction and clearance from other parts in the bot. I also took
the time to let the parts sit in my favorite RIT #13 Purple dye in the oven
overnight. Looks pretty snazzy. |
 |
And here we are pretty much complete. Aside from a few minor
details this is the bot ready for competition. All that's left is to tidy
and tie down a couple of wires, and she'll be ready to go. See you at Motorama! |