Pressure Flaking
 This is most often the final stage of the knapping process. Pressure flaking gives
the tool its final form and sharpens (and resharpens) the cutting edge. The piece
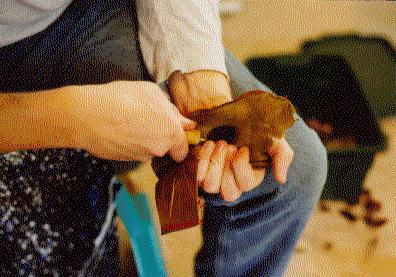
being worked is held in one hand (usually your left hand if you are right handed,
usually not if you are left handed) and the pressure flaker
is held in the other. A piece of leather is usually used between the objective
piece and the hand holding it. This is to protect your hand against the flakes
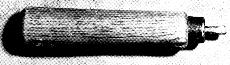
which are being pushed off by the pressure flaker. The flaker was traditionally
antler although many contemporary knappers prefer thick copper wire mounted in
some sort of handle. Unlike hard and soft hammer percussion, where finess rather
than force is emphasized, pressure flaking literally pushes the flakes of. Depending
on the material being used, this can require that a lot of force be applied.
This is most often the final stage of the knapping process. Pressure flaking gives
the tool its final form and sharpens (and resharpens) the cutting edge. The piece
being worked is held in one hand (usually your left hand if you are right handed,
usually not if you are left handed) and the pressure flaker
is held in the other. A piece of leather is usually used between the objective
piece and the hand holding it. This is to protect your hand against the flakes
which are being pushed off by the pressure flaker. The flaker was traditionally
antler although many contemporary knappers prefer thick copper wire mounted in
some sort of handle. Unlike hard and soft hammer percussion, where finess rather
than force is emphasized, pressure flaking literally pushes the flakes of. Depending
on the material being used, this can require that a lot of force be applied.
 The point you are working on will already be bifacially worked and have a sharp edge. Because pressure flaking requires that a force be built up on the edge, the thin edge of the biface will crush, if you do not prepare the platform. The simplest way to prepare a platform is to use the flaker to scrape upward on the edge in the area you want to remove the flake from. The new edge will be able to hold long enough for the inward pressure you exert on it to build up, so that the flake can be driven off. The flake will come off of the underside of the piece being worked. The tip of the pressure flaker is placed against the prepared edge and pressure is applied inward, and then downward. The inward force determines how big the flake will be, while the slight downward motion detaches the flake.
- Some things to remember:
- - The flakes come off the underside of the peice being worked, not the top, so you MUST protect your palm with a leather pad.
- - Remember to push in first and down second. It will be tempting at first to just punch out the shape of an arrowhead, but you should try to focus on making long, well controlled flakes. Its good to start pressure flaking on bottle glass, because its a smooth surface, with a nice flat edge to help you practice making nice long flakes.
- Like all the other stages of knapping, remember to find ridges for your flakes to travel along. They will be longer and better defined if you send them scooting along a ridge left by an earlier flake removal. Flakes which are not made on ridges will fan out, and tend to be short and wide.
You can use pressure flaking to get an arrowhead out of
a beer bottle!
 Back to Flintknapping
Fundamentals.
Back to Flintknapping
Fundamentals.
Return to the Knappers
Anonymous Main Page.
Questions? Suggestions? Mail me.
Knappers Anonymous was prepared by Tim Rast and is being updated by Mike Melbourne