The First Layer
|
The First Layer | |
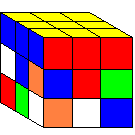
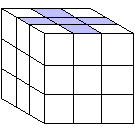
Before you begin, you should know that the top layer of blocks is called the first layer. This is the first set of blocks that you must correctly place. As illustrated in the image above (which here and further will be how your cube will look after you have completed the step), you must correctly place the nine cubes on the first layer.
NOTE: The image above shows the yellow side to be the starting face. You may choose whatever color you would like, but these instructions assume you use yellow.
 |
Because the center piece never moves you need to get the other cubes of the same color around the center piece. The first thing to do on the first layer (or the top) is to get the four edge pieces (edge pieces are the blocks with two colors on them). To do that first find a color that you want to solve first.
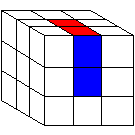
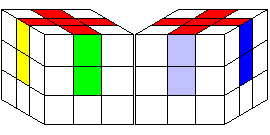
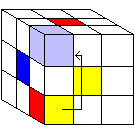
Next, find an edge cube that has that color on it. Remember that the edge pieces have two colors on them. So if an edge piece had red and blue, it would need to go in the space between the red center piece and the blue center piece, like in Figure A.
 |
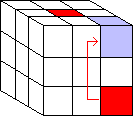
To get that piece there first rotate the edge piece so that it is under the place it needs to go, like in Figure B. The side facing you will be the face, so turn "F2". It does not matter if the cube is rotated correctly. You will rotate them later.
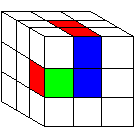 |
If your edge piece is in the middle as shown in Figure C, and you can move it without messing up the top, then hold the cube so that the cube in the middle you want on the bottom is in the Face Right (FR) spot, shown in Figure D. Then do this sequence of turns. "R- B- R+ B- F+ B+ F-" and then it will be on the bottom.
 |
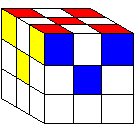
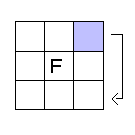
Then after you have all of the edge pieces (Figure E), make sure all of the edge pieces are in the right spot (Figure F). They might not be rotated correctly like in the picture but they are still in the right spot.
 |
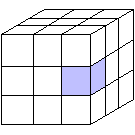
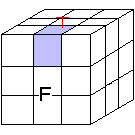
To rotate the FT position, hold the cube like this so the cube you want to rotate is in the same position as the one highlighted in the Figure G and the side with the F is the face and the face with the red T is the top.
 |
Then do the sequence "F- T+ L- T-". Do that to all of the cubes that are not rotated correctly.
 |
 |
Find a corner cube that has the colors that you are doing and find the place you need to put it. Rotate the bottom face until the cube is underthe place it needs to be. This is depicted in Figure I. Then, having your face as the one shown in Figure J, do this sequence: "R- B+ R+" The cube might not be rotated correctly but it is in the right spot.
 |
Now if a cube you need is in the top row and not in the right spot, hold the cube so the cube you need to drop in in the FRT (front right top) position.
 |
Then do this sequence "R- B- R+". That will drop the cube. Now get all of the cubes in the right spot. To rotate them hold the one that you want to rotate in the FRT position like we did before to drop the cube to the bottom. And do this Sequence R- B2 R+ F+ B2 F- You might have to rotate the cube more that once to get it correctly rotated.
 |
Now all the cubes in the top layer have been placed and your cube should look like the cube in the gray box at the top of this page where it says "Step One: The First Layer." Click an arrow below to jump to the top of the page. In the case that your cube does not look like the image at the top of the page, go through the instructions again. If that still does not work, ask for clarification on the Contact Us page.