|
Animating the Colour Slide

- Open your GA 5 and open your colour slide UFO file. At this
stage because we closed off the eye to hide all the layers you will only have
one frame layer in GA with the base background showing. (saves all that
un-clicking :-))
Your Object Manager should look like this

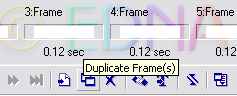
- Ok because we have 8 name layers, so we need to add 7
frames to make a total of 8 frames in all. Click on the Duplicate Frames icon
at the bottom and click it 7 times
-
Highlight your fist frame and open the eye of
the top name layer
-
Goto your next frame and open the eye of the
next layer down (2)
-
Goto your next frame and open the eye of the
next layer down (3)
-
etc.....................until all 8 layers have
a name layer in the frame.
Back
to:
Animating
the Door
-
if not then click on each frame to see if you
have opened the right eye for that layer. make your adjustments. You can also
change your shadow at this stage if you don't like it.
-
Preview, if you are happy with it run the
Optimization Wizard and save!!

This one was made by having 16 layers. first 8
layers as the tutorial above and gradient 058 for the second colour and the 1st directional arrow on the left,
which will make your gradient scroll downward.
The colour change on each layer makes it look
like it is doing a breathing movement as well..............
KEWL!!
NOTE: Each gradient has
their own Hue number so never change that unless you want different hue colours
on each layer.................Hmmmmmmmmmmmm now there is another idea!!!!
Well I thought it and this is the result.

Had another thought and came up with this, but
that is another story for another time.

So you
see there is no telling what your imagination will come up with.
Hope I
have opened your mind a little on the possibilities of this effect.
Thank you for trying my
tutorial, which was conceived by me wondering if it was possible to do it
the same way as you do it in PSP in one image instead of saving every layer as a
jpg and having 8 separate images instead of one.
Please feel free to print
this tutorial
out for your own personal use, but do not copy it in any way to
put on-line, pass out, or
re-write and claim as your own.
Any resemblance to any other
tutorial like this, is purely coincidental.
This tutorial was written on
the 1st January 2007 and is therefore
© to Edna Munn
Website and web set Design
Also created
by
Edna Munn
Back to Index
|