|
ADDING THE SPARKLE

Step 1: Go to File/Open and navigate to the
folder that you have saved your UFO file that you want to add sparkle to.
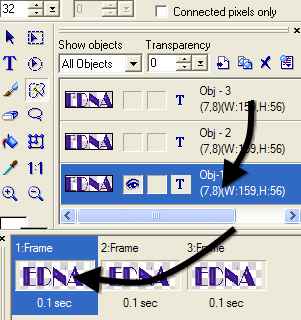
Usually 3 frames is all you need. Click on the top layer and highlight, hold
down shift and click on the bottom layer.
This will highlight all your layers, now goto
the Distribute
Frames Icon
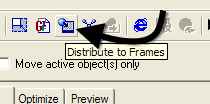
Step 2: This will distribute all 3
layers to 3 frames.
Step3: Click on the Magic Wand on the
left Toolbar
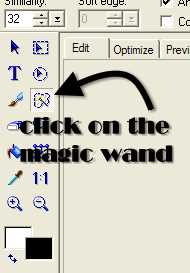
Zoom in so you can see what you are doing.
To zoom in go to View/Zoom in and click on 3x.
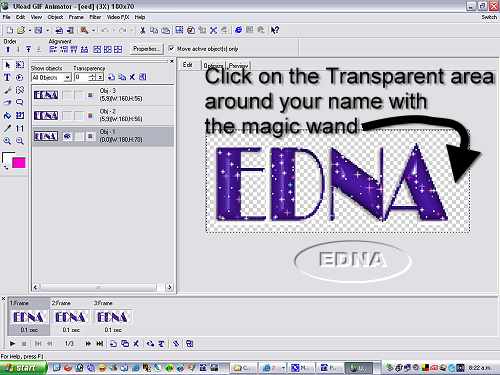
Go to Frame 1 and make sure that you also highlight
the layer with the eye open. (this is important)
~~~~~~~~~~~~~~~~~~
IMPORTANT NOTE: Before
you use your magic wand, make sure that you do Not have a shadow on your image!!
If you do, right-click
on your layers in the Object Manager and take the tick out of Shadow. you can
add the Shadow after you have finished doing your sparkle.
~~~~~~~~~~~~~~~~~~
Click on the transparent space (in your
viewing space, not on the frame running board) around your
name with the magic wand.
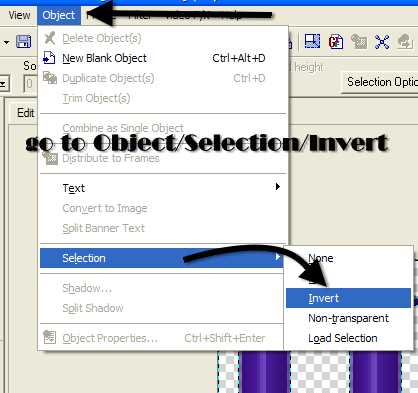
Go to Object/Selection/Invert
Step 4: Make sure that you have the
first frame highlighted and that you also have the layer for that frame
highlighted as well. (the eye should be open)
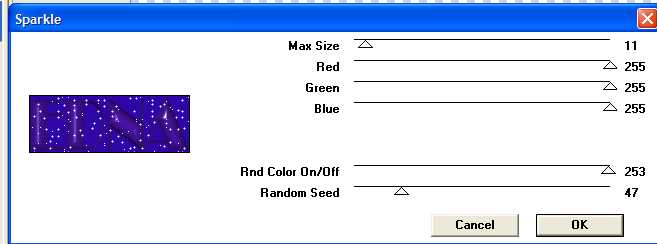
Step 5: Go to Filters/VM
Natural/Sparkles and use the settings below,
(Max Size setting is of personal choice, if
you would like bigger stars, then move the slider to the right for a bigger
number) on your first frame. Click OK
Step 6: Highlight frame 2 and the layer
for frame 2 that has the eye open, go to Filters/VM Natural/sparkles and use the
same settings as above only move the Random Seed slider. Click OK
Step 7: Highlight frame 3 (last frame)
and the corresponding layer should have its eye open and use the same settings
but once again move the Random Seed slider. Click OK
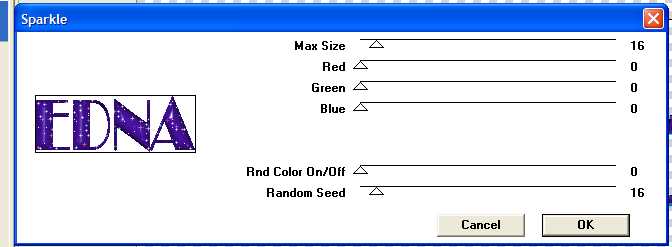
That is it now finished, but if you would like
to added Colour
Sparkle as well, go back to the first frame and follow Steps 5-7, but use
these settings below and (Max Size
setting is of personal choice, if you would like bigger stars, then move the
slider to the right for a bigger number)
just move the Random Seed slider in each frame.
This is now finished and this was the result.
Hope you have
enjoyed doing one of my tutorials, mostly though I hope you had lots of fun and learnt something new from it.
INDEX
Please feel free to print
this tutorial
out for your own personal use, but do not copy it in any way to
put on-line, pass out, or
re-write
and
claim as your own.
Any resemblance to any other
tutorial like this, is purely coincidental.
This tutorial was written on
the 14th January 2007 and is therefore
© Edna Munn
Website and Web Set Designed
by
Edna Munn
|