
|

LOCATION:
Auckland University of Technology (AUT)
State Building (corner of Wakefield and Queen streets)
13th floor (room 1307)
Auckland
DATE:
Tuesday, 22nd Jan 2002
5:30 to 9:30pm.
WHAT HAPPENED:
Welcome to the new year, and I had plenty to make the start of the year a banger meeting, however I must apologise for the last minute announcement and all... Unfortunately some crossed lines, email problems and other issues caused a bit of grief, however thanks to Stuart for doing door duties and making sure people could get in (AUT was still officially 'closed'), as well as providing enough munchies and drinks to keep people fed!
VIDEO TIME:
As always, I had another collection of new and unviewed 3D animation from the web. I find that the videos give plenty of conversation material, and its great to get a looksee at some of the amazing animation work being created by enthusiasts and professionals around the world.
TO BE 3D OR NOT 3D:
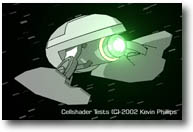
As promised, I came with plenty of things to look at - We started the evening with a look into celshading - The art of making your 3D look NOT like 3D!
HOW DOES CELSHADING WORK?
 Basically a typical 3D surface has shading - That is, where there are shadows, areas will become 'dark', and areas that receive lots of light will become, well 'bright'.
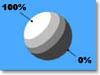 Celshading therefore simply works by boosting defined areas (referred to as 'zones') of shading (ie. from x% to y%) to a uniform value (referred to as the 'brightness'). This gives the effect of 'bands' of brightness, or an extremely simplified shading of the 3D surface. Celshading therefore simply works by boosting defined areas (referred to as 'zones') of shading (ie. from x% to y%) to a uniform value (referred to as the 'brightness'). This gives the effect of 'bands' of brightness, or an extremely simplified shading of the 3D surface.
 I showed some models and animations I had put together to demonstrate the technique, then we then ran through three plugin options (all FREE by the way) available for celshading: I showed some models and animations I had put together to demonstrate the technique, then we then ran through three plugin options (all FREE by the way) available for celshading:
SuperCelShader is a plugin that comes with Lightwave. It allows you to set up 4 zones of shading, and also manages the look of specular highlights and making the edges of the object appear 'bumped' by applying a simple fresnel-type gradient. Its a great little plugin, and does its job well.
Big Eyes Small Mouth (BESM) was next. It has a funky interface and allows for multiple zones to be added by the user, however it appears to be more a celpainter then a shader. Rather then shade the underlying surfaces, it instead paints the 'zones' with a colour... This allows for some extremely cool effects, but it becomes awkward should you want to shade a custom surface...
Finally, Unreal 2.11 is a celshader from Japan. Its functionality is similiar to SuperCelShader, and the output seems identical, however it adds a variety of extra features to the basic shader, allowing cel painting (much like BESM) and masking parts of the surface using a range of buffers. What really sets this plugin even further apart is the other plugin, Toontracer that comes with Unreal. This extra imagefilter traces the edges of the surface and model, and will also halftone shade the surface as well. With a plethora of features for making cool looking edge lines, this plugin got my tick of approval!
ONLY 3 - IS THAT ALL?
There was one other celshader plugin that didn't make it into my review in time to be included, but I include the link here for those who are interested in checking it out (All the info is in Japanese however!) - Its called 3DD_celshader, and from what I can tell its shareware (and not free). The link is here.
NATIVE LW - WITHOUT SHADERS?
Note that BESM and Unreal have edge tracers that give nice 'pen edges' to your renders, however LightWave also allows edge tracing through the object properties box. Although shaders are great and all, its important to note that many of the shading effects can be created with standard LightWave tools. Arnie Cachelin of Newtek has put together an excellent page on the subject right here that I thoroughly recommend!
PLUGIN OVERVIEW
There are literally hundreds of freeware plugins for LightWave, adding extra functionality and features, or making common tasks simple. With the appearance of LScript in L[6], things have just taken off - In fact, we may be doing an LScript tutorial this year, so keep your eyes and ears peeled!
MODELLING:
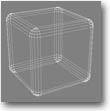 R_Box - This LScript creates very nice round-edged entities (cap, box, panel) quickly and very neatly. You may think that this is a simple object to create, but its surprising how useful this plugin has become in modelling! If you visit the web site, you'll also notive that this guy also has many other very cool and useful scripts and plugins for modelling. R_Box - This LScript creates very nice round-edged entities (cap, box, panel) quickly and very neatly. You may think that this is a simple object to create, but its surprising how useful this plugin has become in modelling! If you visit the web site, you'll also notive that this guy also has many other very cool and useful scripts and plugins for modelling.
RENDERING ASSISTANCE:
AutoFocus - A modifier plugin you attach to the graph for your camera not only sets the focal distance of the camera automatically for you by using a couple of NULL objects, but will also handle the F-stop for you as well! This makes creating that DOF effect so much easier to work with - While there's plenty of Focal distance tools and expressions around, the additional F-stop handling made this a plugin I felt had some potential.
Buffer_Saver - An image filter that mass-saves any selected buffer from Lightwave after frame rendering has completed. Lightwave has a 'render buffer export' plugin already, however this only allows saving of one buffer at a time - Buffer Saver saves them all (if you select them) and even takes care of filenaming each buffer image and more.
Buffers are extra information that LightWave generates when it renders an image such as shadows, specular shading and RGB (to name but 3!) and if you've ever worked with large animation productions, being able to mix and edit layers of information in a video editor is a lot faster then re-rendering hundreds of frames!
EXTRA HELP WITH GAME GRAPHICS:
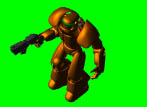 FakeMetric - An ever-so-useful LScript that sets up an isometric camera view set up for rendering models. Ideal for creating sprites, similiar in style to games like StarCraft, Red Alert, etc. FakeMetric - An ever-so-useful LScript that sets up an isometric camera view set up for rendering models. Ideal for creating sprites, similiar in style to games like StarCraft, Red Alert, etc.
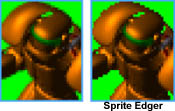 SpriteEdger - When antialiasing is performed, usually the edges of the object are blended slightly with the background - This can create an unsightly 'edge' around the object. SpriteEdger is a very cool LScript that takes care of removing antialiased edges quickly from rendered images (and also alpha) making them game-ready! SpriteEdger - When antialiasing is performed, usually the edges of the object are blended slightly with the background - This can create an unsightly 'edge' around the object. SpriteEdger is a very cool LScript that takes care of removing antialiased edges quickly from rendered images (and also alpha) making them game-ready!
Note that Fakemetric also comes with a handy Photoshop action script to perform a similiar feat, however not everyone has Photoshop.
FINALLY...
We checked out some video examples of excellent celshaded animations created with LightWave to close up the evening. Thanks again to Stuart for his dedication and help as always, to AUT for letting us use the excellent graphics lab to hold our meetings and many thanks to those people who came, and apologies to those who wished they could, but unfortunately couldn't due to other engagements...
Til next time, when I promise to have more exciting tutorials and awesome plugins to check out...
Kevman
|
|
