
|

LOCATION:
Auckland University of Technology (AUT)
State Building (corner of Wakefield and Queen streets)
13th floor (room 1307)
Auckland
DATE:
Thursday, 17th October 2001
5:30 to 9:30pm.
WHAT HAPPENED:
One thing that I must say I like about Media Player 7 for Windows is its ability to create playlists of video material - Being able to compile a series of 3D animations and just let them rip was extremely handy indeed. And that's how we started the October meeting... From virtual pop stars, to pseudo-horror-comedy and the latest Aerosmith video ('Fly away from here' - Effects by our favorite 3D app!) there was a variety of animation material this month around!
KEEN FOLKS:
How keen are people to come to these meetings? Not only did we have a visitor from Singapore (OK, so he was here on holiday!), but people came all the way from as far as Levin for this meeting!
TUTORIAL TIME FOR NEWBIES:
After the initial icebreaker videos and general natter, I quickly covered some basics of surfacing for some of our newer users. Many people often don't make full use of LightWaves awesome surfacing abilities.
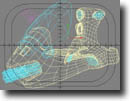 Too often I've seen new users generally just paint on an image, and then set base diffuse and specular settings, creating a surface that doesn't quite work out as well as they'd hoped. To demostrate how to make use of surfacing channels in general, I bought in a new model I'd built on the previous weekend to fill in time, a basic jet-bike type vehicle.
By using Photoshop to create many different elements such as colour, decals, scratches, dings and rivets, I compiled 4 image maps for the side surface of the vehicle and applied 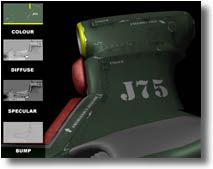 them to key channels such as colour, diffuse, specular and bump. The use of an image in the diffuse channel allowed me to apply grease and stain marks easily (a process usually called 'Dirtying down'), and by applying a much denser variation of the same image to specularity, I could control the way that the light affected the surfaces as the object moved. This is essential if photorealism is to be achieved when animating.
I added a bump image to add small details such as rivets, scratches and grooves between panels. I'll put this together into a small tutorial as soon as I get some time and post it up on the site for everyone.
SOMEONE ELSE IN THE DRIVING SEAT:
It was a great change for me to be able to sit back and watch for once at a meeting! Many, many, many thanks to Sue Guan for running over key features of the new LightWave[7] for us, including:
- Modelling using an Airbrush and morph targets in the same style of Maya's Artisan tool.
- Using Vertex-Paint to test Weight maps and bones in realtime from modeler!
- The new Non-linear animation toolset
Sue then followed this up with some new work he bought with him in the form of a bizarre, yet strangely amusing animation entitled 'Sue Guan Style'. Since his AUT project 'Samurai Teddy Bear', it was great to see how much further he had come with his animation quality and work.
Yet again, more thanks go to Stuart for supplying the munchies, and Sue Guan for his groovy presentation! Your efforts are always greatly appreciated!
Cheers everyone who came - I'm getting married in November (the 10th to be exact) so hopefully I'll be able to get a late November meeting sorted, otherwise early December to finish the year off!
Keep listening and I'll let you all know when!
Kevman
|
|
