 |
 |
 |
 |
 |
 |
 |
 |
 |
 |
 |
 |
| ..::Head to toe tutorial::.. |
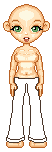
| First make a new layer Start out with your blank base, and draw the outline of your pants. Start with a dark color |
| Fill in your pants with a slightly lighter color then the outline. Very easy. |
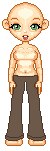
| This is the hard part. Take your retouch tool and darken the inside of the legs or wherever you think the shading will look good. Do the same with the lighten tool. Dont have the opacity too hight or it will look way to bright. I also add folds in the pants lowering my darken tool to a lower opacity and draw lines where the folds would be. Same with the lighten tool. |
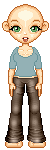
| New Layer Starting with the shirt, its just like the pants, fill in your shirt with a lighter color then the border |
| Following the same steps as the pants, lighten and darken underneith the chest and the arms, as well as add folds |
| New layer Now onto the hair, follow the same steps drawing the border, and filling it in with a lighter color |
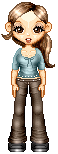
| Lowering your opacity with the air brush tool, draw in dark and light strands all over the head. Keep scrolling out to a higher veiw to see if thats how you want it. |
| Take your retouch tool (again) and choose darken RGB, brush along the parts of the hair that would lay in shadow or the part of the hair. With the lighten RGB tool, lighten the tops and sides of hair where sunlight would actually beam down upon. |
| Shoes are fairly easy. Here is a simple pair. Make sure you make another layer, and draw the outline simular to what i have drawn here. |
| Fill in the shoes with a ligher color, then mirror it around so you dont have to draw the same thing over again, and your finished. |
| This is the finished product. Put your finishing touches on it, by adding jewerly or other details. (i added a bow to the shirt and some buttons along the jeans. |