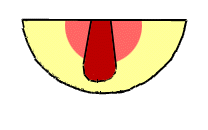
Paper Bag Puppets
Materials
Small paper bags (lunch size bags)
Construction paper
Crayons or markers
Scissors
Glue (white glue or glue stick) |
| 1. Fold a 9" x 12" piece of construction paper in half to
make two sections that are 6" x 9". Cut on the fold. |
| 2. Fold one of the 6" x 9" pieces in half to make two 4 1/2" x 6" sections. Cut on
the fold. Turn the paper horizontally and either round off the bottom two
corners or use the pattern on the Paper puppet accessories page to
make the inside of the mouth. If desired, you can color the inside of the
mouth pink or red, or cut an inner mouth, tongue and even teeth from
construction paper and glue them in place. |  |
| 3. Place the paper bag flat on the table with the open end towards
you and the folded bottom section on top. Without unfolding the bag, lift the
bottom section up. The bottom section forms a flap which will be the part
of your puppet's mouth that moves.
4. Spread glue all over the back of the inner mouth piece and position it so that the
straight edge is even with the line formed where the bag flap folds. |  |
| 5. Turn the unfolded 6" x 9" horizontally and round off the upper corners.
This is the top of the puppet's face. Glue or color eyes, ears, nose, stripes and other facial features.
6. Glue the face section to the bottom of the bag with the straight edge
even with the edge of the bag flap. Trim off any extra paper on the inner mouth
piece that might stick out farther than the face. Allow the glue to dry thoroughly before using your puppet.
| 
|
| 7.To use your puppet, place your hand inside the bag with your fingers
curved inside the bag bottom flap. Move your fingers up and down to make
your puppet talk.
 
To All-purpose Animal Arm
To Puppet Index
|


