3. Operating Procedure
3.1. Loading Film
The camera can be loaded in light.
*Note - Preferably film should be loaded and unloaded in subdued lighting conditions.
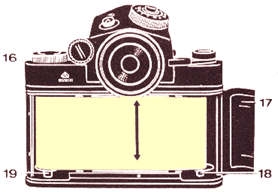
Depress the button 25 (previous page) located on the lower cover and slide it forward in the direction of the arrow to open the cameras back.
This is a lock and catch arrangement that even though it is simple it works reliably.
Pull locks 22 and 24 up by the clips , turning them counter clockwise and fix them in this position.
This will bring centres 18 and 19 down so that there is more space to fit the film spools.
Insert the take-up spool into the right hand film chamber making sure that the grooved hole in the spool is correctly fitted onto its winding spindle.
Holding the spool , engage the lower film spindle 18 into its hole by turning lock 22 clockwise.
Tear the paper tag off the leader of a new film roll. Insert the new film roll into the left-hand chamber of the camera.
In a similar way to the take up spool fit the film into its correct position and release the spring film lock 19.
Hold the spool and leader with your hand to prevent it from accidentally unrolling.
If this is allowed to happen the new film will be exposed to light and ruined.
Thread the leader end into the take-up spool and turning the spool wind the leader onto it until the mark on the leader aligns with the red index on the camera housing.
*Note - Different films and spools may have a slight variation in design but usually it is simple to work out hole to attach the new film leader to to the take up spool.
To get 12 (16 in 645 versions) pictures on the film and to ensure correct operation of the frame counter and film transport system observe these IMPORTANT rules:
- when loading wind the leader tightly on the take-up spool;
- take measures against leader cocking, creeping over the spool flanges or crumpling leader edges;
- cocking the shutter, take care to bring the lever to the stop in one motion (do not cock the shutter, making several small turns of the lever).
Close the back pressing it to the camera until a click is heard.
3.2. Preparing for Shooting
Make three blank shots to wind the leader onto the take-up spool. After the shutter is cocked the next time figure "1" will appear in frame counter window 11 which corresponds to the first frame on the film.
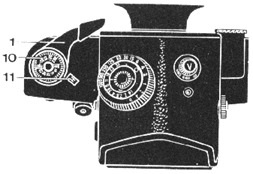
Set the film-in-use speed on scale 10 , proceeding as follows: holding lever 1, turn the disk with scale 10 until the film speed number aligns with the index.
On early production Kiev60 's with this scale is printed in yellow and green , the film speed scale is given in units of GOST and DIN.Latest production Kiev60 's have this top in black , in this case the film speed scale is in conventional ASA format.
*Note - There is NO connection between this ¨film in use¨ scale and the camera in any way. It only purpose is to remind the user as to what type of film (and its speed rating) has been fitted.
3.3. Shooting
Shooting with the camera consists of the following steps:
- shutter cocking and transporting the film to the next frame;
- determining the exposure time and a suitable aperture setting;
- setting the shutter speed;
- setting the lens aperture;
- focusing;
- view finding;
- shutter release. (*Note - MLU modified versions allow the mirror to be pre-fired before the shutter is released)
Cock the shutter by turning lever 1 up to the stop. If the shutter is cocked fully, the lever will automatically return to the initial position, if not, it will remain in an intermediate position (in this case it should be additionally cocked) An incomplete cocking of the shutter should be avoided as it may upset the film spacing on that frame.
*Note - Winding should be done in ONE smooth , slow and firm action all the way around to the levers stop.
At the beginning of cocking the shutter a slight force that needs to be applied to the lever may be felt. In cocking the shutter the film is wound through one frame and the next number appears in the frame counter window.
When determining the exposure time with the TTL viewfinder it is done with the shutter being cocked.
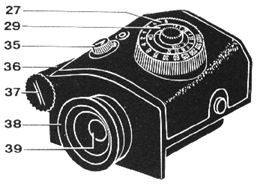
For determining the exposure time , set the speed of the film loaded into the camera by turning knob 31 until the film speed values in units of GOST and DIN or ASA appears in windows 32 and 28.
Turn scale 29 until the appropriate lens F value coincides with the indexing arrow. 30
The lens speed means the number corresponding to the maximum relative aperture. For example, for lens MC Volna-3 2.8/80 = 2.8.
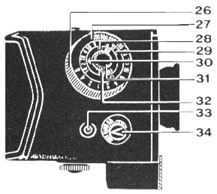
For determining the "Shutter speed + Lens F" pair corresponding to the shooting conditions do the following procedures: check the power level of the power source by turning knob 35 until index 34 coincides with position CB / "check battery".
The signal should light in window 33. If it does not light it is necessary to replace the power source:
*Note - Later production TTL meters that have a slide ON switch with ¨auto-OFF¨ do not have this battery check.
Current consumption is reasonable and battery life may be over 1 year.
- turn on the exposure meter setting knob 35 into position ON; (*Note - or slide ON)
- initially compose your shot through the viewfinder through eyepiece 39 . Inside the viewfinder eyepiece you will see one of red lighting signals: O - Under Exposure or * - Over Exposure. Slowly turn ring 26 until BOTH O and * indicators are LIT ;
- choose the "Shutter speed + Lens F" pair which is necessary for shooting based on the speed calculator scale 27 and by the aperture scale 29;
- upon determining the exposure time turn off the exposure meter , for this purpose turn knob 30 to position OFF.(*Note - Later models of TTL will turn off automatically after a few seconds)
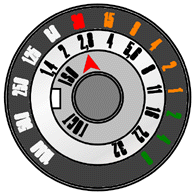
Set the chosen "Shutter speed + Lens F" values on the camera shutter speed dial and on the lens aperture scale.
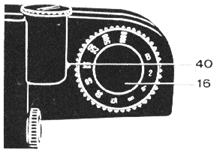
Exposures may be set both with the shutter released or cocked by turning speed knob 16 until the selected speed aligns with index 40 on the top cover. Setting of exposures from 1/ 1000 to 1/60 s with the shutter released requires somewhat more effort than when the shutter is cocked.
The manual exposure "B" setting can be set if desired by turning the knob clockwise only.
Set the lens aperture by turning lens ring 13 until the selected value aligns with the index on the stationary ring. The scale is fixed at all diaphragm values.
Focusing for sharp images is by either the ground-glass surface , micro-screen with wedges by turning the focus ring 15. Focusing can be carried out only when the shutter is cocked as that is then when the mirror is in its working position and the diaphragm is fully open.
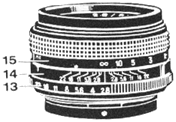
Depth of field can be determined by the distance scale with the aid of additional scale 14. Depth of field can also be checked by observing the image details on the ground-glass surface in the viewfinder after depressing lever 20 down to the limit of its travel. The lens will then close down to the selected aperture opening as selected on the lens. After the lever is let go, it will automatically return to it's initial position and the diaphragm will fully open again.
View finding can be carried out by the use of the viewfinder hood or the TTL prism as desired.
To replace the TTL prism viewfinder with the viewfinder hood proceed as follows:
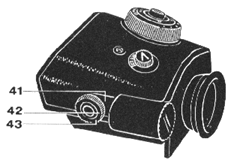
- turn ring 43 clockwise until it aligns with indexes 42 and 41. Depress both lock buttons 12 and lift the TTL prism viewfinder up;
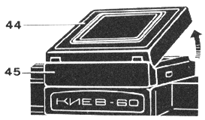
- set the viewfinder hood 45 on the guide pins making certain that it is well secured on the camera.
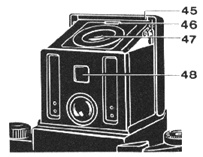
Open the viewfinder hood , lifting the front wall 44 in the direction of the arrow illustrated in the digram below. When in its upright position the front wall of the hood is locked , the sides and rear walls are automatically folded down. When lock lever 46 is shifted up, viewfinder lens 47 is set to the working position.
Upon completion of shooting with the aid of the viewfinder hood, press the viewfinder lens wall to the front wall of the viewfinder until the indexing lever snaps it in, then fold up the side walls (first left-hand, then right-hand), then the rear wall, and holding the latter, return the front wall into its closed position.
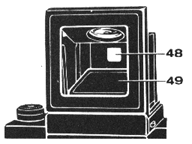
In action shooting (such as sports photography) the viewfinder hood can be used as a simple frame viewfinder. The window 48 in the rear wall of the viewfinder hood will serve as one frame and the window in the front wall for the other frame. Normally closed in the non-working position with cover 49 , when the cover is depressed it will fold down and lock into position revealing the front framing window.
When shooting with the frame viewfinder , focusing is done with the use of the printed distance scale on the lens itself 15.
*Note - Use of telephoto lenses will provide an image of tighter angular proportions to that which is shown in the frame using this method of viewfinding.
To fold down the frame viewfinder depress the wall of eyepiece lens 47 , in this case cover 49 will return to its initial position.
After folding down the frame viewfinder , close the viewfinder hood as explained previously.
To release the camera shutter , gradually depress press button 4 all the way down. During this action the lenses iris will be closed down , the mirror will automatically rise and the shutter operates.
*Note - Keep the button depressed untill the whole shutter cycle is complete.
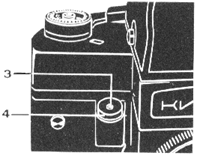
Shooting with exposure durations in excess of 1/30 sec should be performed with the aid of the tripod. The tripod socket in the camera is provided with the 3/8" thread. The shutter can also be released with the aid of a cable release that screws into the release knob 3.
3.4. Unloading film from the Camera
Shooting can be carried out until the "K"-letter (end) appears in the frame counter window , which indicates that the film is used up and no more frames are available. It is then necessary to wind the remaining paper leader onto the take-up spool with the aid of the shutter cocking lever. After ¨K¨ is displayed the shutter cocking mechanism is disconnected and the shutter release button need not be depressed each time after cocking during this unloading process.
When the remaining film and after leader (trailing paper) has been transfered onto the right hand spool the force applied to the cocking lever diminishes. Open the back of the camera , remove the take-up spool complete with the used film.
*Note - Take care so as not to let the film unroll when removing it from the camera and be sure to apply the adhesive tab.
Store the film in a dark , dry and cool place until processing.
next page in this Manual