We had previously lived in a small flat, and then in rented accomodation, so we were glad to have the opportunity to purchase a solid, yet tired, early 20th century suburban semi-detached property, at a time that we could still afford to!
It offers us the opportunity to vastly improve the property in a way that is in keeping with the principles of sustainable living.
1. Minimise energy consumption by using efficient appliances and better insulation.
2. Minimise water consumption, and reuse rainwater and grey water
3. Make better use of renewable resources and solar gain
4. Build to last, not just for short term profit
5. Use recycled materials wherever possible
6. Avoid materials that use connsiderable energy in their manufacture or transportation
7. Minimise waste by recycling and composting
Since moving in, we have redecorated the living room and insulated and boarded the loft space. However career pressures meant that it was not until Spring 2004 until we could finalise our improvement plans, and then a further year before construction actually started. Construction was almost complete by August 14th, sufficient for me to host my 40th birthday celebrations.
Construction
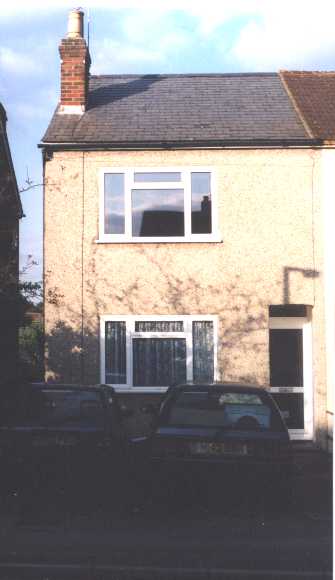
The house is of solid brick construction with a Welsh slate roof. It is typical of countless others in this area, built in 1904 at a time of suburban expansion of the towns surrounding London.
Redhill took off in 1845 when the railway reached the town. Redhill is on the junction of the main line to the south coast from London, and the east-west line from Reading to Dover. Monson Road is half a mile north of the town centre just off the London road. We are 19 miles due south of the centre of London.
The previous owner added gas central heating and double glazing, and a proper bathroom built in the late 1950's replaces the original outside toilet.
Previous attempts at modernisation in the 1960's have left the interior somewhat lacking, with woodchip wallpaper on almost every wall and polystyrene ceiling tiles on almost every ceiling. Fortunately most of these eyesores are being removed now.
As of June 2005, we have almost completed an extension to the rear of the property that provides a much larger kitchen, a utility room and a modernised bathroom.
It also fills in the back quarter, which being north facing, tended to be cold and dull, and greatly improves the overall standard of insulation at the back of the house.
Our main aim is to modernise the house in such a way that is sympathetic with the ideals of suburban sustainability, reduces our reliance on rising cost gas and electricity, and provides a modern home that is more suited to a 21st century lifestyle rather than a mid-20th century one.
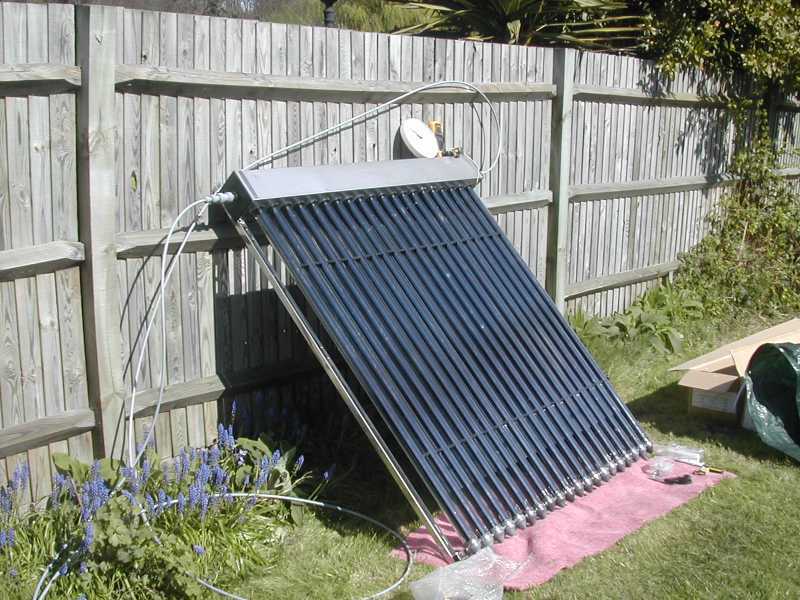
In August 2005 the extenson was nearly complete and the new condensing gas boiler installed. Solar water heating panels (Navitron evacuated tube system) was installed in June and is working well, reducing the requirement to use the gas boiler for water heating.
Although solidly built and benefitting from gas central heating and double glazing, there are several key area of improvement, particularly related to the heating system and the standard of insulation.
1. Almost no loft insulation. Remedied with 150mm layer of rockwool throughout loft space in September 2000.
2. Hot water cylinder insulation was inadequate - new jacket fitted, eventual replacement in August 2005 with modern insulated efficient cylinder. New, additional 200 litre cylinder to be installed as heatstore for woodstove and solar water heating panel.
3. Heating system is 30 years old and consumes 6 to 8kWh of gas just keeping the pilot alight. Replacement with modern condensing boiler in August 2005.
4. Many of the hot water pipes pass underneath plasterwork or through concrete floors. Re-routing of these pipes with adequate pipe insulation fitted was done in May 2005 when we did the plumbing work for the new kitchen and bathroom extension.
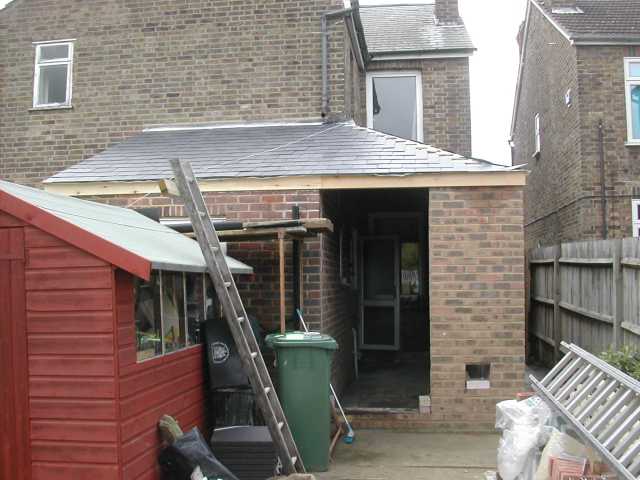
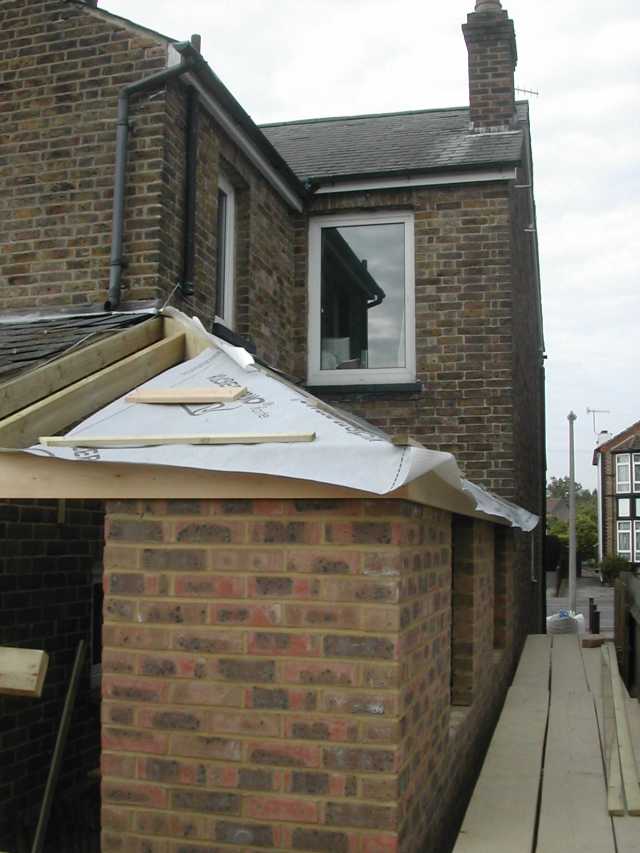
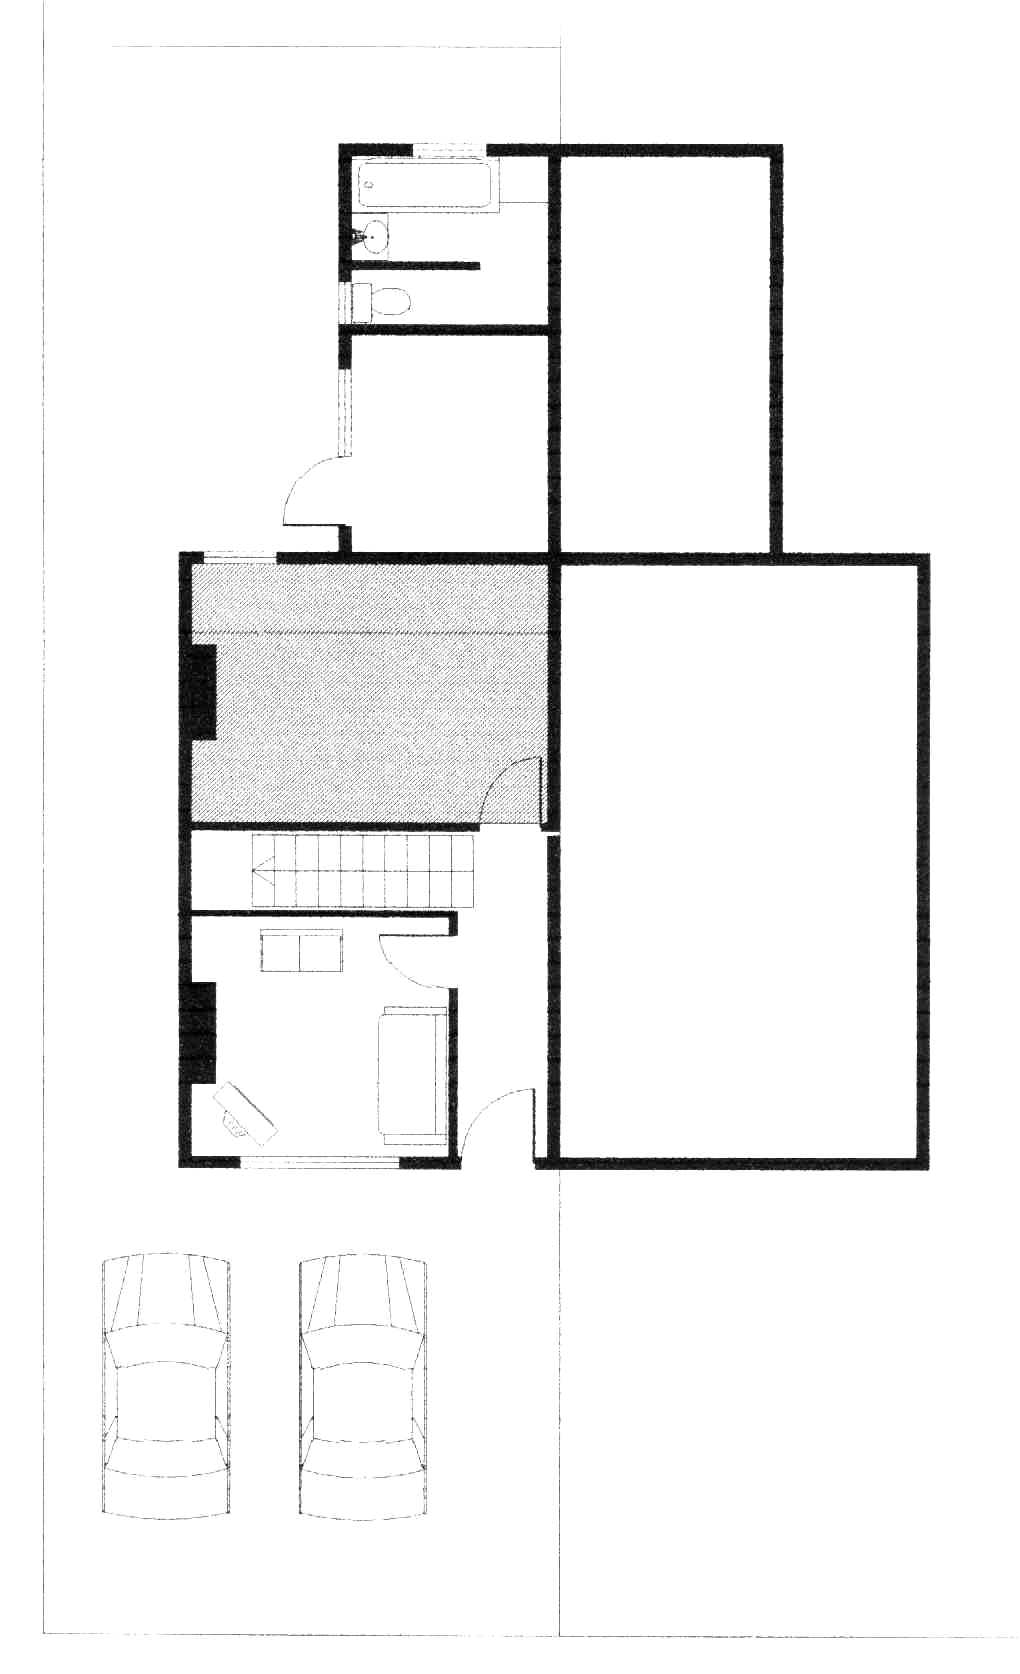
This has been a long time in the planning! It provides a simple, single storey extension of size 2m x 5.8m to the back of the house where the back was cut away.
By knocking through from the existing kitchen, it immediately extends the kitchen from 9' x 8' to 9' x 14.5' and adds a 6' x 10' utility room.
More importantly it replaces the solid 9" outside wall with a new wall ofbrick face, 75mm cavity filled with rockwool and thermal concrete block inner wall, greatly improving the thermal insulation.
It also gives an opportunity to fully insulate the floor, using 100mm of Celotex insulation, then a 75mm screed floor containing the underfloor heating pipes.
This effectively removes the old 7" step down into the kitchen and brings the kitchen and bathroom up to modern standards of insulation.
The underfloor heating is fed directly from the new efficient condensing boiler, (Worcester Bosch 24kW) replacing the 30 year old back boiler and gas fire. This immediately save me 6kWh of gas by not having to keep a pilot hight burning.
A wood burning stove with back boiler will be installed in the living room in the Autumn, to offset the heating from gas to wood.
Additional windows have been added to the gablewall of the livingroom. These provide much needed extra illumination.
The roof of the new extension is fully insulated with 100mm of isulation laid between the ceiling joists and a further 150mm of rockwool applied over the top of the joists giving a full 250mm or 10" of insulation. At the same time the old bathroom was re-roofed and had the same method of insulation applied.
The separate WC and bathroom were knocked into one room to make a spacious 2.4m x 2.4m (8' x8') modern bathroom with economical solar heated shower.
All plumbing was renewed and re-routed so that the hot pipes could be properly insulated and no longer run underneath the cold concrete floor or set into the plaster of the walls. Such was the previous heatloss from the hot supply, that it required about 4 gallons of wter to be run before the tap would run hot. A total waste of heat and water.
Provision has been made for collecting and re-using rainwater and grey-water, for garden watering.
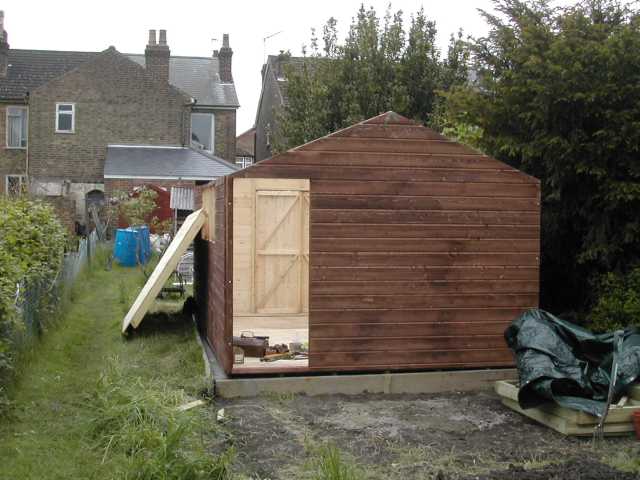
A service duct containing heating pipes (22mm MDPE insulated pipe), power cables and communications wiring leads from the back of the extension to the new workshop. The 6hp Lister engine running on waste vegetable oil in the workshop/engine shed will provide both heat and power to supplement the house.
1 Minimise Energy Consumption
In order to get some idea of the existing energy consumption of this property I have been recording the gas and electricity consumption figures for the last 5 years.
Gas (kWh) Electricity (kWh)
2000-2001 30910 2251
2001-2002 24044 2596
2002-2003 26249 1702
2003-2004 21477 4108
2004-2005 20030 3902
5 year Average 24453 2911
Note that to produce 1 kWh of electricity uses about 3 to 4 kWh of fuel (usually coal or gas in the UK) at the power station. Multiply the electricity consumption figures by 3 to obtain a more realistic figure of the true energy consumption.
Targets: 30% reduction in gas to 14000 kWh per year. 37.5% reduction in electricity to 1825kWh per year, or 5kWh per day.
Between 6 and 8kWh were being used each day on the boiler pilot light. A modern boiler with electronic ignition eliminates thes wastage.
During the summer of 2004 when the boiler was out of action, the gas consumption attributable to cooking amounted to 2.2kWh per day.
It is good to note that the gas consumption figures are generally reducing, but the electricity consumption is rising. There are two reasons for this:
One of the reasons is that I spent a year working in Birmingham between April 2002 and April 2003, and so for much of the week I was away. Without my PC running, the electricity bills are much reduced. Elaine also likes the heating a bit higher than I do, so that explains the slight increase in gas consumption for the period I was away!
In April 2003 I returned from Birmingham and started working from home, which meant that the house was occupied for most of the day, with a resultant increase in energy consumption.
My desktop PC remained on for much of the day and amounts to 1kWh for every 6 hours of operation. A PC left on 24 hours a day will consume 4kWh per day, effectively doubling our base load consumption. Use of a modern laptop will reduce this to just 50W or 1.2kWh in any 24 hour period.
In April 2004, the gas boiler refused to light due to a faulty gas valve. We used the electric immersion heater for most of our water heating until October 13th 2004. This consumed an additional 3 to 4 kWh of electricity per day, but clearly we used very little gas except for cooking and the occasional use of the gas fire.
How to Improve on these figures.
1. Don't use electricity for water or space heating. This includes electric fires, immersion heaters, electric showers and even kettles. These are all high wattage devices and consume a lot of power.
2. A typical modern desktop PC will consume about 150 watts. A modern laptop will use about 1/3rd of this. Switch off the PC and monitor when not in use.
3. Fit low energy compact fluorescent lamps to all light fittings. These use 1/5 of the electricity of incandescent bulbs and will pay for themselves within 300 hours of operation.
4. Try to purchase appliances that have the best energy rating "A". If you are using old appliances, make sure that fridges and freezers are kept defrosted and possibly consider adding additional external insulation. This can improve power consumption by up to 30%
5. Dishwashers consume unnecessary gallons of water and then heat up cold water to 90 degrees C. Either wash up by hand - or plumb the dishwasher into the hot tap, having set the hot water temperature to no more than 60 degrees.
6. During the summer months, consider using solar water heating to provide your domestic hot water. Low cost DIY kits are now available starting at around �400. This will considerably reduce your gas bill during the summer.
7. Use efficient gas heating and underfloor heating to minimise on electricity consumption. A modern condensing gs boiler can run at close to 90% efficiency, compared to about 65% for a 30 year old backboiler. Use modern efficient radiators or consider hot water underfloor heating where appropriate.
8. Turn down the central heating thermostat, 20 degrees C is generally sufficient for most homes.
9. Fit thermostaic radiator valves and set them to suit the temperature required on a room by room basis. Bedrooms generally require less heating than living rooms. TRVs are available at all DIY stores for less than �10 each (Try Screwfix or Wickes for bulk saver packs)
10. Wherever possible, increase the amount of insulation in the walls, ceiling, floor and loft space.
11. Consider installing a woodburning stove with a backboiler to provide some of your space heating. Not only are these cosy in winter, but they use renewable fuels and will help to reduce your reliance on fossil fuels.
Water is a valuable resource and often relies on ancient infrastructue to pipe it to our homes. My water main was laid in 1890, and ironically as I type this, there are two guys up to their shoulders in a trench trying to fix a leak and replace the old lead main!
As much of the infrastructure was put in place during Victorian times when consumption was much lower (fewer people, less wasteful appliances) the service is now creaking and groaning.
The best way to save water is to have a meter fitted! A little controversial but it focusses the mind as to the true consumption and then it becomes a challenge to reduce your monthly readings.
1. A shower uses about 1/3 of the water of a bath
2. You can was dishes in 2 gallons of hand hot water, not the 10 gallons consumed by the average dishwasher.
3. Use the economy programme on your washing machine whenever possible.
4. Install a low flush or dual flush toilet cistern , or consider using the grey water from the bath and shower to flush the loo. Alternatively place a couple of bricks in the cistern. A solid house brick dispalces close to 2 litres of water.
5. Use grey water for gardening purposes.
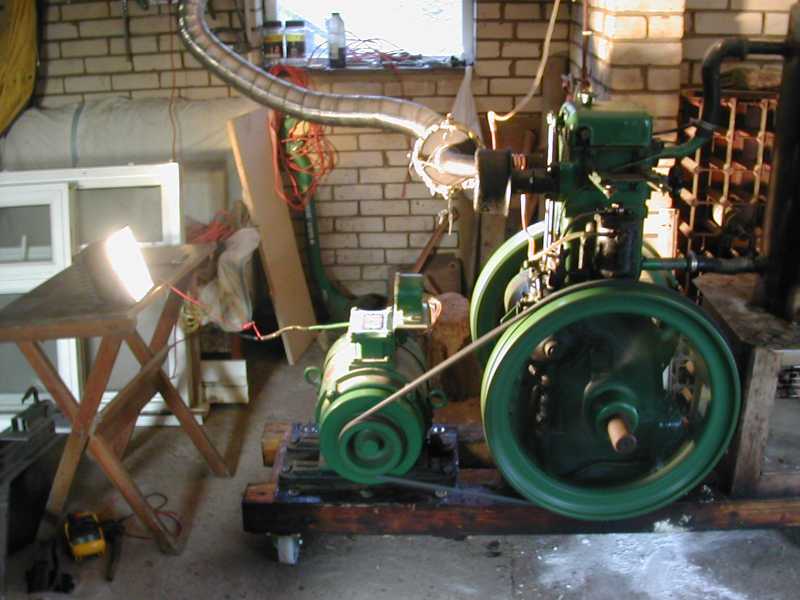
1 litre of vegetable oil will provide 2kWh of electricity and between 8 and 10kWh of waste heat.
It will be run for a few hours per day in the winter time and contribute to the general heating of the house and workshop.
The extension uses underfloor heating underneath a large slab of concrete, and this is plumbed directly into the waste heat output of the Lister engine.
A 200 litre water tank also acts as a 16kWh heat store and is to be supplied from the Lister, the woodstove and the solar water heating panel.
Windows that face from south east to south west will receive the majority of the direct sunlight. This is often reflected in house design where southerly windows are large and those towards the north are kept as small as possible.
If possible, downstairs rooms fitted with south facing windows should have solid insulated floors to act as a large thermal mass to absorb as much of the incident solar radiaton as possible. In summer these rooms may become uncomfortably hot and stuffy, but could be fitted with blinds to reduce the sunlight or with a ducted ventillation system to circulate hot air from near the ceiling replacing it with cooler air from the other rooms.
If the back of the house faces south, then there are options for solar porches or conservatories, which help to preheat the air in winter and the cooler spring and autumn months.
Solar Water Heating.
This has been around for about 30 years now and is a mature technology. Low cost DIY kits from China have recently appeared on the market, using evacuated tubes. Kits for a 2m2 panel of 20 tubes now start at around �400, and a DIY installation can be done for a total of about �600.
On fine days from April to October, such a system will heat a 110 litre tank of water to around 65 degrees C and may be sufficient to allow you to minimise your boiler usage.
Other Renewables
Whilst solar water heating is a practical possibility on most private homes, wind power generally is not. Photovoltaic panels are also available but are still very expensive and unlikely to replace the power drawn from the grid.
A more practical proposition is to consider fitting a woodstove with accompanying water jacket. Whilst this may not entirely replace your gas or oil fired central heating, it will reduce your total dependency on fossil fuels, by perhaps as much as 50% during the winter months.
Woodstoves require a fair amount of effort in collecting suitable firewood, lighting, and cleaning, but if you are prepared to work at it, it could save a fortune in gas at a time when gas prices are rising sharply..
1. Heating and Insulation
Efficient gas central heating provided by a modern condensing gas boiler.
Replacement of old radiators with more efficient double convector units and substantial underfloor pipe insulation.
Class 3 Insulated hot water storage cylinder to replace the badly insulated existing unit.
100mm of rockwool insulation between the ceiling joists in the loft.
New kitchen and bathroom extension that effectively improves the overall insulation at the rear of the property.
Underfloor heating provided by hot water pipes buried in screed flooring. (Screed is a 3:1 mix of sharp sand (grit) and cement)
100mm of Celotex underfloor insulation throughout new kitchen and bathroom.
Re-plumbing the hot water system so that the heat is not lost to the walls and the sub-floor.
Kitchen cleaned, repainted and storage shelves fitted.
Extra storage shelves in bathroom.
Main loft insulated and floored in central part with 118mm tongue and groove chipboard.
Living room wall paper stripped, ceiling tiles stripped and ceiling plasterboarded.
Ceiling and walls given skim coat of finishing plaster.
Office area in back bedroom with PC, phone and fax.
Workshop and storage areas made in existing sheds.
In the mid 1950's it was commonplace to replace the traditional wooden sash windows with larger "landscape" windows often with metal frames. These wre notorious for condensation and were usually ripped out after 25 years and replaced with double glazing - in our case uPVC.
Unfortunately, the fitting of larger windows of different aspect ratio, wrecked the surrounding brickwork and so the solution was to cover the brickwork with pebbledash. This was a mortar mix applied over the bricks with pea-shingle gravel trrown at it. The result is ghastly and prevents the brickwork from breathing naturally.
Sadly these "improvements" done by the previous owners are almost irreversible and have spolit the original character of the house.
So sadly, in order to make good some of these misguided - now unfashionable improvements there is a cost of about �1000 per room to get back to a good starting point.
What will the next generation be saying about the likes of Lawrence Llewellyn-Bowen et al, in 35 years time?
The house was built in 1904 by a builder called J. Farmer. He built four pairs of semi-detached houses on a plot of land he aquired from the United Land Company in about 1880 - when the land around this area was first sold off for development. The plots are long and thin about 240' x 20'. 75m x 6m.
There was a stream at the bottom of the garden but this was put into a concrete culvert pipe about 20 years ago,to minimise the re-occurance of flooding.
The house is of traditional brick construction - 9" outside walls and a Welsh slate roof. The roof is pitched on conventional 4" x 2" rafters and so there is a lot of loft space. Ceilings are lath and plaster which was common until about 1920. The floors are suspended on standard floor joists and the boards are nominally 6". There is a 2' 6" sub-floor space.
The kitchen and the small back bedroom above it almost appear to be an afterthought - although this was common around 1900 to take a standard 2 up, 2 down design and build a bit on the back to provide a proper kitchen. Earlier properties would have had no kitchen and meal preparation would have been done in the scullery or back room over a coal burning range.
There is evidence that there has been a range in the kitchen from the chimney flue on the back gable end wall.
The kitchen is on a solid uninsulated concrete floor and is a 7" step lower than the usual wooden floor level. Likewise the back bedroom also has a 7" step. This was to save time digging a basement. Heatloss from the back of the house is considerable, and so it is a primary intention to rectify this when the extension is under construction.