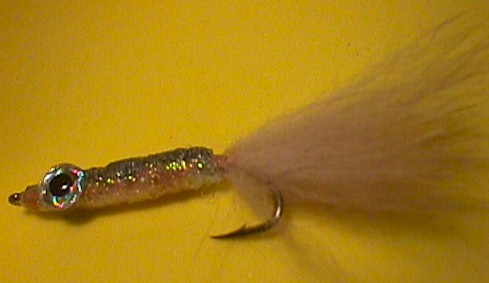
Tying Directions:
- Start by tying in a tuft of fur for the tail. I like fox body fur, but
any fur would probably work just fine. I first tied this pattern with a marabou
tail, but found that it was simply not durable enough.
- Add, a couple of strands
of Krystal Flash to each side of the tail to add some flash.
- Now, tie is a 3-4
inch piece of the plastic canvas needle point yarn right at the tail, and
advance the thread to the eye of the hook. (The plastic Canvas needlepoint yarn
is manufactured by Rainbow Gallery and should be available at any craft store.
It is sold on a card and comes in several colors, but I find that pearl is the
most useful and it takes color well with markers.)
- Next, cut a 3/16" wide
strip of the thin foam packing material used for packing computers and other
electronic equipment. If you can’t find any of this material, go by any store
that sells electronics or computers and they should be able to give you several
lifetimes worth.
- Tie in the foam strip at the eye of the hook. Wrap the foam
back towards the tail, using even wraps that overlap each other. When you get to
the tail, wrap back up to the eye of the hook again, making a tapered body shape
as you go. DO NOT wrap this too tightly, as it will compress the air out of the
foam and your pattern will not float. Tie off the foam at the eye of the hook.
-
Now, smoothly counter-wrap the plastic canvas needlepoint yarn up to the eye of
the hook and tie it off. I will often color the back and sides of the minnows
with markers depending on the fish I am imitating.
- I use a small dab of Goop
adhesive to glue on the eyes. You can use the thin Mylar stick-on eyes, but I
prefer the 3D eyes. My experience with adding eyes to minnows and streamer
patterns strongly suggests that the addition of eyes makes a significant
difference in their effectiveness.
- I add a coat of Softex to ensure durability
from sharp teeth.
Notes:
This is a fairly simple pattern to tie, and is an absolutely go-to pattern
for me.
I devised this pattern primarily for largemouth Bass, but have since found it
very effective on virtually all species that enjoy eating their little cousins
for snacks. It is much easier to tie than the regular Mylar minnow pattern and
more versatile. I named this the Craft-Store minnow because of the material used
for the body comes from a craft store.
You can add a few wraps of lead as an underbody if you want a pattern that
sinks or has close to neutral buoyancy. In the very small sizes 10-12 hooks, you
can skip the foam underbody and use the plastic canvas needlepoint yarn to make
the body.
To fish this pattern, I use fairly steady, long (12-18 inch) strips. It is a
very durable and productive pattern. Occasionally an eye will fall off, but
another dab of Goop and new eye makes the fly as good as new again.