Extended HintsThe standard missions and exercises for this game are pretty self explanatory.  Missions are short challenges that test your ability to pilot vehicles and perform specific tasks. Missions are short challenges that test your ability to pilot vehicles and perform specific tasks.
 Exercises are longer challenges testing your ability to manage a park and complete a list of objectives. Exercises are longer challenges testing your ability to manage a park and complete a list of objectives.
 Site B, is only available after completing all missions and all exercises. Site B, is only available after completing all missions and all exercises.
Missions: 1). A Picture is Worth 100 Points - Photo Safari Tour 2). When Carnivores Attack - Retire all Carnivores 3). Time to get moving - Muster herbivores to safe zone 4). Dinosaurs and weather.- Photo Safari Tour - Weather 5). Rescue the President - Retire all Carnivores and perform a rescue 6). Danger Club Safari - Photo Safari Tour - High Thrill 7). Rescue Hammond - Safari Transport and Rescue 8). Clean Up Operation - Disable Hatcheries and Retire all Carnivores 9). The Amazing Maze - Muster 2 herbivore herds through a maze 10). Jurassic Calendar- Photo Safari Tour - High Diversity Exercises: 1). Welcome to Jurassic Park - Basic Controls 2). Dino Origins - Excavate and hatch 1 Dinosaur 3). What Visitors Want - Implement amenities and attractions 4). Safe and Secure - Install a Ranger station 5). Open Range Safari - Exhibit open range herbivores 6). Jurassic Classic - Create high authenticity Safari Tour 7). The Lost World - Repair a damaged Park 8). Dangerous Abodes - Create high thrill Safari Tour 9). Any Port in a Storm - Create a 3 star park in 3 years Hints: In missions 2, 5, and 8 you have to retire all Carnivores within a certain time limit. One tip is to shoot only the small Carnivores (Velociraptors) first, since many of them will be "retired" by the large carnivores (or they Zap themselves) during the course of the mission anyway. (They'll do some of the work for you). Mission 6 (Jurassic Classic ) - Create 70% high authenticity exhibit. This mission can be a bit misleading. You are given an "Objectives" list of dino's to be included in the park, yet there are more species available than is required. If you'll notice though not all specimens are from the same period. :-). Even if you have one of each species in the Safari Tour, some need to be separated or eliminated from the main exhibit to increase your Authenticity rating to 70%. Mission 6 - Time to Get Moving Muster a herd of herbivores to a safe zone Contrary the manual, for "Muster", you have to go to Utility Mode (Right Click) and then left click (for Muster). Muster sends out a pulse that "sheperds" dinosaurs. 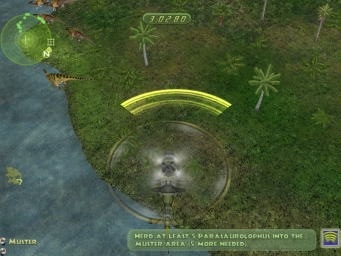
Mission 9 - Any Port in a Storm (the final mission) Build a 3 Star park in 3 years. The main challenge of this mission is you get bombarded with Twisters. My first try, I got hit with 7 Twisters in the first year. On my "second" attempt :-) I didn't build anything until I had all tools and resources available, then built it all at once. Bingo! It hit 3 stars almost immediately. No sense building a lot of stuff when it will only be destroyed. (I opened a very small -easy to fix- park and invested everything in research, or anything that couldn't be trashed). After getting one of each (premium) research and dna, I finished the park and it actually only took about 2 years. 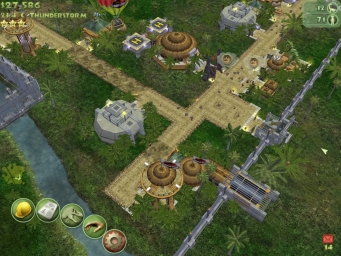
* Build a Visitor's Shelter first, make sure they're within "fleeing" distance. ** If a guest gets "flung" by a Twister, it completely ruins your rating and budget. (Save often). *** Balloon Tours will not operate in bad weather, (I put one in anyway). I also made sure to invest in at least one Large Carnivore exhibit (a T-Rex). and to unlock Judith River early enough to get one. At 2 1/2 stars, the last attraction I added was a viewing dome in the T-Rex paddock. As soon as it was installed - mission accomplished. 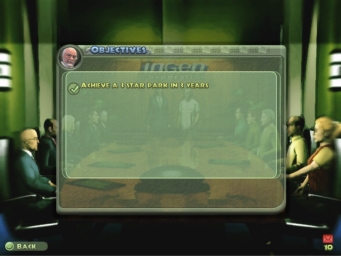
How to make a 5 star park. Your final solo mission. Basically, what I did was build a main path in one giant cross, and divided the island into 4 sections, keeping each period (Jurassic and Cretaceous) separate. 
Installed 4 of every amenity and attraction. (with a few extra vents, towers and security around the carnivores). I also had at least 1 of each dinosaur. * On the first attempt some dig sites (the Trike:-)) may only yield partial DNA. Some sites should still yield fossils even after reported as "exhausted". (just keep diggin') For the Carny's, I had to cordon off one extra paddock to separate the final 3 Jurassic Carnys (Cerot, Dilo and Allo) from the Cretaceous. 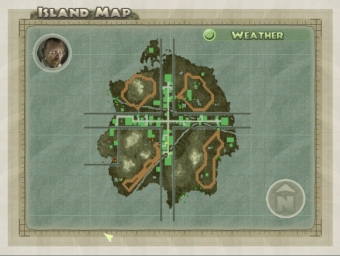
That's it. You're not really supposed to have a Safari Tour in the T-Rex paddock :-), but... The screen fades to black, then Hammond appears and congratulates you on your performance. 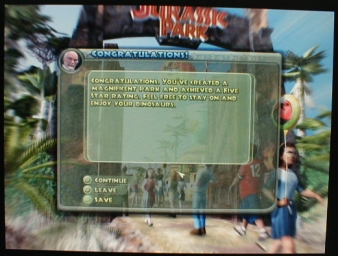
Good Job Ranger! 
Happy Peeps. 
Good Night Jurassic Park. As it appears there is no easy way or mod yet available that starts a new Island with all Dinos at 100% DNA, the next best thing is the Mr. DNA command Set all DNA to 100% (extracted dinos only) ] up ] right [ down 
A quick solution for fast inventory (requires money and time hacks): * Set all research and dig times to fastest. * Buy 9 dig teams (or more), place one at each dig site. * Go back to the extractor and "sling bones" for a few minutes until you have at least a partial DNA sample from one of each dino. click off all selections, then use the Mr. DNA command. Save it! :-) 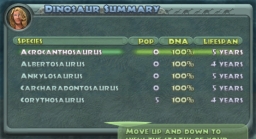
I like beginning a new map with all resources already available. Sequencing is kind of fun the first few times, but after a while it should just be optional. |