|
*Graphics NOT for download* |
|
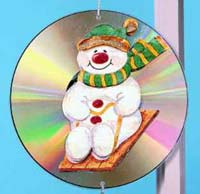
~*~ CD Sun Catcher ~*~ |
|
Send me your comments and/or suggestions. Contact the Webmistress: RJ McKinney Created by RJ McKinney for fun and entertainment |
 |
 |
 |
 |
| By: Paula Payne Crafts �n Things, July 1999 Materials * Small sharp scissors * Sewing needle * Pliers * Flame Source * Two CD's, 4-3/4" diameter. * Gift-wrap with repeating pattern. (Select a paper that has a clearly defined figure.) * Metallic silver tassel, 3" long. * Thin metallic silver cord, 4-1/2 inches. * Double-sided foam-adhesive pads, 1/8" thick. * Glues: wood; glitter glues in color complement design, two or three colors. Instructions Finished Size: 4-3/4" diameter Skill Level: beginner Time: less than 1 hour Finally! A great use for those un-playable CDs. The CD becomes a prism when exposed to sunlight, displaying the full spectrum of colors and reflecting color all over the walls. Kids will love them! (Note: Use wood glue to glue discs together; use craft glue for everything else.) With labels facing and edges even, glue discs together; let dry. (Front and back of disc is decorated in the same way.) 1. Cut five identical motifs from gift-wrap. Glue one full motif to center of disk, covering hole. Cut adhesive pads into small pieces; set aside. For a three-dimensional look, cut one feature from remaining four designs. For instance, cut only center of body from second design, leaving upper and lower body intact. 2. Attach body top and bottom to first design using adhesive pads. Cut another feature from third design and layer over second design and so on. Continue cutting and layering pieces to achieve a three-dimensional look, using adhesive pads as spacers between each design layer. 3. Embellish designs as desired with glitter glues; let dry. 4. For hanger and tassel holes, hold needle with pliers. Hold needle over flame to heat. When hot, push needle through center top and bottom of discs, 1/8" from edge. 5. For hanger, thread silver cord through top hole; tie cord ends together in an overhand knot. 6. Cut tassel hanger in half at fold; tie tassel to bottom hole. (Optional: To make your own tassel, follow instructions below. How to Make a Tassel If you don't want to purchase a tassel, and have floss or cord on hand, it's easy to make your own. (See Fig. 1.) Wrap cord around a 3" wide strip of cardboard 20 times. For hanger, insert a length of cord under wrapped cord at one folded edge. Tightly tie hanger cord in a know against wrapped cord. Cut cord loops at other end. Tie strands together in a bundle 1/4" from folded end (Fig. 2). Trim tassel ends even |
 |
 |