|
*Graphics NOT for download* |
|
~*~ Teacher Clay Pot ~*~ |
|
Send me your comments and/or suggestions. Contact the Webmistress: RJ McKinney Created by RJ McKinney for fun and entertainment |
 |
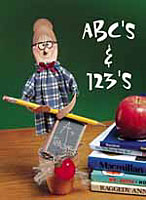
| By: Mary Ayres Crafts �n Things, September 2000 Materials * Wooden items: spoon, 10" long; large circle*; flat apple*, 1 1/2" tall; round plug, 1/4" diameter; dowel, 3/8" diameter. * Clay pot, 2 1/2" tall. * Framed chalkboard, 2"x3". * White craft foam, 6"x8". * Acrylic paints*: Mocha, Light Buttermilk, Cranberry Wine, True Red, Sable Brown, Hauser Medium Green. * Fine-line markers: black permanent, white opaque. * Blue plaid fabric, 1/4 yard. * Burgundy satin ribbon, 1/8" wide, 5" length. * Black craft wire, 20-gauge, 8" length. * Spanish moss. * Jute twine, 12" length. * Sharpened pencil. * White transfer paper. * Pinking shears. Matching thread. Wire cutters. *WoodsiesTM by Forster�, Americana� Acrylic Paints by DecoArtTM, and Zig� Memory System� white Opaque WriterTM by EK Success were used for this project. Instructions A shiny, red apple left on a teacher's desk will certainly bring a smile to her face, but a gift like this will let her know how much her work is truly appreciated. Take a break from the books and craft this smiling schoolmarm with your child to brighten the day of the head of his or her class. Write the teacher's name and the current year on the pot for a personal touch. Finished Size: 10-3/4" tall Skill Level: beginner Time: less than 2 hours 1. Paint the pieces. Cut patterns from Pattern Section, cutting along dashed lines. Use arms pattern to cut material as indicated. (Note: Use bristle brush to dry brush and round brush for everything else.) Basecoat the following: arms, spoon, and plug (nose) Mocha; circle (bun) Sable Brown; apple True Red. Use head pattern to transfer face and outline of hair to back of spoon (head). Paint hair Sable Brown. Transfer hair details to head and bun. Use black marker to draw hair details on head and bun, eyes, ears, and mouth. Dry brush cheeks True Red. Use toothpick to add Light Buttermilk highlight dots to each cheek. For apple, paint stem Sable Brown and leaf Hauser Medium Green. If desired, use apple pattern to transfer details to leaf and stem; draw details on apple with black marker. Use handle end of paintbrush to add Light Buttermilk highlight dot to upper right corner. Dry brush edges Cranberry Wine. Use Cranberry Wine to dry brush sides of chalkboard, lower edge of pot, and upper and lower edges of pot rim. Use black marker to draw dashed border around front of chalkboard, lower edges of pot, and upper and lower edges of pot rim. Transfer lettering to chalkboard; outline letters with white marker. 2. Assemble the teacher. To make dress, use pinking sheers to cut a 4 1/2"x6 1/2" rectangle from fabric. (Note: Sew with right sides facing in 1/4" seams.) Fold rectangle in half to measure 3 1/4"x4 1/2". Sew 4 1/2" edges together; turn dress right side out. Sew a gathering stitch along one 3 1/4" edge; slip dress over head so that seam is centered in back. Pull up gathers tightly around neck; knot and clip thread. Glue dress to body to secure. For sleeves, use pinking shears to cut a 4 1/2"x6" rectangle from fabric. Fold rectangle in half to measure 2 1/4"x6". Sew 6" edges together; turn sleeves right side out. Sew a gathering stitch along both 2 1/4" edges. Insert arms into sleeves so 2 1/4"of each arm extends from sleeve. Wrap thread around center of arms and sleeves where indicated on arms pattern to secure. Pull up gathers tightly around each arm; knot and clip thread. Center and glue arms to back of body below neck. Tie ribbon into shoestring bow; glue bow to neck of dress. For glasses, wrap wire around dowel twice, beginning 2" from wire end. Remove wire from dowel; press flat and wrap around face over eyes. Twist wire ends in back; glue to secure. 3. Finishing. Spread glue around bottom of body and into bottom of inside of pot; pack pot firmly with Spanish moss. Wrap twine around pot below rim; knot to secure. Cut twine ends to form 2" tails; separate fibers. Glue apple to pot over knot. Using photo as assembly guide, glue chalkboard to Spanish moss in front of teacher. Glue arms around pencil so teacher appears to be holding it. Add Your Own Touch . . . 4. Write your child's favorite teacher's name on the chalkboard and give the project as a gift. 5. Keep your child's school colors in mind when you choose the fabric for the teacher's dress. For more teacher's pet projects featured in Crafts 'n Things� September 1998 (School Bus Photo Holder, Greeting Cards, Super Job Note Holder), September 1996 (Stitched Box for Teacher, Book Lover Cuties), September 1994 (Painted Address Book, Pencil Teacher, Schoolhouse Wreath), send $13.90 to Crafts 'n Things�, Dept. C0900SCL, PO BOX 5039, Des Plaines, IL 60017-5039. Canadian and overseas, please add an additional $1. |
 |
 |
 |