Little Chicks Tutorial pg2
|
|
Please respect my rights as the creator of this tutorial and do not
download, duplicate, copy, upload to another server, or distribute it in
any other way, except in the form of a link to the Tutorial Index page. You may however Print
a personal copy out for ease of use while following it.
Welcome back
|
|
You have a body, now lets make a Head..
In the Layer palette right click on body layer...choose duplicate..
rename this layer to "head" go to Image/resize  choose:
percentage original 70%
Resize all layers Unchecked click OK.
now select mover tool  and
move the head into position. and
move the head into position.
|
 |
Beak...
make new layer name it beak. select preset shapes tool ,
select the red cone from the drop down menu. Settings retain
style checked, create as vector unchecked. ,
select the red cone from the drop down menu. Settings retain
style checked, create as vector unchecked.
place the cursor in your image and drag upwards to form a small wide
cone shape. you now have a beak.
|
 |
Just one more thing to
do...
using the retouch tool  set to round, in soften mode.. just lightly go over the top edge of
the beak to soften it.
set to round, in soften mode.. just lightly go over the top edge of
the beak to soften it.
don't forget to save :-) |
 |
Legs... new layer
name it legs. Select paintbrush tool  change brush size down to 10. (or whatever size you like). you can
also change the paint color to a darker yellow or orange. now draw
two simple legs. don't worry too much
about getting them in the right position as we can move the layer
when we've finished, just get a shape
you like.
change brush size down to 10. (or whatever size you like). you can
also change the paint color to a darker yellow or orange. now draw
two simple legs. don't worry too much
about getting them in the right position as we can move the layer
when we've finished, just get a shape
you like. |
 |
with your leg layer still active
go to Effects../3D Effects../Inner Bevel..
select the frame setting from the presets list, press OK.
you're legs are now finished. Just position them where you
want and in the layer palette place the leg layer below the body. |
 |
Wing..
new layer, name wings,
select paintbrush tool, change size to 25. paint in a rough wing
shape. select it using rectangle selection and clicking inside once
to close selection around your wing. Apply Kpt's FiberOptix
same settings as before, just remember to reselect your gradient if
Kpt's has reset it. |
 |
|
You now have a wing... back in
paint shop, right click on the
wing
layer in
your layer palette and choose Deselect.
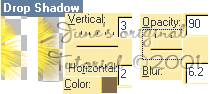
now apply a drop shadow, then place
this layer below your head layer in the layer palette.
now would be a good time to apply a drop shadow to your head layer
too.
don't forget to save :-)
|
 |
|
We're coming up for
the home straight now ;) just the eyes to go...
|
Eyes...
new layer, name eyes...
select preset shapes tool, scroll down and choose button 035, drag
out an eyeball shape. remember don't worry about position just get a
nice size. |

|
|
Iris
& Pupils... still on the eye layer...paint brush tool.. select a
color for your iris, I chose blue, size of your brush will depend on
size you made your eyeball. I used size: 12. click once on your
eyeball to place a colored spot for the iris.
Pupil... still with the paintbrush
tool, change color to black and reduce the size to suit your eye, I
chose 7. click once on top of you iris to create the pupil.... now
change the paint color to white reduce size to 2 and place two small
highlight spots either side of the pupil.. (refer to eye screenshot
for placement). when your happy with how your eye looks... duplicate
layer. and arrange your eyes and beak any way you like. |

|
You're
Finished! all
that's left to do is switch off the background layer and merge
visible. you can now save this image as a picture tube, or use it
any way you like. to save as a picture tube.. copy and paste
as new image. then file/export/picture tube.. name it and press
ok. your chick will then be available in the drop down menu of
your picture tubes to use whenever you need it.
If you now undo the layer merge on your main image you can play
around with the placement of your "chick parts" to come up
with lots of other chicks!
Thank you for bearing with me
and making it to the end of this tutorial:-) I would love to know
how you get on with it so please drop me a line ( and maybe a pic of
your new chick). |
 |
|
Bye for now &
Happy creating
~June~ |
| Tip: you can also save single
elements of your chick as tubes i.e. the eyes, furball body.. etc. |
|

