Braking system for Ford Sierra
General information and precautions
Bleeding
Master cylinder - removal, overhaul and refitting
Vacuum servo - removal and refitting
Deceleration sensitive valve - removal and refitting
Brake pedal - removal and refitting
Teves caliper
Front brakes for engines 1.8/2.0/2.3 with ventilated brake discs |
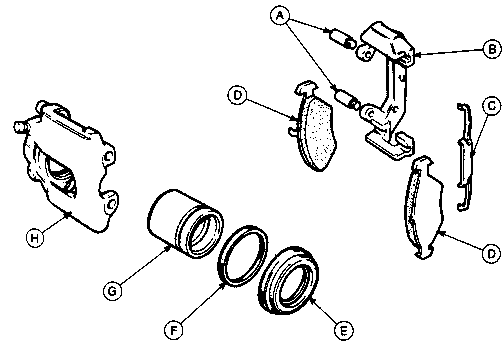 |
| A - guide bolts
B - caliper carrier bracket
C - retaining clip
D - brake pads
E - dust excluding seal
F - piston seal
G - piston
H - caliper |
Girling caliper
Front brakes for engines 1.6 with solid brake discs |
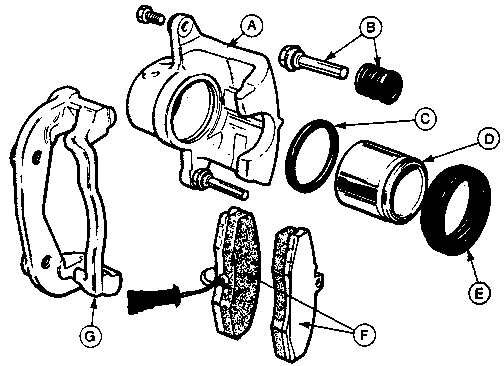 |
| A - caliper
B - guide pin bolt
and dust boot
C - piston seal
D - piston
E - dust excluding seal
F - brake pads
G - caliper carrier bracket |
Specifications
| Front discs | Rear discs | Rear drums |
| Diameter, mm | 240.0 * | 252.7 | 203.2 - 1.6
228.6 - 1.8, 2.0 |
Max. disc
run out, mm | 0.15 | 0.15 | |
Min. pad friction
material thickness,mm | 1.5 | 1.5 | 1.0 |
* 1.6 - solid; 1.8, 2.0, 2.3D, 1.8TD - ventilated
Inspection and replacement of the brake pads
1. The disc pad friction material can be inspected for wear without removing the roadwheels. Working beneath the vehicle, insert a mirror between the caliper and the roadwheel and check that the friction material thickness is not less than the minimum given in the Specifications - 1.5 mm.
2. If any one of the pads has worn below the specified limit (1.5 mm), the front pads must be renewed as an axle set (4 pads).
3. To renew the pads, slacken the front roadwheel nuts, apply the handbrake, then jack up the front of the vehicle. Remove the roadwheels.
4. Proceed as follows according to model:
Girling caliper (1.3 and early 1.6 litre models)
5. Where applicable, disconnect the wiring to the disc pad wear sensor. 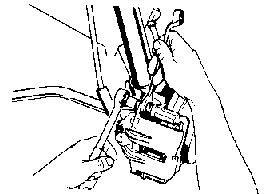
6. Unscrew and remove the bolt from the upper caliper guide pin while holding the pin stationary with a spanner (see illustration).
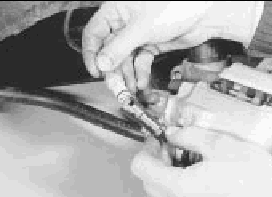
7. Swing the caliper downwards and lift out the disc pads. If the outboard pad is stuck to the caliper, free it using a screwdriver with the guide pin bolt fitted (see illustration). Do not use a screwdriver to free the inboard pad, as this may damage the piston dust seal. The inboard pad can be freed by hand after lowering the caliper.
8. Brush all dust and dirt from the caliper, pads and disc, but do not inhale it as it may be injurious to health. Scrape any corrosion from the disc.
9. As the new pads will be thicker than the old ones, the piston must be pushed squarely into its bore to accommodate the new thicker pads. Depressing the piston will cause the fluid level in the reservoir to rise so to avoid spillage, syphon out some fluid using an old hydrometer, a teat pipette or a syringe. Do not lever between the piston and disc. To depress the piston ideally a spreader tool, applying equal force to both sides of the caliper, should be used (see illustration).
10. Further refitting is a reversal of removal bearing in mind the following points.
11. If disc pads with wear sensors are fitted, the pad with the sensor wire should be fitted inboard.
12. Ensure that the anti-rattle clips are correctly located on the caliper.
13. Repeat the procedure on the opposite front brake.
14. On completion, apply the footbrake hard several times to settle the pads, then check and if necessary top-up the fluid level in the reservoir.
15. Avoid heavy braking, if possible, for the first hundred miles (~160 km) or so after fitting new pads. This will allow the pads to bed in and reach full efficiency.
Teves caliper (Later 1.6, 1.8, 2.0, 1.8TD and 2.3D litre models)
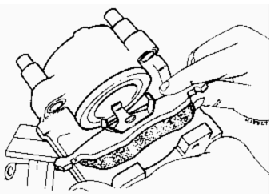
 16. Prise the retaining clip from the caliper. Hold it with a pair of pliers to avoid it causing personal injury.
17. Unclip the pad wear sensor from the caliper, and disconnect the wiring plug (see illustration).
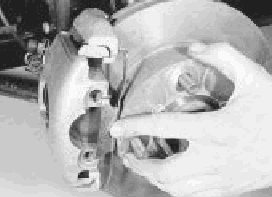
18. Using a 7 mm Allen key, unscrew and remove the two guide bolts securing the caliper to the carrier bracket, and withdraw the caliper (see illustration). Support the caliper on an axle stand to avoid straining the hydraulic hose.
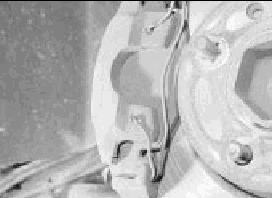
19. Withdraw the disc pads from the caliper (see illustration). It may be necessary to prise the outboard pad with a screwdriver to release it from the caliper. Do not use a screwdriver to free the inboard pad, as this may damage the piston dust seal.
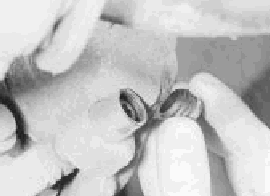
20. Proceed as described in paragraphs 8 to 15 inclusive, but in addition ensure that the clip on the back of the inboard pad fits into the piston recess (see illustration), refit the caliper retaining clip, and ignore the reference to the anti-rattle clips (see illustration).
Late model modification
21. On some later models, slightly revised front brake components are used. A new type of retaining clip is used to secure the pads in the caliper, and the caliper body is modified accordingly (see illustration). Also, plastic covers are fitted to the caliper guide bolts (see illustration).
22. Procedures are unchanged from those given above.
Rear drum brake shoes - inspection and replacement
 1. The shoe friction material can be inspected for wear without removing the roadwheels. Working beneath the vehicle, prise the plug from the brake backplate, and using an inspection lamp or torch, check that the friction material thickness is not less than the minimum given in the Specifications (1.0 mm).
2. If any one of the shoes has worn below the specified limit, the shoes must be renewed as an axle set (4 shoes).
3. To renew the shoes, slacken the rear roadwheel nuts, chock the front wheels, then jack up the rear of the vehicle. Remove the rear roadwheels, and release the handbrake.
4. Proceed as follows according to model:
1.3 and 1.6 litre models
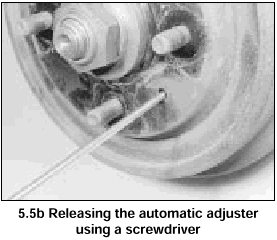
5. Remove the brake drum retaining spire washer(s) from the wheel stud(s) and remove the brake drum. If the drum will not pass over the shoes, it is possible to release the automatic adjuster mechanism by inserting a screwdriver through the small hole in the drum and pressing down on the ratchet (see illustration).
 6. Using a wire hook or a pair of long-nosed pliers, remove the top and bottom shoe return springs. Note the fitted positions of the springs for reference when refitting (see illustration).
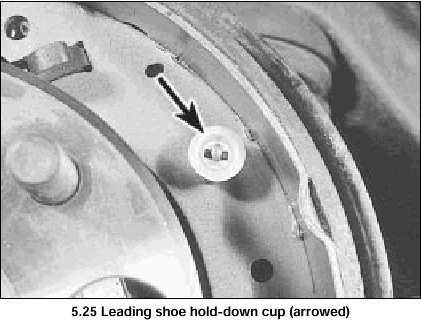
7. Remove the hold-down cup, spring and pin from each shoe by depressing the cup and turning it through 90� (see illustration).
8. Pull the bottom of the leading (front) shoe towards the front of the vehicle so that the self-adjuster ratchets separate, then disengage the shoe from the strut by twisting it. Remove the shoe and adjuster mechanism.
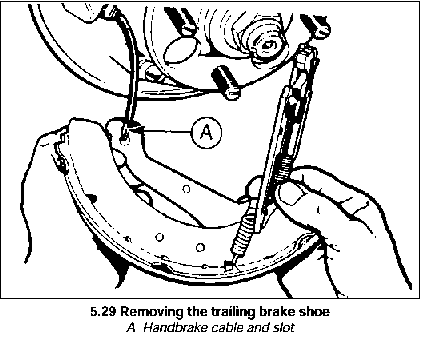
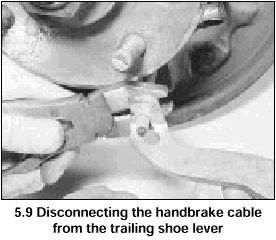 9. Pull the trailing (rear) shoe away from the backplate far enough to gain access to the handbrake cable. Disconnect the handbrake cable from the lever and remove the shoe with strut and lever (see illustration).
10. Clean and inspect all components, and lubricate the shoe contact points on the backplate (see illustration). Take care not to inhale any dust, as it may be injurious to health.
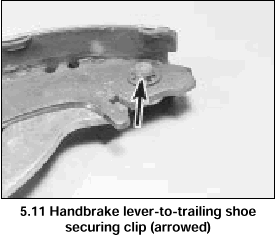 11. Remove the strut from the trailing shoe by unhooking it from its spring. If a handbrake lever is not attached to the new shoe, remove the old lever by prising off the clip and driving out the pin. Use a new clip on reassembly (see illustration).
12. Similarly transfer the self-adjuster components to the new leading shoe. Note that a small clearance (0.2 mm/0.008 in) must exist between the underside of the smaller ratchet segment and the brake shoe web. Insert feeler blades of the correct thickness beneath the ratchet when fitting the spring clip, then withdraw the blades (see illustration). The larger segment should be fitted without any clearance.
13. Commence reassembly by engaging the self-adjuster ratchet teeth as shown (see illustration).
14. Offer the trailing shoe to the backplate, fitting the handbrake cable to the handbrake lever and (if not already done) the strut and spring to the top of the shoe (see illustration).
15. Fit the leading shoe and adjuster mechanism, engaging the hole in the adjuster with the hook on the strut (see illustration).
16. Fit the top and bottom return springs: this is most easily done by allowing the ends of the shoe to pass in front of the wheel cylinder and the bottom pivot point, then engaging the
shoes in their correct positions after the springs have been fitted. Be careful not to damage the wheel cylinder rubber boots.
17. Fit and secure the hold-down pins, springs and cups.
18. Back off the self-adjuster mechanism, by depressing the lower (small) ratchet segment, to enable the brake drum to pass over the shoes. Centre the shoes relative to the backplate.
19. Refit the drum, making sure that the small hole is in line with one of the two large holes in the drive flange. Secure the drum by pushing the spire washer(s) over the wheel stud(s).
20. Have an assistant operate the footbrake several times: a series of clicks should be heard from the drum as the self- adjuster mechanism operates. When the clicking no longer occurs, adjustment is complete.
21. Renew the brake shoes on the other side of the vehicle, then check the handbrake adjustment.
22. Refit the roadwheels, lower the car and tighten the wheel nuts.
23. Avoid harsh braking if possible for the first hundred miles or so until the new linings have bedded in.
1.8 and 2.0 litre models
24. Proceed as described in paragraph 5.
25. Remove the hold-down cup, spring and pin from the leading (front) shoe by depressing the cup and turning it through 90� (see illustration).
26. Note the fitted positions of the shoe return springs for reference when refitting, then release the leading shoes from the wheel cylinder and the anchor bracket using a screwdriver as a lever.
27. Unhook the return springs and remove the leading shoe. Note the direction of wheel rotation arrows on the shoes.
28. Remove the hold-down cup, spring and pin from the trailing (rear) shoe by depressing the cup and turning it through 90�.
29. Withdraw the trailing shoe and disconnect the handbrake cable from the lever (see illustration).
30. Unhook the springs from the trailing shoe and remove the self-adjuster strut.
31. Clean and inspect all components and lubricate the shoe contact points on the backplate - refer to illustration, paragraph 10. Take care not to inhale any dust, as it may be injurious to health.
32. Commence reassembly by fitting the springs to the trailing shoe and attaching the self-adjuster strut.
33. Attach the handbrake cable to the lever and position the trailing shoe on the wheel cylinder and anchor bracket. Ensure that the upper return spring is located on the self-adjuster strut.
34. Refit the hold-down pin, spring and cup to the trailing shoe.
35. Connect the return springs to the leading shoe, then locate the lower end in the anchor bracket and lever the upper end onto the toothed quadrant lever and wheel cylinder. Be careful not to damage the wheel cylinder rubber boot.
36. Refit the hold-down pin, spring and cup to the leading shoe.
37. Using a screwdriver, push the self-adjuster toothed quadrant fully towards the backplate to its initial setting.
38. Proceed as described in paragraphs 19 to 23 inclusive.