Rigs for Bottom Baits
Welcome to this page dedicated to rigs for bottom baits. This page contains some of the most up to date rigs in use, along with some of the tried and tested and also some rigs that you may not have seen before. You will find clear explanations of how to tie the rigs and the theory behind them. Click on any of the links below and you will be taken to that rig:-
Snake Skin/Snake Bite Combi Link Hair Rig
Braided Hair Rig
Line Aligner
Blow Back Rig
Withy Pool Rig with reverse Hair
Multiple Hair Rig
Extended Running Braid Rig
Rhino Rig
Anchor Rig
Anti Eject Combi-Link
Snake Skin/Snake Bite Combi Link:-
Kryston Snake Skin and Kryston Snake Bite are very versatile rig materials, it has a plastic coating that gives it stiff properties, this can be peeled back to reveal Kryston Multistrand (Snake Skin) ,and a soft white braid (Snake Bite). The reason why allot of anglers use Snake Skin, and Snake Bite is that it offers so many different rig variations because it offers both stiff and flexible properties.Another advantage of this rig is that it offers almost perfect presentation on the lake bed, as it does not tangle that easily. The rig that I mainly use it with is the combi link rig. I've had allot of fish on this, using both Snake Bite and Snake Skin, i have a preference for Snake Skin when using Pop-ups, and I use Snake Bite when using bottom baits. If you choose to use "Kryston Snake Bite" experiment with the amount of coating that you peel back, when I first started experimenting with the stuff I peeled back only an inch of the coating, but the hook holds I was getting were in the front of the mouth! So all I did was peeled an extra two inches off of the coating, and then I was getting good hook holds in the back of the mouth!!! Experiment with the stuff, until you find what works for you.
The above picture shows a combi-rig, using Kryston Snake Skin, note that the plastic coating has been peeled back to reveal a couple of inches of "Kryston Multistrand".
This rig is probably the easiest rig to make, it keeps every thing nice and simple. There's no stainless rings, bait floss, fancy knots etc... with this rig!!!
It is simple to tie, you can use any flexible braid you like for this rig. Such as "Kryston Silk Worm", "Kryston Super Nova" but I usually use 10Lb-25Lb "Kevin Nash Trick Link", I find this a good all round braid:
1. It offers good strength to diameter
2. It is flexible and is very abrasion resistant.
The hooks I generally use for this rig are "Fox Series 3's", "Drennan Boilie Hooks" and "Kamasan B175's", but any good quality carp hook will do the job. It is a very simple rig, yet will work on the majority of lakes that people fish. This rig has caught me allot of fish, although I will say the length of the hair (the material between the hook and the bait) does have an effect on where the hook finds it's hold. Once again experiment till you find what is right for you.
The line aligner, was invented by a Carp angler called Jim Gibbinson, and is one of the simplest and most effective rig for Carp ever devised. Just like the simple braid rig, this rig uses no stainless rig rings or other expensive components associated with other modern rings.
The line aligner was designed about 10 years ago, it was based on a bent hook rig. The only problem with the bent hook rig, was that they caused quite bad damage to Carp especially Small Carp. Jim Gibbinson didn't like this, so he came up with the line aligner, as it has the same hooking abilities as the bent hook rig, but at the same time it is fish-friendly.
The theory behind the line aligner rig was that the bend on the shank caused the hook to revolve on it's axis, which improves the ratio of fish landed to pickups received.
You can use this rig with either mono, or braid. Although I feel braid is best, try using "Kryston Silkworm" or "Kryston Super Nova", but any supple braid will do. The line aligner should be tied using straight shanked hooks such as "Fox Series One" or any other straight short shanked eyed hook. Use shrink tube, or silicon that matches the size of your hook. You can tie the using the knotless knot or a separate hair, it's up to you!
Below I will show how you make this simple rig:
1)Get you components together, i.e. Hook, Hook Link material, shrink tube/silicon, swivel etc...
2)Tie a small loop knot on to the end of your hook length.
3)Thread a similar size boilie to the size you will be using when you are fishing, on to the hook length, and secure with a boilie stop.
4)Cut your desired length of hook length material. But beware the shorter you make it, the more ineffective the line aligner becomes.
5)Tie on your hook using the knotless knot, and as the boilie is already attached you can make the hair the correct size that you wish for.
6)Get about an inch of shrink tube/silicon, and make a very small hole about 2mm from one end. Use scissors for this.
7)Insert a baiting/rig tying needle through the small hole and out through the other side.
8)Attatch the spare end of the hook length (the end with no hook attached!!!) and thread the silicone on.
9)Slide the shrink tube/silicone down the shank of the hook, until it looks similar to the drawing below:
10)If you have used shrink tube to make your rig you must put the shrink tube over a kettle and expose the tubing to the hot steam. The tubing will rapidly shrink into place.
11)Now all you have to do is tie the swivel on, and your finished!!!
This rig is an advance on the standard combi-link rig. It can be used with bottom baits or an over shotted pop-up. This rig gives you the best chance of converting pickups to fish on the back with a bottom bait. In principal it works in the same way that a D-Rig works. To make this rig you will need the following components:
1. Size 6-8 long shanked hook (Fox Series Five's, or similar)
2. 2-3mm Rig Ring (Drennan or Solar)
3. Good quality swivel (Solar are the best in my opinion)
4. 5mm Strong Rig ring (Drennan)
5. Any supple braid
6. Monofilament
Below I will show you how to tie the "Blow Back Rig":
1. Get your braid and tie a loop knot at the end for the hair.
2. Tie on the 2-3mm rig ring, using an overhand knot or granny knot.
3. Slide the rig ring over the hook point to a position where the knot on the ring is opposite the barb.
4. Thread your boilie on to the hair. And then adjust the length of the hair by holding the ring and pulling the braid.
5. When you have got the desired length hair, dab a bit of glue on the knot on your ring to secure it.
6. Hold the braid in place, and tie the knotless knot.
7. Now you have the hook sorted out, select the length of braid to use (I use between 1 inch and 2 inches), then tie this to your 5mm rig ring.
8. Now you will select your desired length of hook-link, and tie a swivel on one end.
9. Now tie the other end of the link to the 5mm rig ring.
You now have your completed "Blow Back Rig", now just go fishing and wait for the screamers, and they will be screamers!
I have had allot of success on this rig, mainly because it's so good!
Withy Pool Bottom Rig with Reverse Hair:
This rig is the ideal presentation when fishing over or near dead weed, Lilly pads or any other detritus. This rig is theideal presentation in the winter months, use the rig on a six inch hook link, and try presenting it in a PVA bag full of chopped up boilies or whatever.
This rig should be quite easy to tie if you have tied other carp rigs such as the knotless knot. The components needed for this rig are:
1. Any strong carp hook. (I prefer to use those trusty Fox Series Five's)
2. Mono or Braid for the hooklink.
3. Any Supple Braid for the hair.
This rig works in the normal way that the knotless knot works until ejected. The force of the bait being ejected causes the hook to turn in the mouth and snag the skin instantly. This is how you tie this winter rig:
1. Get your braid and tie a loop knot.
2. Get your hook and whip your supple braid to it, making sure that the hair comes off the at the top of the knot.
3. Now just dab the reversed hair with superglue.
4. Just tie your main hook link etc... To complete the rig.
This is the rig to try if the Carp in your local lake seem to have seen every thing, because they probably won't have seen this!!! You will need the following components to make the "Multiple Hair Rig":
1. "Carp-'R'-Us Sly-Ply" as the hook link.
2. Any strong size 8 Carp hook.
3. Swivel.
4. Shrink Tubing.
As the name of the rig suggests, you have to make more than one hair. It is best used with one or two mini-boilies on each hair. To fool the Carp fish this rig in a PVA bag full of other mini-boilies, the Carp will not be able to distinguish the free offerings from the hook bait(s) To tie the "Multiple Hair Rig" follow the instructions below:
1. Get your "Carp-'R'-Us Sly Ply" and decide how many hairs you want (4 maximum)
2. Tie loop knots to make the hairs.
3. Tie the hook on using the knotless knot.
4. Cut away any tag ands from the sly-ply that have not been used for hairs.
5. Get your Shrink Tubing or silicone and slide it over the knotless knot, now place this offer some hot steam until the tubing shrinks.
6. Now to complete this rig you just have to tie the swivel on.
I don't know whether this rig has been documented before, it probably has so I'm not going to claim it as my own development. But this was the result of some thought on my own part. On some of the more pressured lakes I'm sure the carp have grown wary of the semi-fixed rig, and the way a rig will behave when it is attactched to a semi fixed lead.
How would you like to fish with a running rig until a certain point where the semi-fixed lead would come into play, and act as a bolt rig? Well you can with this rig.
What you will need for this rig:-
1. Strong Carp Hook
2. Swivel
3. 4.0mm Stainless Rig Ring
4. Supple Braid
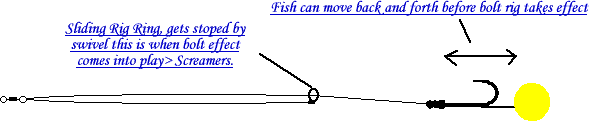
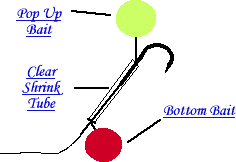
This rig it has to be said is quite strange looking when it is made up. And it also takes quite a bit of messing about with bait floss hairs and shrink tube. I have never seen this rig at any of my local haunts so maybe if your looking for a totally different presentation to trip up wary carp then this could be it!
This rig uses a bottom bait and a pop-up on separate hairs. The pop-up is tied on as usual on a hair going down the shank, but the bottom bait is tied on by a hair thatgoes up past the eye of the hook this is held up in place by some shrink tube. The bottom bait should weigh down the pop-up creating a critically balanced effect. The main asset this rig posses apart from the fact it's totally unique and different is that it is relatively hard to eject by the Carp because of the two baits.
I would say this rig would be best used with small boilies no bigger than 14mm. Any bigger and the hook may get masked by the baits. This rig would be suited to situations where Carp are feeding confidently but avoiding capture (You now the one where you can see your baits in the water in the evening and then the next morning you have been wiped out apart from one bait>>> Your hook bait!).
To make this rig you will need the following tackle:-
1. Shrink Tube (I prefer clear> Less Obtrusive)
2. Hair Braid (Kryston Merlin, Kryston Super Nova, ESP Sinklink etc...)
3. Size Six Short Shank Hook (Fox Series 2 and 3, ESP Raptors, Drennan Boilie Hooks etc...)
4. Hair Braid or Bait Floss (Kryston Samson Hair Braid or any other bait floss)
5. Swivel.
Follow the instructions below and you will have a fully functioning Rhino (Rhino Rig that is):-
1. Take between 9-12 inches of your hair braid or bait floss. You will only need this length for both of the hairs.
2. Get you hair braid and tie a loop knot in one end. Get your desired pop-up boilie and thread it onto the hair braid via the loop knot. Use a boilie stop to keep the boilie on the hair.
3. Now tie the hair braid onto the hook as you would if you were going to use the pop-up on it's own using the knotless knot. So tie it on as you would a knotless knot rig.
4. Thread the end of the hair braid back through the hooks eye, do not cut off the excess because this will form the second hair as well.
5. Get your hook link of between 4 and 7 inches (short hook links with this rig recommended) And tie it on to the hook using a grinner, palomer, or tucked blood knot. Know you have done this trim the knot. Now take the pop-up off of the bottom hair, and glue the hair braid knot into place and glue the not attaching the hooklink ot the hook if you wish to do so for extra security.
6. The next stage is to form the second hair, so cut the hair braid back to a suitable length and tie a loop knot into the hair braid. Now you have both of the hairs.
7. Enter Shrink Tube. Now line up the two hairs one up and one down the shank, now cut a length of shrink tube to fit along the hook up to where the second bait will be . So the second bait will have about a 1mm hair because it is being help by the shrink tube.
8. Now thread the shrink tube onto the hook link, and then carefully thread the second hair through the shrink tube, now that the shrink tube is in place you should be able to see clearly how the two hairs will be held apart. Now shrink the shrink tube using steam from a kettle.
9. And now you have your finished rhino rig, note the two different colour boilies might be worth trying. No putty is needed to weigh down the pop-up as the bottom bait should do this for you. Anyway your rig should look similar to this, but remember experiment with certain elements of the rig to suit your fishing needs:-
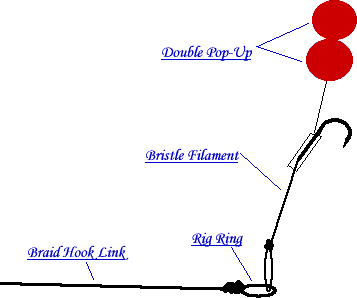
This rig is based upon the combi-link theme, i.e.. Using two different hook links. But this rig is most effective because as the title suggests it is very hard for the carp to eject the rig without getting hooked.
One of the main components used to achieve the anti eject qualities is stiff monofilament. Now several types are available such as Amnesia etc... but I prefer to use the mega stiff ESP Bristle Filament, this stuff is wickedly stiff. Because the bristle filament is tied to the hook you cannot use for your bait hair, so get some supple floss or hair braid and tie a hair using this. Now think of how a Carp might approach the pop-up and rig, it'll probably come along and take it into it's mouth, it may detect something is wrong at this point and try to blow the bait and your rig out, but because you are using a stiff hooklink and a supple hair braid; the boilie(s) will fly out on the supple hair but the hook will stay in the carps mouth because of the mono's stiff properties, this should lead to a hooked Carp.
To make this rig you will need the following tackle:-
1. 15-20lb Stiff Mono Material Such as ESP Stiff Rig Bristle Filament (Not Normal Mono> it is not stiff enough)
2. Hook Link Braid.
3. Large Rig Ring.
4. Some Hair Braid or bait floss.
5. Good Strong Hook (Straight Long Shanks best)
6. Shrink Tube.
7. Swivel.
Now you have collected the bits of tackle you need follow these steps to make the rig:-
1. Get your hair braid and tie a loop knot in it for the bait.
2. REMEMBER Make your hair the same length as the bristle filament section of the rig. With this in mind you should use quite a large hook bait, such as a double 16mm pop-up bait (Don't worry the bait will not be too big, I've had Small 4lb Tench on these sort of baits so a double figure Carp should have no problems.)
3. Now tie the hair to the hook using the good old knotless knot, bearing in mind Step.
4. Once you are happy with your hair length cut the excess off. If you have threaded on your hook baits to the get the hair the correct length then take them off now. To keep the hair braid in place secure the knot with a dab of superglue.
5. Now that the hair has been sorted out, get your bristle filament and cut a length of about 8 inches for the second part of the hook link. Now as Bristle filament or any other stiff mono for that matter has an annoying tendency of coiling, you will need to straighten it out this is easily done by running your fingers through the bristle under tension.
6. Slip a stainless rig ring onto the filament, then tie an overhand loop knot, so that the rig ring is trapped inside the loop of filament. Make Sure you Tighten the knot as much as you can, this can be quite difficult especially with ESP Bristle Filament, be at least after you have done this the knot will knot become loose! Get a pen or the shaft of a screwdriver and place it inside the loop and pull tight.
7. Now Tie the bristle filament at the other end; to the hook using a grinner knot. Try and get the bristle filament part of the rig about 2-3 inches long, this takes a little bit of practice but shouldn't propose any serious problems. This will probably be quite bulky so get a little bit of shrink tube just long enough to cover and protectboth knots on the hook. This shrink tube should make the rig look less obtrusive.
8. That's the tricky part over with now just get your braid and tie it to the other end of the rig ring and then to your swivel. To complete the rig dab a little bit of superglue on knot for a little extra security if you wish.