 |
|
|
|
|
|
|
|
|
|
|
|
|
|
|
|
|
|
|
|
|
|
|
|
|
|
|
|
|
|
|
|
|
|
|
|
|
|
|
|
|
|
|
|
|
|
|
|
|
|
|
|
|
|
|
|
|
|
|
|
|
|
|
|
|
|
|
|
 |
|
|
|
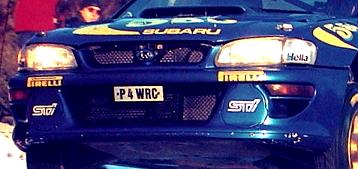
A long time coming, I'm finally getting back around to this kit. One of my favorite wins was Piero Liatti with his 1997 Monte Carlo victory. It was also the first win for the new World Rally Car specification machines. An underdog, Liatti put on a fantastic performance in a spectacular machine; the 1997 Subaru Impreza WRC.
I'm starting with the Tamiya 1998 Monte Winner kit as a base. Extensive modification's will backdate it to the 1997 spec car. |
|
|
 |
|
|
|
|
|
|
 |
|
|
|
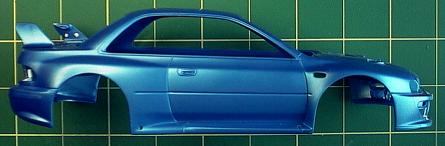
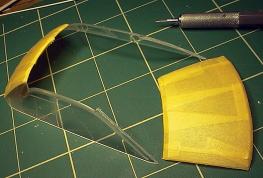
One of the most obvious differences between the 1997 and 1998 Impreza's is the front Bumper Spoiler. This is important to get right, inorder to get the look of the 1997 car. There are four crucial areas: First is the upper grill intake, it is smaller on the 1997 car. The second is that the bumper itself is the same thickness all the way across the front. Third is that the lower grill intake does not have the "deflection" panels on each side to improve air flow. These panels will need to be removed to have the 1997 spec front end. Also, the very bottom of the front bumper spoiler is rounded on the 1997 Impreza, while the 1998 is a flat piece of carbon fibre. |
|
|
|
|
|
 |
|
|
|
|
 |
|
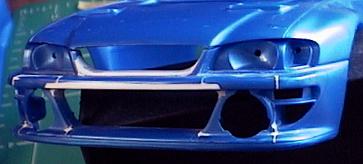
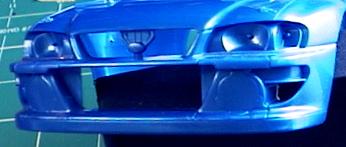
At the left is how the kit comes, and at the right is my new 1997 front bumper spoiler. I used plastic card and putty to get the shape right. I also removed the aux lamp cover's so that I can model the aux lamps for the final rally stage. I rounded off the spoiler on the underside of the bumper spoiler with a file, |
|
|
|
|
|
|
|
|
|
Preparing the Body |
|
|
|
 |
|
|
|
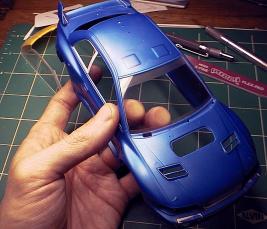
I prefer to start work on the main body of the model kit. It is the most important part of the entire model. First, I clean it up as best as I can. Tamiya makes fantastic molds which minimize this process; but there is still plenty of work to be done. I engrave, with a sharp scribe, the panel lines that need to be opened up more. This was around the door handles, where the hood connects to the base of the windscreen, where the boot hits the base of the rear window and a few other odds and ends here. I also removed the molded on side indicators, I'll be making ones from clear plastic to go there later. Tail lamps were opened up as well. |
|
|
|
|
|
 |
|
|
 |
|
|
|
|
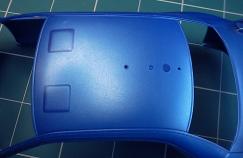
Roof vents didn't appear on the Impreza untill the third event of 1997, the Safari. I filed them off, as well as the GPS and antenna bases. The newer Tamiya kit, 1999 Subaru Impreza, doesn't have the roof vents molded on; though it was easy to remove the panels from this one.
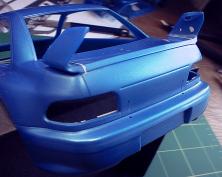
At the rear....
I attached the uprights and filled the connection points with putty on the rear spoiler. Mold release dots were also filled with putty here. The molded on boot spring hooks were removed and holes drilled to accept the Sakatsu Metal spring hooks. |
|
|
|
|
|
|
|
|
 |
|
|
|
|
|
|
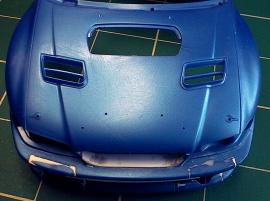
Back to the front....
The molded on hood pins were removed and holes drilled where photo-etched ones will be placed. I also drilled tiny holes for the mounts for the light pod. |
|
|
|
|
|
 |
|
|
Glass Problems |
|
|
|
|
|
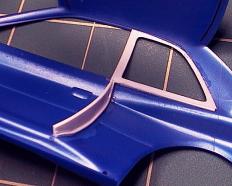
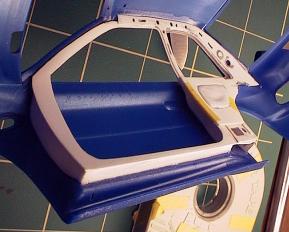
My biggest problem with the Tamiya kit is how the side glass and "B" pillar are dealt with. I wanted this to be more realistic and wanted the side windows down to have interior veiwing less obscured. I didn't want to open the doors on this kit, since the lines were so nice on the body. I would need to vaccuum-form new side glass and use the kit glass for the front and rear screens. I cut up the kit glass first to get some good measurements. Then I would begin to tackle the interior structure of the Impreza body with plastic sheet. |
|
|
|
|
|
The glass cut easily. I have several kits of the Impreza; so it didn't need to worry about getting it perfect the first time. |
|
|
|
|
|
|
|
|
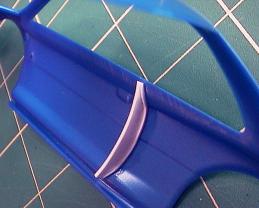
I began first by getting good reference of the Impreza body shell. Then I started cutting out patterns of the body structure from sheet styrene. I used different thickness to get the desired effect. |
|
|
|
 |
|
|
 |
|
|
|
|
|
|
|
|
 |
|
|
|
|
|
|
|
|
|
 |
|
|
|
 |
|
|
|
|
 |
|
|
|
|
|
|
|
|
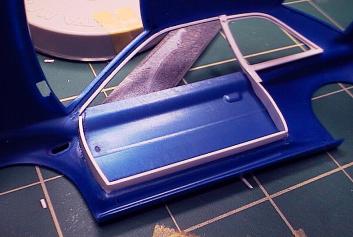
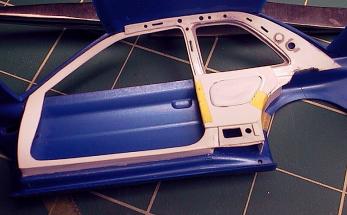
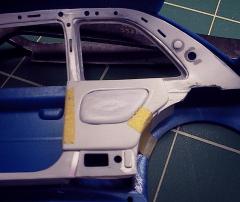
Some good photos of one side 90% complete. Carefully drilled holes and cut openings complete the look. Notice the interior rear panel trim piece taped into place. |
|
|
|
 |
|
|
|
Testing fitment of glass. |
|
|
|
|
|

|
|
|
More to come................................. |
|
|
|
|