 |
|
|
|
|
|
|
|
|
|
|
|
|
|
|
|
|
|
|
|
|
|
|
|
|
|
|
|
|
|
|
|
|
|
|
|
|
|
|
|
|
|
|
|
|
|
 |
|
|
|
The Raising of Don't Panic |
|
|
|
|
|
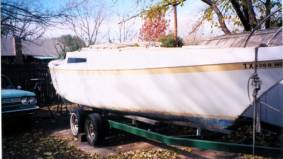
When I finished bringing the boat back from the coast, it still had the remnants of a once great civilization of sea life apparent on the hull. The grime apparent on the bottom almost completely obscures the bottom boot stripe. The amount of water that was in the boat lowered the water line by a good 3-4 inches which really increased the amount of surface area for sea life to set up condos. |
|
|
|
|
|
After bringing the boat to the local car wash and spending about $20 in quarters to use the pressure washer, we actually got down through the grime to the paint (or lack thereof mostly).; The barnacles locked in a death grip with the hull were a different story entirely. I ended up taking a 2x4 and shearing the barnacles off the hull. This was actually pretty effective for the big crusty parts of the barnacle but there was little sand-dollar type marks covering it everywhere. Using Star-bright barnacle remover worked pretty well, it's basically just a watered down acid which foams the little buggers out of existence. However you go through A LOT of that stuff and it smells pretty bad. What smells worse by far is the barnacles laying on the ground that I failed to sweep up, one additional tragic fact is that fire ants LOVE barnacles and will come for miles around for this delicacy. |
|
|
 |
|
|
|
|
|
|
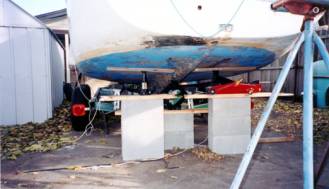
I contemplated several different methods of redoing the bottom of my hull. There was even a do-it-yourself boatyard here in Dallas that I was going to use, only to have them shut down that particular service the day before I was going to bring my boat over there. I did talk them in to renting me the sailboat stands for $100 since they apparently no longer needed them. This turned out to be a good move and a much better idea than the wood behemoth I was trying to build to support the hull. Since I didn't have the money to rent a crane, I decided to go with the cinder block and car jack method of raising the boat. I borrowed car jacks from all my friends and located them at several areas of the boat. This picture shows the big jack I put at the front of the boat a little bit ahead of the keel well. |
|
|
|
 |
|
|
|
|
|
 |
|
|
|
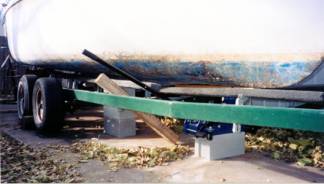
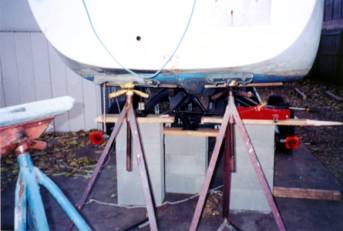
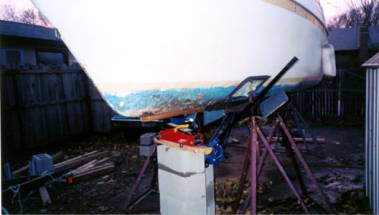
Here is a close up of the setup at the front of the boat. I placed the heavy duty jack on the cinder blocks with a board in between the jack face and the boat. One important note to the non-cinder-block savy people like myself, place the blocks with the holes placed vertically. If you put to much pressure on the blocks positioned in the other direction they will most likely crush and drop the load. Another suggestion, although the heavy duty car jack in the picture is nice for ease of use, there are some major drawbacks. When the jack is raised it travels both in a vertical and horizontal motion that can cause possible problems by shifting the load. Lowering this type of jack requires very careful handling or it will just drop the load. I highly recommend finding some good quality screw jacks with a decent vertical travel distance and a solid base, this will make the job significantly less scary. |
|
|
|
|
|
 |
|
|
|
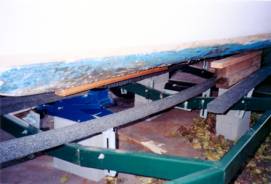
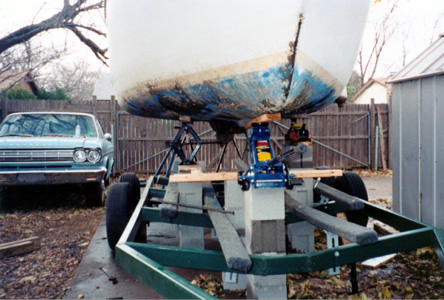
Here you can see a little of my paranoia, on the two sides of the front jack I placed cinder blocks and wood supports in order to catch the boat should it fall. As you can see there is only one jack supporting the front of the boat. When the jack gets to its maximum height I had to bring in another jack from the back of the boat, move the load to the other jack and lower the first jack. I then put in another cinder block under the first jack, raised that up, and moved the load back to the first jack. Also, I brought in another jack for the side just to have extra support. |
|
|
|
|
|
 |
|
|
At the rear of the boat I went with the same triangle support system the I was using a the front, only with a jack in every position. I placed 2x4's in between the jack and the boat to even out the load. I would hate for the relatively short area of the jack to punch a hole in the hull. Every time the jack would get to the maximum height I would take the load off of it, add another cinder block, and proceed. This takes a very, very long time. |
|
|
|
|
|
|
 |
|
|
|
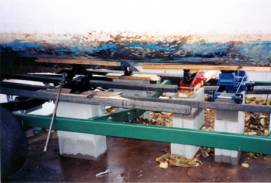
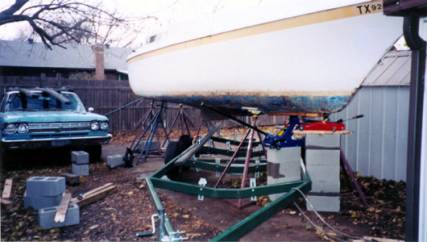
After I raised the rear of the boat 4 cinderblocks high I was able to just barely slide the boat stands under the back. The curved at the aft section made it a lot easier to slip them in without raising the jacks another set of cinder blocks. Although it looks like I'm home free from this picture, this is only where the real terror starts. |
|
|
|
|
|
 |
|
|
|
Here is the picture of mind numbing terror. In retrospect I'm glad it was not a windy day or I might have had a more manuevarable boat (that being it being in several sections and all). This step obviously freaked me out quite a lot, if you look at the storage shed or the car for reference you can tell just how high in the air this is. |
|
|
|
|
|
 |
|
|
|
Removing the trailer and not dropping all 3500lbs of sailboat on the ground from 5.5' in the air was quite a trick. First, I had to remove all the bunk boards that were bolted on. We then had to move the trailer small sections at a time. Then we had to move cinderblock stacks multiple times as we were literally lifting the rear of the trailer and carrying it sideways. Needless to say I was very tired by the end of the day. |
|
|
|
|
|
 |
|
|
|
I finally have the trailer removed and am able to get the remaining boat stands set. I put to in the rear, two in the middle, and to about 4 feet from the bow. Definitely make sure to chain the stands to its opposite before placing a load on them. As you can see in the background it is now the end of the day, the whole job took two people over 12 hours. |
|
|
|
|
|
Return to Home Page |
|
|
|

|
|