
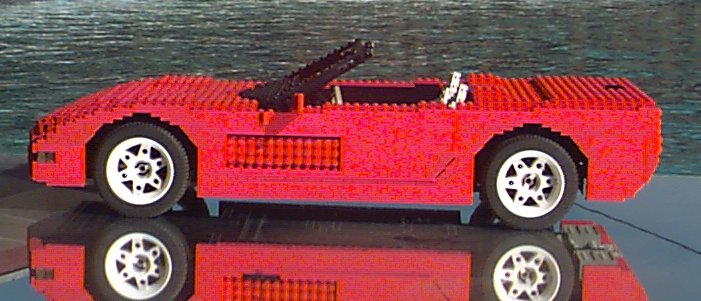
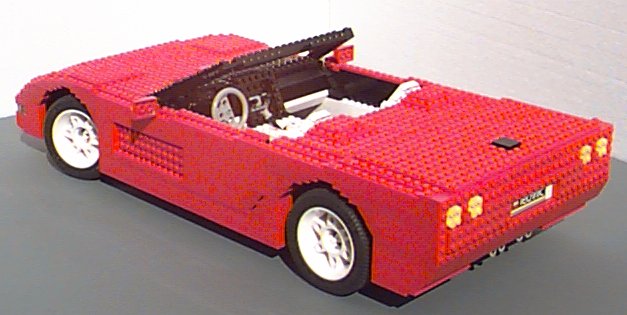
This is my original design of a two seated sports car that intentionally bears a resemblance to the '98-'99 Corvette convertible. It's a fully-featured Technic design. Features include a V8 engine with fiber optic spark plug cables, rear mounted 4 speed transmission, four wheel independent suspension, electrically operated popup headlights, opening doors, trunk and hood, steering, and parking brake. I've included a fair amount of text in the page because some people might be interested. If you prefer you can just skim the pictures and click on them for a larger image.
You may have seen the page on my Mustang. The Mustang is the Corvette's predecessor and I'll be referring to it periodically, for comparison's sake. At the time I built the Mustang, I hadn't built a Legocar since Expert Builder days in the mid '80's, so I was really happy to have built a car with so many features by using the new Technic parts. I was pleased with the car and got a lot of positive feedback. However, after a little time had passed, I knew that I could do better. The Mustang worked well and looked good, but it wasn't quite solid, smooth and tight enough to measure up to the Lego theoretical benchmark of being able to be sold as a Lego kit. For what the four Lego auto chassis kits have lacked in accuracy, they are all extremely solid structurally and smooth mechanically. I feel the Corvette very nearly reaches that level, while pushing the envelope of realism and proportion a level beyond the Mustang and at least a couple levels beyond the kits Lego has sold.
I've been thinking of doing a Corvette Legocar for quite a while, especially when the new '97 Corvette came out. I love the new Corvette. I think it showcases what can be achieved with modern automotive technology in a package that's still distinctly American and Corvette. Some have said that the styling is not very bold or innovative, but I think it's a great looking car and a deserving subject for a new Lego project. It also seemed to be fairly renderable with Legos both mechanically and stylistically. So when I found some time to do it, I was excited to get started.
HOME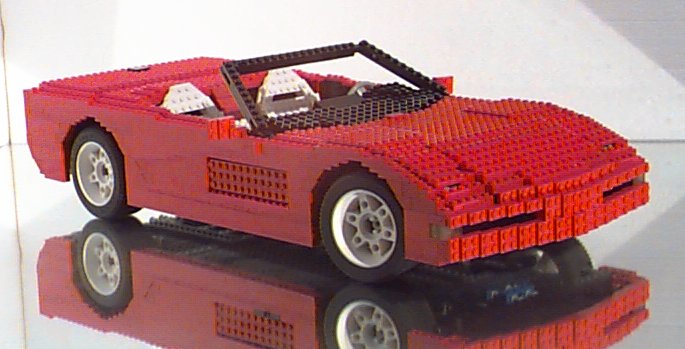

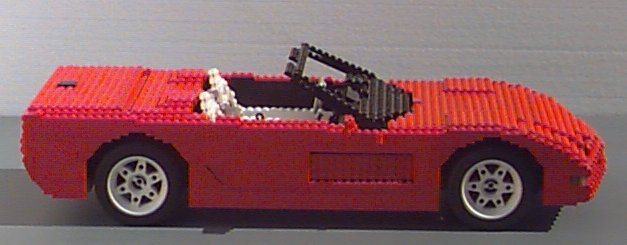
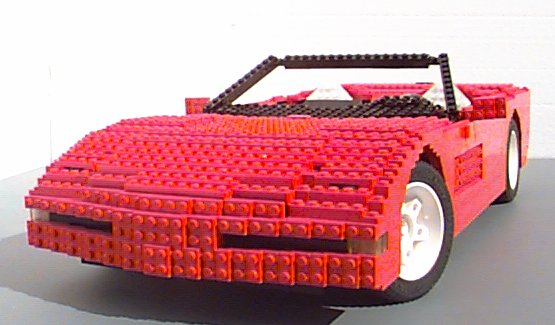
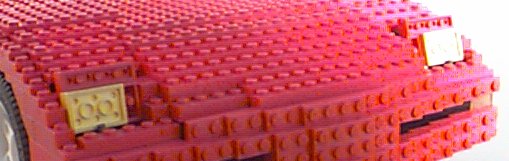
A car is a good styling subject for Legos if it gets its distinctiveness and identification from its basic shape rather that styling details. Since the Corvette is one of the only front engine, rear drive, two seat, true convertible sports car in the world , that makes it pretty unique in shape and layout. The basic lines of the shape are straight or gently curving and thus highly Legoable (unlike something like the Viper, the way the doors curve into the hood would be tough and/or impossible!). The details like the side vent openings and taillights I tried to capture as best I could. A key styling element of the real Corvette is that the wheels are perfectly flush with the side of the car. With the Supercar suspension/wheel pieces, one doesn't have an awful lot of control over track width, but fortunately, I was able to make the wheels flush by attaching the end of the control arms to 1 X 1 rails (for lack of a better term) that have the hole directly below the stud instead of in between studs with the regular rails.
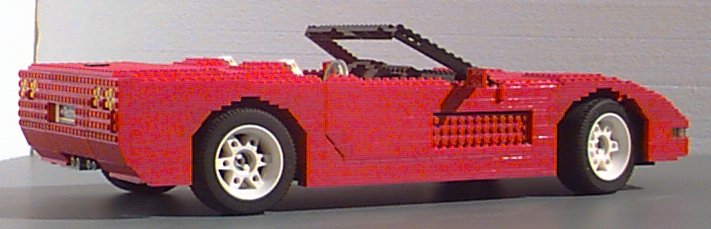
I wanted to give the car a smoother, more refined look than the Mustang had, so I eliminated the use of holed beams and made the front and rear fascias one piece structures. I had originally wanted to make it the coupe version with removable targa top, but a few limitations presented themselves. With the battery pack, rear transmission, parking brake and spring support assemblies, there wasn't enough scale space to accurately reproduce the real car's cargo compartment. The cargo space should also be white to match the rest of the interior and I didn't have enough white pieces. A future project might be to get some more white pieces and see what I can do to convert it.
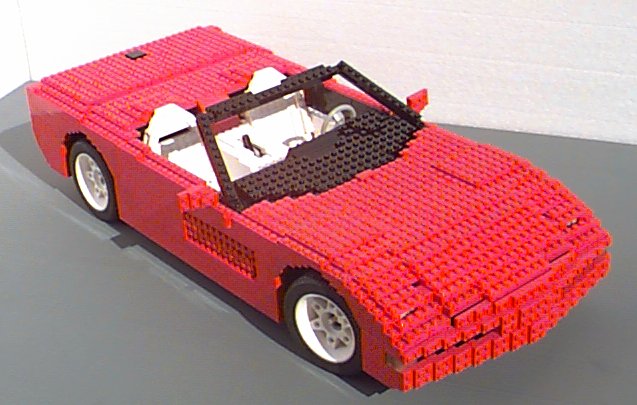
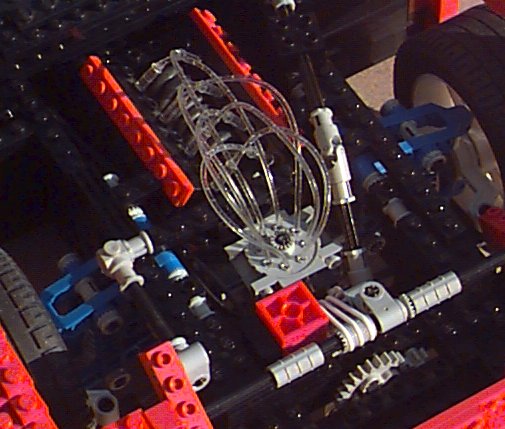
It has pop up headlights that pop up when you flick a switch on the dash. It uses the micromotor which can be seen under the hood just above the steering mechanism. The motor spins rubber bands which turn an axle that runs between the headlights.
The doors, trunk and hood all open. The trunk is held open with Legoshocks. The hood had been held open with shocks, but I unfortunately had to change it to a simple prop rod that slides into place when the hood is opened and which you lift up to close the hood. The headlight axle also serves as the hingepoint for the hood and the shocks put so much pressure on the axle that it was a struggle for the little micromotor to turn the headlights. One detail I was excited to include was the double-tipped dual exhausts which come out the center of the rear.
HOME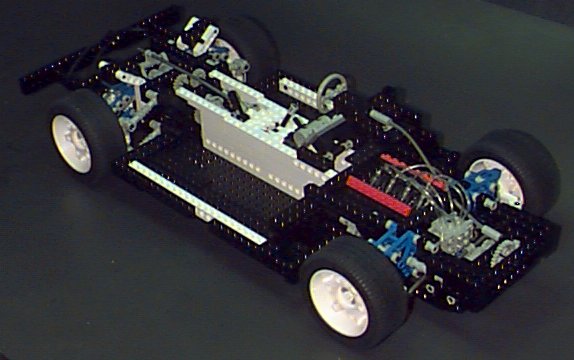
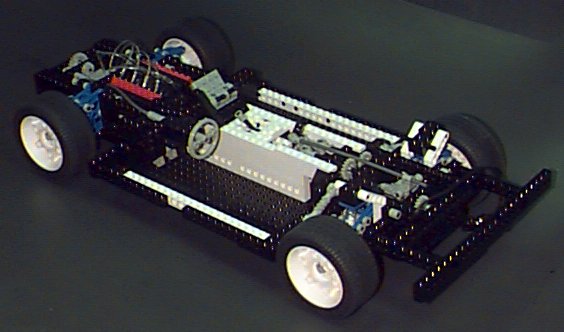
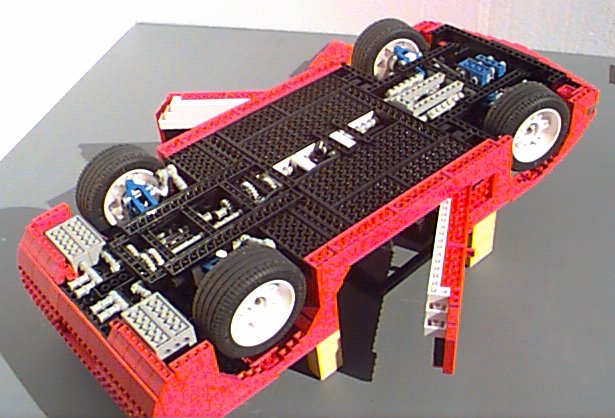
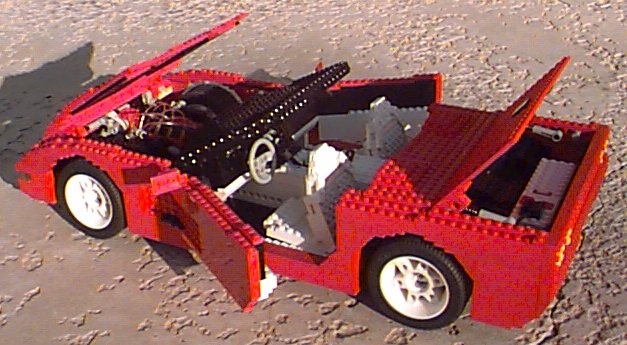
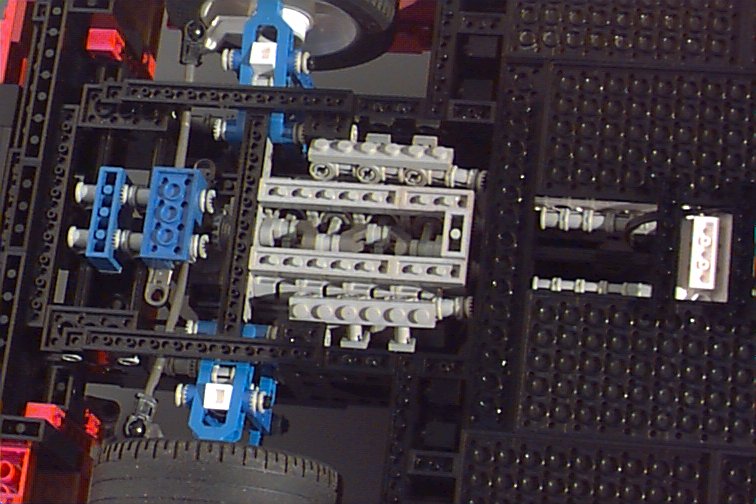
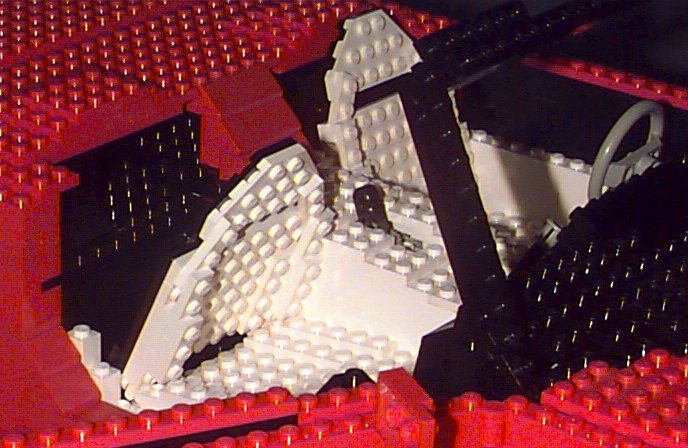
The chassis configuration is similar in theory to the real Corvette. It uses a huge backbone structure down the middle of the car with smaller side beams running down the edge of the car. The very thin floor structure (one plate deep, no balsa wood though) runs between these. This allows the seats and interior to be very close to the ground while providing an extremely stiff chassis. The intersections between the backbone and front and rear frame sections are relatively massive in both the Lego and real versions. It doesn't show much in the pictures, but the areas behind the seats and in the cowl use a lot of pieces and I went to great lengths to build them solidly. The interior has a little bit less scale legroom because of this. Chevrolet claims that the new Corvette has a four-and-a-half times stiffer chassis than its predecessor. The difference between the Lego Corvette and its pedecessor, the Mustang, is not quite that dramatic, but it's a very significant improvement. I had to be careful how I picked up the Mustang, it creaked and strained if I picked it up in the middle and, when sitting, the doors provided a small amount of support when closed. I can pick the Corvette up any way I want to and the doors provide no support as far as I can tell. This is possible mainly because of the rear-mounted transmission. I also used the driveshaft tunnel for support in the Mustang, but since the tranny was in that area, it limited the amount of strength it could provide. The tunnel holds the driveshaft, remote shift linkage, parking brake linkage and power cord, but that all fit within a four-stud-wide space and allowed a relatively massive structure.
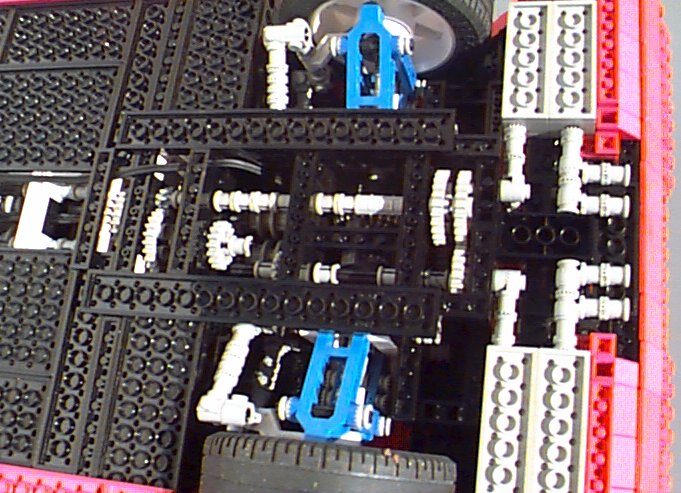

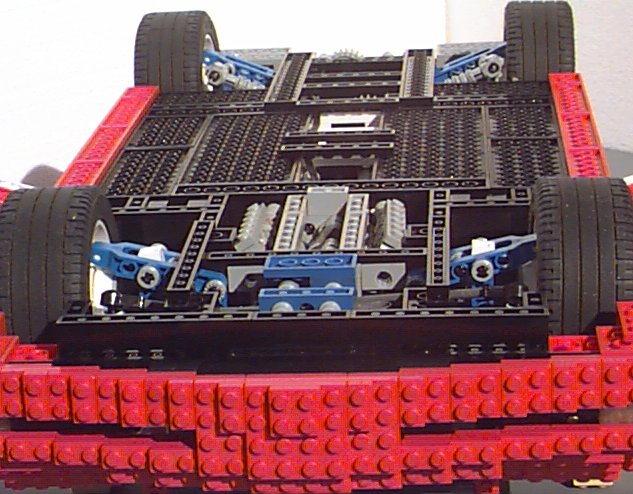
Another goal for the Corvette was to make the chassis and underside of the car smoother and prettier to look at. The Mustang chassis was functional, but not much to look at. If you compare the two, I'm sure you'll agree that the underside of the new car is much better looking.
HOME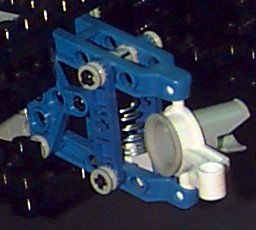

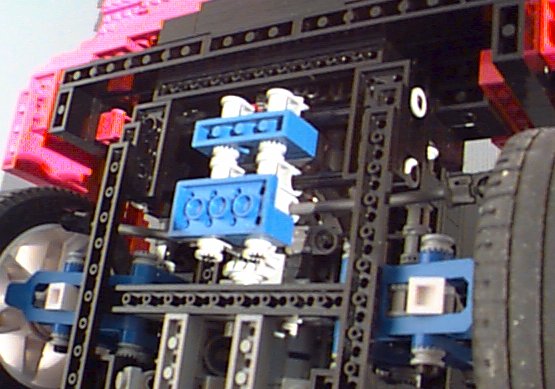
The car has a four-wheel independent suspension. The front has coil springs on the lower control arm and the back has coils over the upper control arm, to make room for the half shafts. I used the same small non-Lego springs that I used on the Mustang (see that page for my thoughts on springs). One thing I don't like about the Supercar suspension components is that the steering rods are not the same length as the control arms, so the toe in/out varies when the suspension travels up and down. In the back I used axle shafts for steering rods so that they could hinge on the same points as the control arms. Toe change is virtually imperceptible. For the front steering, I decided to use a flex system like the one on the 8440 racecar. Instead of a rigid steering linkage, I use flex tubing. There is no toe change at all. The rack slides on two axle pieces. It's very low friction. I may have been wrong about the theory I wrote on the Mustang page that using a very large gear for the pinion with a small gear from the steering wheel to turn it makes for lower steering effort. I used a fairly small pinion gear with a smaller reduction to the steering wheel and I think the effort is lower. You might notice in the chassis picture that I use a long flex tube to the steering wheel, while in the other shots I use the traditional axles and U-joints. The flex was an idea I was trying out initially. It had about the same amount of slack as the regular way, but it felt more vague and the effort was a bit higher. I was able to use only three U-joints instead of four (marginally reducing slack), so I went the traditional route. The independent rear suspension is a big improvement over the Mustang's live rear axle. The live axle worked as well as a live axle could with Legos, but I think in a car this big and heavy, it's just a bit more than a live axle should have to support. The suspension was never as smooth in the back as in the front and I'm sure it also contributed a bit of drivetrain friction.
HOME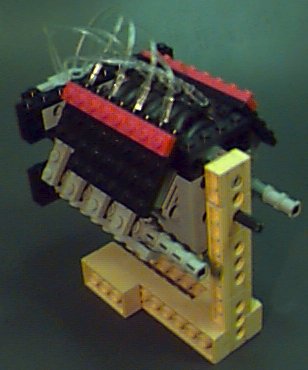
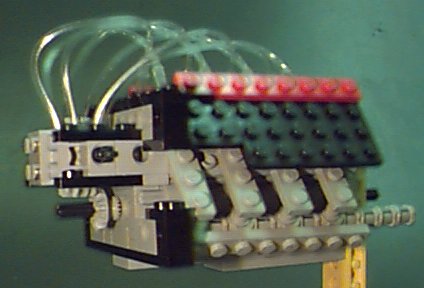

The engine is a basic Supercar V8. It has the same angle between the cylinder banks as the Supercar. I wanted to make the engine look as much like the real car's as possible, so I adopted the anti-Lego philosophy of covering the pistons. I was inspired by Lewis Valentine's awesome big rig engine (see his page under links on the main page) and his approach that if you don't see it in real life, you don't see it in Lego. It's got black intake manifold tubing not unlike the real LS1 and exhaust manifolds that aren't very accurate, but do look good, I think. The coolest feature of the engine is the fiber optic spark plug cables. This, of course, isn't anything like the real Corvette, but how could I resist? The fiber optics are turned on by a switch on the dash.
I initially had planned on making the whole engine compartment as accurate as possible, with full fender wells and as much detail as I could muster. After playing around with it some, I found that I couldn't get the details to look very good and it just looked so much better wide open so you could see the suspension and chassis. It's more in the style of the old Corvette.
HOME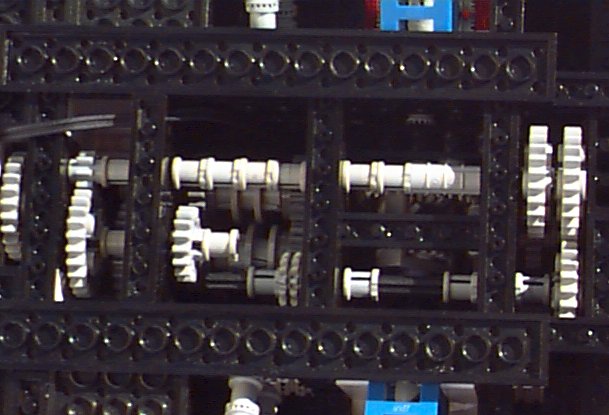
As in the '98 Corvette, my Lego Corvette has a rear-mounted transmission. It's a four speed with no reverse, basically the Supercar design with different packaging. Aside from adding reverse, there's not much that could be changed or improved on from the Supercar design. I just wasn't motivated to try to add reverse. As with my Mustang, there was barely enough space to fit the tranny into space allotted as it was, and the added complexity (and space) required to add a reverse simply wouldn't be worth it in a car who's wheels turn its engine. I was really happy with the remote shift linkage. The pictures show it fairly well, so I won't try to explain to verbally. As with the Mustang, the parking brake exists mainly to allow me to say that it has a parking brake. The lever engages a fixed gear which slides onto the main differential gear, sort of like when you put a car into park. It works really well, the only catch is that it only works going forward. I put this in because it took very little space and is very simple. The drivetrain works great in all gears, very smooth and consistent. I have to say it works better than the Mustang. I attribute this mainly to the very stiff chassis structure. There's no variability or movement anywhere along the drivetrain to mess with the fitting of gears or placement of moving parts.
HOME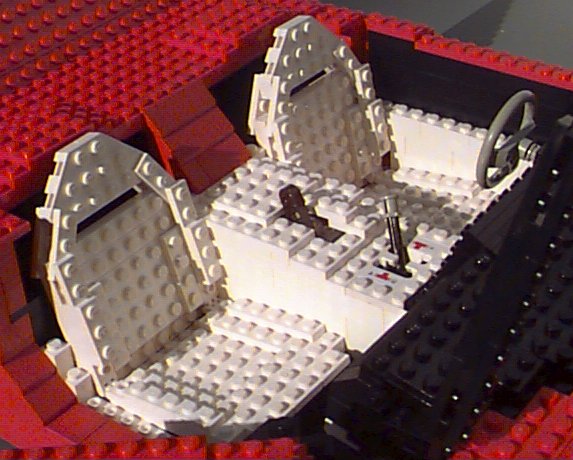
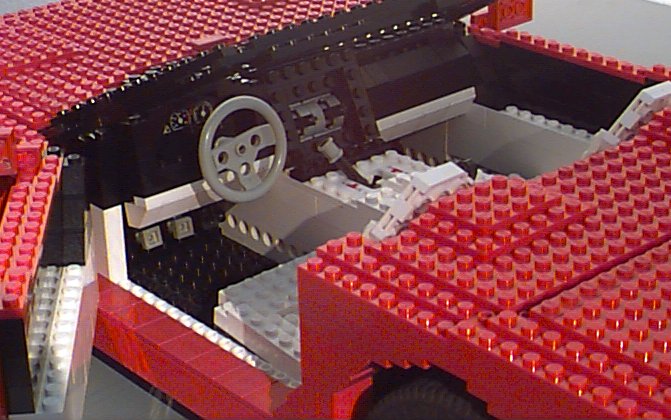
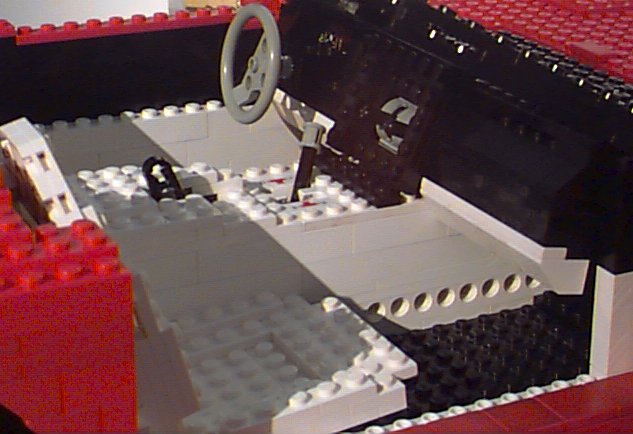
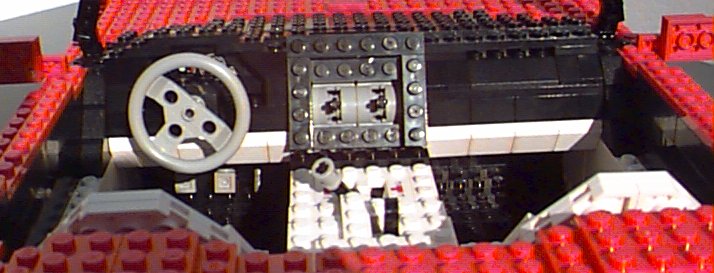
The interior is pretty basic and straight forward. The upper part of the doors and the dashboard are black while the bottom of the doors and seats are the interior color, as in the real car. In the real car the floor is the interior color, and the upper surface of the center console is black, but I couldn't do that. The Supercar shifter plate is white, so I had to make the whole console white to have it look good and I didn't have enough white plates for the floor. Another inaccuracy is that Corvettes don't have a white interior color choice, just gray, beige, red or black. So in the dream world of unlimited pieces, I would have made the interior gray, but again the shifter is white (that really stuck out in the Mustang's red interior) and I don't have enough gray pieces. The white interior also matches the wheels, which looks good. (Gray wheels would be really cool!)
The seats don't move, other than that the seatbacks tilt forward to allow access to the storage space behind the seats (which goes straight through to the trunk like in the real Corvette). To be accurate, the seats had to be very low to the floor, nestled between the frame rails. This didn't leave any space for fancy, knob-controlled movements. Even to have the seats simply slide forward and back, without falling out when the car was flipped over, would have required a whole brick in height. It didn't seem worth it to me, so I went basic. I do think the seats look good. The black spot in the upper part of the seat is actually open, like on the real Corvette. The real Corvette has metallic brake and clutch pedals, which I've replicated with gray pedals. The pedals are strictly for show. The electric switch on the right controls the headlights, up for up, down for down. The switch on the left turns the fiber optics on, up or down doesn't matter. The black knob between the seats is for the parking brake.
HOME, last updated January 27, 1998