The first step is assembling the miniature. Carefully clip all the
plastic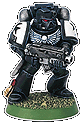 parts off their trees. Sand down any contact points still visible.
It's important to plan ahead of time what you will equip your marine
with. Most Templar's carry close combat weapons, make sure to plan
your poses out first hand.
parts off their trees. Sand down any contact points still visible.
It's important to plan ahead of time what you will equip your marine
with. Most Templar's carry close combat weapons, make sure to plan
your poses out first hand.
Next step is to prime your marine for painting. I've
heard people say to prime you Templars white and paint on the black.
But I have had no problems at all with priming my miniatures black
and leaving the primed black for the armors black. This will save
you tons of time.
Painting the white shoulder pads is the next step.
After the primer is dry your going to want to paint the shoulder
pads Bone White, this may take a few coats because of the black
primer. But it's easier imo than painting the black out lines on a
white base.
Painting the chest and eyes are the forth step. The
chest will take one coat of Boltgun Metal and if it has a skull on
it, than you will want to paint that Skull White. Add a light black
ink wash to the eagle and skull to add depth. If you want you can
also highlight with a dry brush of Skull White very lightly on the
eagle. The eyes are a layer of Red Gore with a high light of Blood
Red. Some people like to start with a layer of Blood Red and dark
red wash the eyes, but I find it's too hard to control the ink in
this area.
The next step is adding the high lighted areas.
Carefully dry brush the edges with Codex Grey. If you feel you want
the high lights to be sharper try Fortress Grey. Be careful not grey
the black armor too much. After all they are Black Templars!
Last steps! Shoulder pad detail and base. The
shoulder pads can be attacked in a number of ways, the codex gives us these examples.
Most people use the decals that come with the models but some order
their decals from other sites, such as Griffon
Games.
attacked in a number of ways, the codex gives us these examples.
Most people use the decals that come with the models but some order
their decals from other sites, such as Griffon
Games.
|