Headunit Relocation
This is a detailed step by step write up explaining how to go about doing a head unit relocation. My process will be explained in a manor of doing it by scratch. There are companies who make a �relocation kit� which consists of a lengthy wiring harness that�s simply plug and play. It�s probably much cleaner, but I, like most people, don�t want to waste money when it�s not necessary.
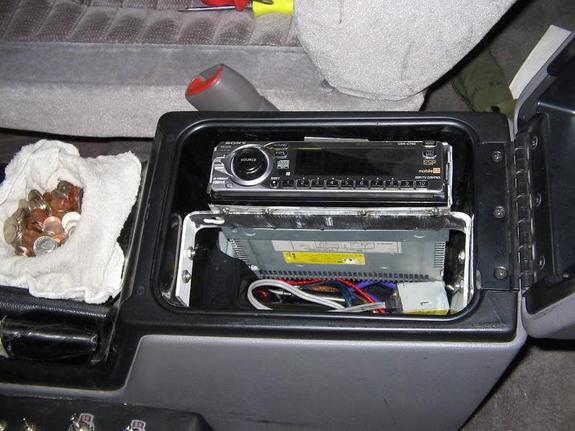
The first thing you�ll need to do is decide on a new location you wish to mount your head unit. If you don�t have a wired remote, a remote that you can reflect the signal to where the HU is located or within arms reach without taking your eyes off the road, I don�t suggest doing this. I decided on mounting mine in the arm rest storage compartment of my Grand Cherokee.
It�s also recommended by almost all manufacturers that head units are not mounted at more than a 45 degree angle. Doing so can cause abnormal heat dissipation, which may cause a short life span of the unit, and more than normal skipping of the disc, especially when vibrations occur. Despite what the manufacturers recommended, I mounted mine completely vertical, and haven�t had a single skipping problem in the long time I�ve had it mounted like this. My head unit is also from 1998, so the same may not apply to me as the new units.
The only reason I mounted it in the arm rest storage container is because my unit came with a wired remote. I went a few days when first installed without it, and became very annoyed and frustrated with having to reach over to my side, opening the arm rest, and then messing with changing the song or volume. When I�m using the wired remote, I can keep full attention on the road and use one hand to change songs, volume, and everything else.
Process
I suggest you don�t attempt this if you can�t do a simple head unit install. It�s a bit more involved than simply attaching a harness and crimping a few wires together. It�s also quite damaging to one or more of the harnesses because you�ll be cutting and soldering/crimping on pieces to run a good length to it�s new location.
The first thing you need to do is rip out the head unit from the factory location, and disconnect the harness from the back of the head unit. There should be a sticker somewhere on the head unit that tells you what wire is what. You�ll want to take the unit and try placing it where you want to mount it, and make damn sure it�s going to fit where you want it. Do not forget to account to the wire, harness, antenna plug and RCA plugs that will also need to fit behind the unit when it�s mounted.
After you�ve decided on a spot that you�d like to mount to, figure out how you�re going to secure it in this place to ensure it isn�t going to be sliding around, and so it�s sturdy enough that every little bump or crack in the road isn�t going to cause it to skip.
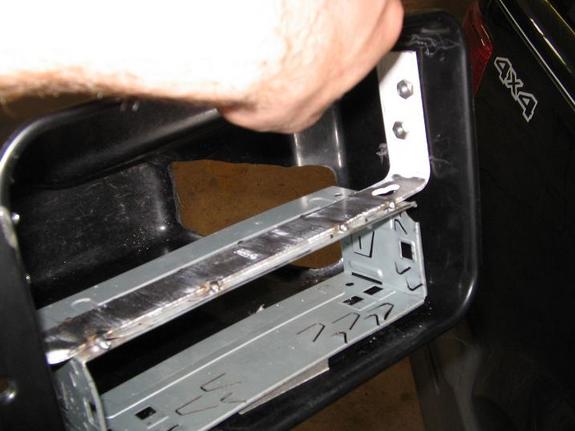
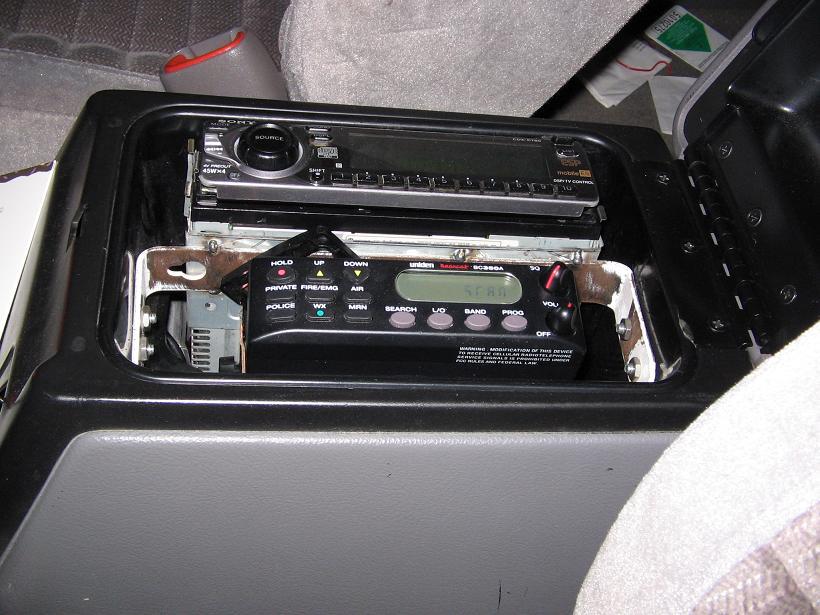
Since I didn�t intend on ever moving my head unit back to the factory location, or ever getting a different head unit because I found the old school one I wanted, I didn�t have to worry about what I was about to do. I took some metal brackets from a hardware store and bent them in a shape to fit around the inside shape of the storage compartment. It had to have enough space left on one side for the head unit, and enough space on the other side for the police scanner. I made sure it was both sturdy enough to support a little bit of weight, and fit perfectly so I could bolt it down.
The piece I bent was shaped like a �C� with 90 degree angles. It was just long enough to perfectly fit inside the storage compartment. I drilled 2 holes in each end, and put bolts with lock washers and nuts on it. It was tricky to find bolts just long enough to have enough thread left for the nuts to grip, and to make sure it wasn�t so deep that it would interfere with the storage compartment fitting back into the center consol. I made sure not to tighten them down too much, after all it was being bolted to nothing but plastic, so I had to be careful.
After everything was bolted in place and everything fit ok with enough space for the head unit and police scanner, I grinded off the paint from the bracket I just made, and took it next door to a car repair shop. I brought another bracket with me for the scanner, along with the cage from the head unit. Like I said before, I wasn�t worried about having to ever move or replace my head unit. I had a friend tack weld the cage and the other bracket. (The other bracket is what the police scanner mounts to, refer to that write up.) Since the cage is such thin metal, be very careful welding it. I had about 10 tacks put onto it, and it seemed quite sturdy.
I brought the bucket back to my car, and set the head unit in place, along with the police scanner to make sure it all fit properly. After assuring it all set in place correctly, time to move on with the wiring.
Back at the factory location, you should have a bunch of wiring to mess with. There should be ~10 crimped connections. Write down somewhere what each wire from the head unit harness is connected to on the next harness in line. After everything�s documented for later use, go ahead and cut out all the crimped connections. Take the head units harness and plug it into the back of the head unit, just to make sure you don�t lose it.
You now need to decide what wires you�re actually going to need. For example, if you�re not using the head unit�s internal amplifier, there�s no point in running the speaker wires from the factory harness to the new location. You do however need to for sure bring back the REM wire, Positive, and Ground wires. Not all, but most head units utilize a dimming feature. You need to look at the HU and determine which wires in the dash are the ones you need by crossing it with your documented info before you cut the crimped connections out.
Take a piece of string, or a run of wire, whatever you have handy, and do a test run to figure out length of wire you�ll need. This may end up being quite a long piece of wire, or a rather short one. With how I did my setup, I ended up having to run down the inside of the dash, down the middle of the cab, and into the center console�s arm rest, which worked out to be about 6 feet. Whatever length you come up with, add one or two feet to it, to make sure you have enough slack in the line to work with. If the factory wire is 18 and you aren�t planning on doing any wire upgrades to the head unit�s power and ground, then 18 gauge is fine to use. If it�s a considerable length the head unit is being moved, or the factory wire is bigger than 18 gauge, 16 gauge would be necessary. Remember, a wire is only as strong as it�s weakest point.
After you�ve figured out how long the wires need to be, get a spool of wire and cut as many lengths as you need. Solder or crimp (strongly encourage soldering)* all the new wires onto the wires you�ll be using. Wrap a piece of masking tape around the ends that are going to be going to the head unit, and number each individual wire. The numbers should be written down and correspond to what color wire they�re attached to. All the wires that aren�t being used, cut off the exposed copper, and wrap the ends with electrical tape to ensure nothing will happen with them.
Now you have to route the wires. Take some time and carefully route them to where they need to be. Make sure they aren�t being pulled tight across any corner or edge that could potentially cut the insulation off the wire. Also make sure they aren�t going to be interfering with any mechanical or moving parts, and they shouldn�t be touching anything that gets extremely hot that could melt the wire. Once they are all routed to the new location and pulled all the way through, you can go ahead and strip the ends and connect them back to the head unit�s harness. Make sure to run them through the middle of the cage so when the head unit is ready to mount, it�ll slide right into the cage. Make sure they�re all connected to the proper wires, check all your notes.
I�ll assume if you�re doing this process, you�re running aftermarket amplifiers. In which case you probably had the RCA cables run into the dash. You need to also re-route these to the new location.
The other thing that is potentially a pain in the ass is extending the antenna cable. I found it rather difficult to find something to do this. However, my local checker auto parts, or whatever their newest name is, their rather small, extremely crappy audio section had a 5 foot antenna extension cable. It wasn�t long enough to reach where I had my head unit relocated to, but I had bought a splitter cable that was about a foot long, so it was perfect length. I needed to split the antenna cable to be able to hook to the head unit for radio, and also to the police scanner to pick up signal.
After all the wiring is connected, turn the key backwards to make sure the unit powers up and functions properly. If all is good, slide the unit into the cage and you�re good to go.
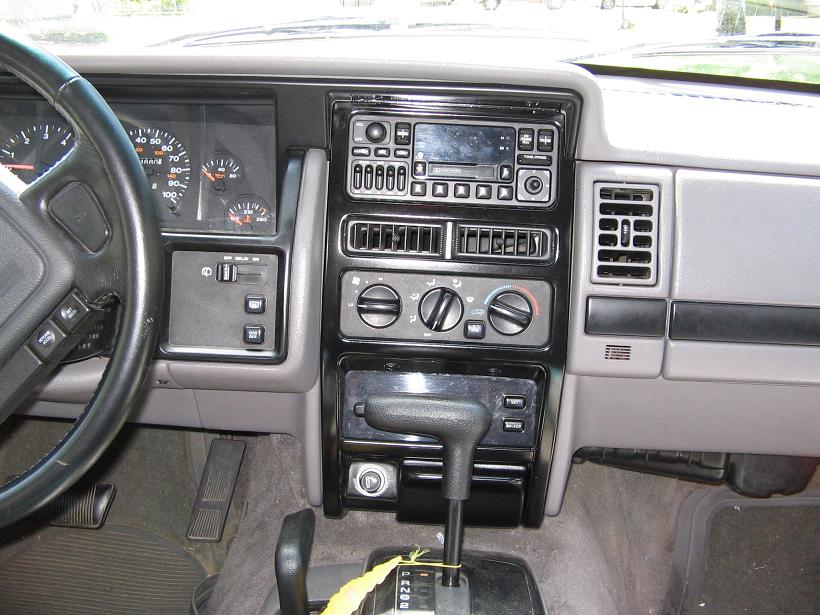
To make things even cooler, I decided to mount the factory unit back in the dash, just to keep everything looking stock. All I needed to do was solder on an extra foot long lead to the positive, negative and switched power wires to the factory harness. Now it appears to be perfectly stock. If I happened to get pulled over for loud music, I could also try and tell the officer that my factory radio doesnt even work, it must have been a different car. (yes, I know i'm a bad influence)
Also, a word of caution. If you're mounting your head unit in an enclosed area, figure out a way to keep it cool. Add a fan or two to the back of the enclosure to circulate air. Heat and electronics don't mix. I'm running 4 small low current fans just to keep air moving on the back side of the storage compartment's inside bucket.
Any questions or comments can be sent to me at [email protected]