 |
|
CHAPTER 1:
Basics of Flight Dynamics
 Before
we can begin to understand Basic Fighter Maneuvers, we need to
understand a few basics of flight. Most modern flight simulations
are doing a decent job of modeling the different variables that
help or hinder the practice of flight. Before
we can begin to understand Basic Fighter Maneuvers, we need to
understand a few basics of flight. Most modern flight simulations
are doing a decent job of modeling the different variables that
help or hinder the practice of flight.
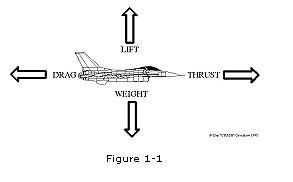
There are four
forces that effect flight; two that help and two that fight
against you. Thrust and Lift are essential for flight, but are
forced to overcome Drag and Weight.
Figure 1-1
Thrust
Thrust
is the force that causes an aircraft to move through the air. This
can be produced by anything from a jet engine to a rocket motor to
a propeller pulling your aircraft through the air. The measurement
of thrust is usually in pounds or newtons. It would seem pretty
obvious that the more thrust an aircraft engine produces, the
faster an aircraft can travel. The faster an aircraft can travel,
the faster the air can be moved across the wings, and thus the
more lift that can be generated.
The
power of fighter aircraft engines are expressed in a thrust to
weight ratio. The ratio compares the thrust of the engine to the
weight of the aircraft. The higher the ratio, the more powerful
the aircraft. Most combat aircraft have had between 0.7 to 0.9
thrust to weight ratio. The F-15 and F-16 fighter models actually
have a thrust to weight ratio of greater than 1.0 which allows
them to climb vertically. The Soviet built twin engine MIG-29,
with no weapons has a greater than 1.0 thrust to weight ratio …
with one engine turned off.
Lift
We
briefly touched on lift. Lift is the force generated by air moving
across the surface of the wing. To be more precise, it is the
force generated by the unbalanced movement of air across the top
as opposed to across the bottom of the wing. Due to the curvature
of the top of the wing being greater than the curvature of the
bottom of the wing, air flowing across the top of the wing must
move faster, to cover the greater distance, if it is to meet the
air moving across the bottom of the wing at the trailing edge of
the wing at the same time.
The
principal at work is known as Bernoulli's Law. Bernoulli, an 18th
century Italian scientist, discovered that the faster a gas
travels, the lower it's pressure. So if the air moving over the
wing is moving faster than the air moving under the wing, there is
more pressure below than above. This allows the higher pressure
below the wing to "push" up and "lift" the
wing.
The
faster the aircraft travels, the faster the airflow across the
wing. The faster the airflow over the wing, the more pressure
differential there is between the top and bottom of the wing. A
simplified example: if the pressure at 100 knots is 95 PSI on the
top of the wing and 100 PSI on the bottom, there is a 5 PSI
pressure differential.
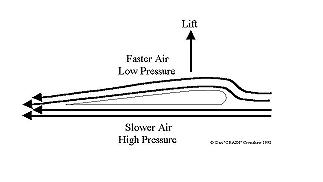
Figure 1-2
|
|
At 200
knots, the pressure would be 200 over 190, for 10 PSI
differential, or twice the lifting force. It should be noted that
there are those that claim the Bernoulli theory is incorrect and
that Newtonian theorems should be used. I have used the current
most accepted explanation of Lift.

Figure 1-3
We also
must take into account the AOA, or Angle of Attack, of the wing.
Initially the amount of lift increases with the AOA. But there
comes a point when the AOA is too high for the air to flow over
the wing. Without airflow, there is no pressure differential. With
no pressure differential, there is no lift. When this happens, the
aircraft stalls. While AOA can cause a stall, flying too slow can
cause a stall as well. When you fly slowly, you decrease the
amount of airflow over the wings, which in turn decreases lift.
When your lift drops too low to keep the aircraft aloft, you
stall.
Drag
Drag is
the opposite of thrust. Drag is the force that slows the aircraft
down. Drag is basically friction, the resistance of the air
against the structure of the aircraft. This may be a bit difficult
to understand. If you put your hand out the window of a moving
car, the wind pushes against it and tries to push it back. This is
drag.
Aircraft
designers try to eliminate as many drag inducing features as
possible. Bumps, rivet heads, paint, antennae, bombs, missiles,
drop tanks, even control surfaces (rudders, canards, etc.)all
cause drag. The smoother an aircraft's surface is, the less drag
will be induced. But you can never completely eliminate drag.
It is
very interesting to note the Soviet design concept. The Soviets
make the front of the aircraft as aerodynamic, thus less drag
inducing, as possible. Nose, wing leading edges, anything that
comes into contact with the air first is made as smooth and
flawless as possible. The areas behind these parts of the aircraft
are not considered as critical. By this time the air is
"dirty", or is in a somewhat turbulent state, since the
front of the aircraft has already pushed through and disturbed the
airflow. Because of this, they feel there is not much purpose to
spending the time or money to make these surfaces smooth. The
Western countries do not follow this same train of thought and
make the entire aircraft as smooth as possible.
Weight
Weight
is the opposite of lift. Weight is the effect of the gravitational
pull of the earth on the aircraft. We can always add more thrust,
or create a more efficient wing, or even reduce drag as far as
possible, but we can do nothing to counteract gravity. Gravity
will always win in the end (unless you hop on the Space Shuttle
and blast yourself out of the reach of the gravitational pull of
the earth … but then, that would not be flying anymore). If
thrust or lift become too low, or drag becomes too high, weight
and gravity will persevere.
Now that
you have a basic understanding of what actually holds your
aircraft in the air, we can start learning Basic Fighter
Maneuvers. I am sure you have figured out by now that holes in
your wing reduce lift and increase drag. So lets learn how to
avoid getting hit while making sure you cause some flight dynamics
problems for your opponent.
|
|
|
|
|
|
|
CHAPTER 2: Fundamentals of BFM
(Basic
Fighter Maneuvers)
While
the basic fundamentals and geometry of BFM are not very exciting
to read or learn, it is critical to understand these basics.
Without knowledge and understanding of these very basic concepts,
the remainder of these lessons will seem like so much jibberish.
Positional
Geometry
"Angle
Off", "Range", and " Aspect Angle" are
the common terms used when describing the relative positions as
well as the advantage or disadvantage of one aircraft vs. another.
Angle
Off:
Angle
Off is the difference between your heading and that of the bandit.
This difference is measured in Degrees. If you and your bandit are
heading in the same direction, you would be at an Angle Off of 0°
. At 90° angle off, you would be perpendicular to the bandit (see
Figure 2-1 for details). Angle Off is also known as HCA (Heading
Crossing Angle). This is the basic, root form of other, more
specific geometry’s (Angle Off Tail - AOT, and Angle Off Nose -
AON).
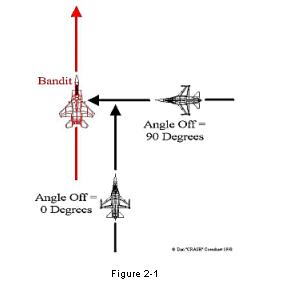
Figure 2-1
Range:
"Range"
is simply the distance between your aircraft and the Bandit. This
can be displayed in feet or miles. Most modern western military
aircraft HUD systems (Heads Up Display) read in nautical miles and
tenths of miles unless you are less than one mile from the target,
then the display will read in feet. Some European/Soviet aircraft
use the Metric system in a similar fashion. A nautical mile is
6000 feet. A bandit at a 3000 foot range would display as
"3000", a bandit at a 6000 foot range would display as
"1" mile, a bandit at a 9000 foot range would display
"1.5" miles.
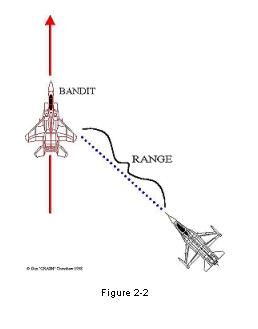
Figure 2-2
Aspect
Angle:
Aspect
Angle is the number of degrees, measured from the tail of the
bandit, to your aircraft. Aspect Angle indicates your relative
position to the bandits 6 o’clock position. Aspect Angle has
absolutely NOTHING to do with the heading of your aircraft. Your
aspect angle will remain the same regardless of your Angle Off.
Aspect angle is determined from the tail of the opposing aircraft.
The tail, 6 o’clock position, is 0° . The nose of the Bandit is
180° . If you are on the right side of the bandit, that is right
aspect. If you are on the left side, this is left aspect.
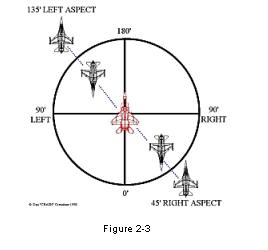
Figure 2-3
 In
figure 2-3 the two F-16’s in the lower right corner are both at
45 Right Aspect. The two F-16’s in the upper left are at 135
Left Aspect. In
figure 2-3 the two F-16’s in the lower right corner are both at
45 Right Aspect. The two F-16’s in the upper left are at 135
Left Aspect.
Aspect
Angle is very important in assisting in determining your position
from the bandit. By using Aspect Angle and Range, you can
determine the "lateral displacement", or turning room
available.
ATTACK
GEOMETRY
Attack
Geometry describes your Offensive aircraft’s flight path to its
target. Very simply, if you are pointing behind your target
aircraft, you are in "Lag Pursuit". If you are
"Nose On" the target, you are in "Pure
Pursuit". And if your nose is pointing in front of the
target, you are in "Lead Pursuit".
Lag
Pursuit:
Lag
Pursuit is primarily used for approaching the target. It can also
be used when a bandit pulls out of plane; that is, when the bandit
pulls out of the same plane of flight, or motion, as the attacking
aircraft (See Figure 2-4). To fly Lag Pursuit for any extended
length of time, you must be able to out turn the target. In a 1V1
fight with like aircraft, you would not want to maintain a Lag
Pursuit for very long. You must be able to out turn the target in
order to pull your nose out of lag to shoot guns or a missile. If
the target is able to out turn you, or at least match your turn
rate, he will be able to keep you in lag and prevent you from
getting a shot.
Pure
Pursuit:
Pure
Pursuit is exactly what it sounds like. You keep your nose on the
target and fly straight at him. A Pure Pursuit path all the way to
the bandit will lead to an over shoot. This is reason enough not
to fly in Pure Pursuit and put your nose on the target until you
are ready to shoot him. Use Pure Pursuit for missile shots.

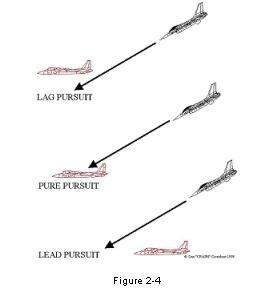
Figure 2-4
|
|
Lead
Pursuit:
Lead
Pursuit is the "short cut" to the target. You fly Lead
Pursuit to close on the target and get into weapons parameters.
This is also the most commonly used pursuit for Guns shots. You
must be careful not too establish Lead Pursuit to early or you
will over shoot the bandit when you get in close, unless you have
a much higher turn rate than the bandit. When flying against an
aircraft with similar abilities (F-16 vs. MIG-29 etc.), you will
not be able to maintain a Lead Pursuit for very long, and may be
forced into an overshoot situation. It is critical to pick when
you go into Lead Pursuit to close the gap to set up in Guns
parameters.
I
have been forced to go Lag to Lead to Lag to Lead, several times
over in some dogfights. This is not desirable. You want to pull
your nose on the bandit and shoot him, get it over and done with.
This sort of maneuvering also bleeds speed at a higher rate, which
is just not a good idea. If you find yourself very evenly matched,
you may have no choice but to "dance" for a while to
line up a good kill shot.
Determining
the Pursuit Course:
There
are two positions that the bandit can be in, "In Plane"
and "Out of Plane". Figure 2-5 shows both "In
Plane" and "Out of Plane" examples.
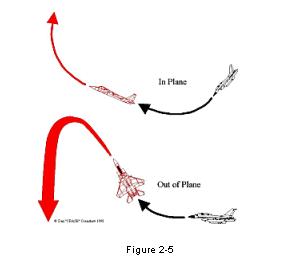
Figure 2-5
"In
Plane" is where the attacker and the defender are both in the
same plane of motion. If the bandit is "In Plane" with
your aircraft, the HUD Velocity Vector will determine the pursuit
course you are taking. See figure 2-6 for an example of a Flight
Path Marker in a HUD displaying Velocity Vector.
Figure 2-6
The
Velocity Vector is the direction your aircraft is traveling. For
the sake of explanation, this can be determined by the nose of the
aircraft. It represents the direction of travel of your aircraft.
The Flight Path Marker on your HUD will indicate your Velocity
Vector. If the defender and attacker are not in the same plane of
motion, then you are "Out of Plane". To determine the
pursuit course during "Out of Plane" maneuvers, use your
"Lift Vector". Figure 2-7 demonstrates "Lift
Vector".
Figure 2-7
"Lift
Vector" is simply a vector pointing out of the top of the
aircraft. This is the direction the aircraft moves at high G’s.
You position your Lift Vector by rolling the jet so that the Lift
Vector points in the direction you want to go. The nose of the
aircraft will track towards the Lift Vector.
When
an attacker pulls "Out Of Plane", he is technically
flying "Lag Pursuit". As he pulls back into the bandit,
he may be flying Lead, Pure or Lag pursuit, depending on the
maneuver. Remember, when you are attacking, where you position the
nose of your aircraft is VERY important.
The
Weapons Envelope:
The
Weapons Envelope is often overlooked as a fundamental and listed
in other areas of BFM instruction. But if you do not know and
understand the Weapons Envelope and how it affects your choice of
maneuvers, you will not be able to make good choices for the next
move you should make.
The
Weapons Envelope is the area in which a particular weapon is
effective. It takes into account the weapons maximum and minimum
range, weapons capabilities, Aspect Angle, Speed, Angle Off,
Relative Headings ... what I am I missing? Basically, the Weapons
Envelope is determined by every possible variable imaginable.
The
basic shape of a Weapons Envelope is that of an egg shaped
doughnut that you impose over the BANDIT. See Figure 2-8.
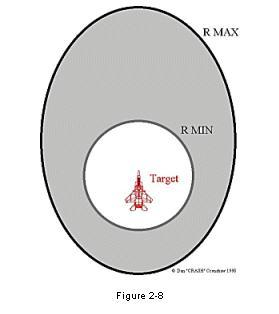
Figure 2-8
RMAX
is the maximum effective range and RMIN is the minimum effective
range of a particular weapon. Figure 2-8 is an example of a
weapons envelope of an All Aspect missile. A Rear Aspect missile
would not have the front lobe of the "egg". As you can
see, the effective operating range to the front of the bandit is
much larger than the rear area. Obviously, if you are shooting the
bandit in the face, he is moving towards you as your weapon moves
towards him ... he is doing half the work for you. While a rear
aspect shot forces the weapon to "chase down" the
target. If you shoot too soon, the missile will burn out it’s
motor before even coming close to the target Remember this when we
get to Chapter 4: Defensive BFM.
Figure
2-8 is a "perfect world" example of a Weapons Envelope,
the bandit flying straight and level. The shape of the Weapons
Envelope will change as the target starts to maneuver and pull
G’s. The Weapons Envelope will deform and may grow in one area
while almost completely disappearing in another. It should go
without saying, the target will attempt to put the less effective
portion of the Weapons Envelope towards you. Remember this as well
for the Defensive BFM chapter, what works for them will work for
you too.
Most
missiles will have similar Weapons Envelopes, RMIN and RMAX
figures being the primary difference. As I said before, Rear
Aspect Only missiles would not have the forward portion of this
diagram. Guns are the other exception. You are close enough to
minimize the effect of the bandits movement for RMAX range, so the
"egg" becomes more rounded. There is no minimum range on
a bullet. You can have your nose half way up the targets tailpipe
and still shoot guns. The problem here is that you may end up
killing yourself as pieces of your opponent start coming off and
smacking your aircraft. Most recently released sims as well as
some on the way have begun to model this aspect of air combat. So
beware just how close you get before you take the shot.
|
|
|
CHAPTER 3:
OFFENSIVE BFM
 This
is the lesson that most of you really want and think will give you
the edge. I should have made this the last lesson to keep you from
stopping your training here … too early. But, in order to
understand the defensive maneuvers that we will discuss next
lesson, you need to know what the offensive maneuvers look like
first. This
is the lesson that most of you really want and think will give you
the edge. I should have made this the last lesson to keep you from
stopping your training here … too early. But, in order to
understand the defensive maneuvers that we will discuss next
lesson, you need to know what the offensive maneuvers look like
first.
Offensive BFM is,
in a nutshell, what you need to do to kill your opponent. You need
to keep your maneuvers smooth and graceful. Sudden jerks, quick
directional changes, and basic rough handling of the aircraft will
cause loss of energy, speed and attitude (both of the aircraft and
your mental attitude when all your fancy moves makes you a
wallowing, low speed pig, ripe for the kill by your opponent).
The basic
objective of Offensive BFM is to put you in control of the fight,
and in position for the killing shot. If your opponent has no idea
that you are there and maintains a straight and level flight path,
no BFM is needed. You just drive up behind the bandit and shoot
him. Offensive BFM is needed when the bandit is aware of you as a
threat and attempts to maneuver away from you.
Once your opponent
has begun Defensive BFM maneuvers, you need to employ Offensive
BFM maneuvers. To maintain control of the encounter, you must
maintain a position in the "6 o’clock" area of the
bandit. This is the position where you will get the most
effective, likely and controlled shot. This is also known as
"flying to the elbow".
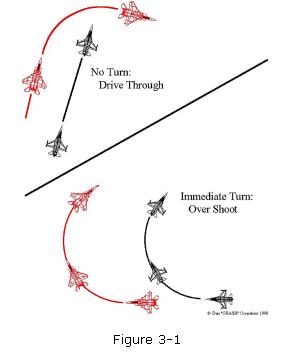
Figure
3-1
Figure
3-1 shows two different scenarios of not using Offensive BFM once
a bandit starts to break. If you do nothing, you will drive
straight ahead, lose the Angle advantage and will most likely put
you at the disadvantage in a hurry. If you turn immediately with
the bandit, you will probably end up in front of the bandit and at
an obvious disadvantage.
What we
need here is a hybrid of these two maneuvers to resolve the Angle
Problem created by the bandit’s turn. We need to decide how and
when to turn based on what the bandit is doing.
Turns
One of
the most encompassing and important parts of BFM, of any type, is
the turn. To be able to develop competency and skill in BFM, you
must understand some basic concepts of turns. We will discuss
positional energy, turn radius and rate, corner velocity, and
turns in the vertical.
Energy:
There
are two types of energy in air combat maneuvering: kinetic and
potential. Kinetic energy is directly related to the speed or
velocity that the aircraft is traveling. Potential energy is
"stored" energy available for use. This does not mean
stored like in batteries. Potential energy is directly
proportional to the altitude of the aircraft. At high altitude,
the aircraft has a HIGH potential energy, while at low altitude,
the potential energy is LOW.
The
easiest way to explain this is to visualize a jet at 30,000 feet.
This pilot has the option to put the jet into a dive, thus
increasing his airspeed. The higher he is flying, the more speed
he can generate in a dive. An aircraft at low altitude of 5,000
feet has much less room to increase speed in a dive.
Always
remember: you can trade altitude (potential energy) for speed.
Likewise you can trade speed for potential energy. If you have
one, you have the ability to have the other when you want or need
it.
You can
also trade energy for nose position. As I mentioned in lesson one,
maneuvering costs energy, and any "dancing" you do will
cause your aircraft to slow down and lose energy. The higher the G
pull in a maneuver, the more "costly" to your energy
level it is. The only consolation to this is that the bandit is
working under the same laws of physics and has the same problems
to overcome.
Turn Radius and Rate:
Turn
radius and rate are the two primary characteristics of turns.
Radius is just the "tightness" of the turn circle. If
you were to look down from a Gods Eye View (see Figure 3-2), the
radius is the distance from the center of the turn to the turn
circle, or plane, of your aircraft in feet. While the actual math
for calculation of turn radius is not important (TR=V2/gG
where TR is Turn Radius, V2 is Velocity squared, g is
gravity and G is G force. Got that?), it is critical to understand
that Turn Radius increases exponentially with velocity, or speed.
A 500 knot turn at 9 G’s will not be twice the size of a 250
knot turn at 9 G’s, but roughly 4 times the size. Just remember
that airspeed has a much greater effect on turn radius than does G
force effect.
Figure
3-2
Turn
Rate is how fast your aircraft can get around the Turn Radius. It
also indicates the speed of which you can change the nose position
of the aircraft. Turn rate is dependant upon G’s and Velocity
(Turn rate = KG/V, where K is a constant and G and V are the same
as in the turn radius calculation. The constant is based upon
several factors including altitude, humidity, temperature etc.).
Turn rate is measured in degrees per second.
|
|
To
really over simplify this, if the velocity remains constant the
higher the G’s the faster the turn rate. And inversely, if the
G’s remains at a constant, the lower the velocity, the faster
the turn rate.
CORNER
VELOCITY:
Corner
Velocity is the airspeed at which your aircraft has the fastest
turn rate and tightest Turn Radius. This is not the slowest you
can fly while pulling back on the stick as hard as you can. You
can not pull higher G’s at slower speeds. Less lift is
available, therefore there is less force available to work with.
Also,
at high air speeds, you are unable to pull high G’s. So
somewhere in between really fast and really slow is your Corner
Velocity. In most modern jet fighters simulated, this is between
400 to 500 KCAS (knots, computer airspeed). There are exceptions
of course: EF2000 has a corner velocity of about 350 KCAS. If
there is no documented speed in the manual, you will need to play
with the handling to figure it out. It also needs to be noted that
altitude can affect this figure as well.
There
are 4 basic means by which you can adjust your airspeed, up or
down, to reach Corner Velocity.
Throttle
position:
Pretty
simply here, more throttle to increase your speed, less throttle
to slow down.
Drag
Devices:
So you
are going too fast and chopping the throttle won’t slow you down
fast enough to get to Corner Velocity as soon as you need to. Your
main device here is your speed brake. You can also use flaps and
as a last resort (not recommended), you could use your landing
gear. Be careful with this last one. Many simulations are modeling
gear damage due to lowering at excessive speed. You may end up
with your gear in a permanently down and damaged position, making
maneuvering, and ultimately landing, rather difficult.
Nose
Position:
Nose
Position refers to the nose of your aircraft in relationship to
the ground. Point down and you can increase your speed, point up,
and you bleed off speed.
Aircraft
G’s:
The
higher G force you exert on the aircraft, the faster you will
bleed off energy (speed).
These
methods can be used singularly or combined, depending on how much
speed you need to increase or decrease. I have often found myself
with a chopped throttle, speed brakes out, pulling into a high G
slow banking climb in an effort to slow down in a hurry.
Point
to remember: your first turn is the most important turn in the
fight. Blow it and allow the bandit on your 6, the fight could end
very fast and with an outcome you would rather not talk about. Use
all your tools to achieve corner velocity, and you could be on the
bandits 6, in control of the fight, and in a very good position to
add a tally to your kill sheet.
"Rate
Kills" is a common fighter saying. Simply put, a fighter with
a higher turn rate can out maneuver a fighter with a tighter Turn
Radius. The ability to put your nose on the bandit to allow a shot
is more important that being able to fly in a tighter circle. Get
to your Corner Velocity, pull your nose on him, shoot him … the
party is over, you win. You no longer have to worry about him.
VERTICAL
TURNS:
There
are two key factors for you to consider in a dogfight; the bandit
and the ground. Both can kill you. However, the ground can also
help you. The gravitational pull of the earth can actually allow
you to pull a faster turn rate and tighter Turn Radius than a turn
that has you parallel to the ground.
The
earth’s gravitational pull causes the actual G force to be
different from the G meter reading in your HUD. This is also known
as Cockpit G OR "Gods G". The actual G force affecting
the fighter is known as "Radial" G’s. Figure 3-3 shows
an example of Radial G force vs. Cockpit G force.

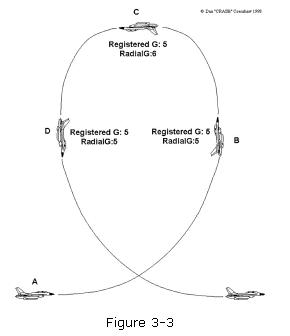
Figure 3-3
At
point A, the fighter begins a high G vertical turn. The HUD is
reading 5 G’s. At point B, in the pure vertical, the HUD and
actual G force are the same. HUD G registry is the actual G force
applied if you are in a full vertical climb or dive. Gravity has
no affect on Cockpit G in this position.
At this
point, your Lift Vector is parallel with the ground. The less
parallel the Lift Vector is with the ground, the more effect G
force will have on your maneuver, up to a maximum of 1 G. If the
Lift Vector is pointing up, you would subtract the G force from
your HUD reading. If the Lift vector is pointing towards the
ground, you would add to the G force registered. Radial G is
merely the effect of gravity on cockpit G. At Point C, completely
inverted, the HUD reads 5 G’s, but Radial G’s are actually 6
G’s. As the jet continues down the backside of the vertical
turn, at point D, the G force and actual G force is identical
again at 5 G’s.
Radial
G describes the effect of the gravitational pull of the earth on
the aircraft, which could be positive or negative, depending on
the attitude, position and maneuver of the aircraft. Radial G is
also the determining force for Turn Rate. Each Radial G could be
worth up to 4° of Turn Rate per second!
|
|
|
CHAPTER 4:
DEFENSIVE
BFM
 The
call comes over the virtual radio, "I’ve been hit!".
You execute a Wingman Padlock only to see "2" rolling
into a spiraling dive, flames and smoke belching from the
aircraft. The
call comes over the virtual radio, "I’ve been hit!".
You execute a Wingman Padlock only to see "2" rolling
into a spiraling dive, flames and smoke belching from the
aircraft.
You think to
yourself, "Where did that come from" as you frantically
do a search for bandits … you spot him. The MIG that just took
out "2" is moving into position on your "6" to
take his next ATOLL shot … at you.
Welcome to
Defensive BFM. You are in the worst position a fighter pilot can
be in … on the defensive. In Chapter 3 we learned the basic
Offensive maneuvers to get into and stay in control long enough to
take a "Killing" shot. In this lesson, we will learn
what to do to keep the bandit out of the "Kill Zone". If
that fails, what to do to avoid getting hit by the
"Killing" shot.
When you think of
Defensive BFM, think of High G, difficult maneuvers that are
executed while straining your neck to watch what the bandit behind
you is doing. There is no magic move … no, you can not
"Just hit the brakes and he will fly right by" like Tom
Cruise did (Unless you are flying the Pre-TACTCOM or Pre-Version
2.O versions of EF2000 ... then it works like a charm). To avoid
getting killed by the bandit, you’re going to have to work
pretty darn hard. As in Offensive BFM, you want to keep your
movements smooth and fluid, no sudden maneuvers.
Keep in mind, if
you fly perfect Defensive BFM and the bandit flies perfect
Offensive BFM … "your gonna die". What you want to do
is cause BFM problems for the bandit and force him to make a
mistake. If he does not, all you can do is make him work for the
kill and force him to close to gun parameters, then you must work
to defeat his gun shot.
Detection
Most kills are on
a target that had no idea he was about to get hit. Before you can
execute Defensive BFM, you need to know there is a threat. There
are 3 basic ways to detect a threat.
RADAR:
RADAR is probably
the best way for detection. It has good range (usually 60 or more
miles), allows you to lock weapons onto your target, can allow you
to track his movements … pretty much, if you get a bandit on
RADAR, you can keep him there and know what he is doing.
The problem is,
RADAR is limited in scan area. You can not always pick up a bandit
and you have a rather large blind area to deal with. You may need
to use one of the other resources to get a general bearing on the
bandit in order to use RADAR. You can also do frequent
"sweeps" to search you area. The 209th
usually uses a leapfrog method for sweeping, one aircraft will
perform a sweep while the rest of the flight moves along the
flight path. If the sweep is negative, he moves back towards the
flight. About the time he rejoins the flight, it is time for
another sweep. The job gets handed off to the next plane in the
wing.

TWS:
TWS (Threat
Warning System, DASS also falls into this category, sort of.) will
react if RADAR is looking at you. It will pick up airborne as well
as ground threats. It does not pickup Electro-Optical targeting
devices or threats not using RADAR. So, again we have some
limitations.
I am going to lump
JSTARS and AWACS into this ategory as well. Some of the newer sims
are modeling these systems. Most JSTAR type systems will give you
a gods eye view of EVERTHING in the air. This is regardless of
whether or not they are a threat, emitting RADAR, 300+ miles away,
etc. They tend to work a bit too well in the gaming environment.
But if the game has it as a resource … use it. AWACS has been
modeled in various forms, some similar to a JSTARS type system
while others just offer up digital heading calls. SU-27 has an
AWACS view that lends itself extremely well to multi-player use.
This system allows a person to actually perform the AWACS function
and give out calls for bearing and prioritization.

VISUAL:
Your
eyeballs … probably the best detection device ever. Regardless
of how you first detect the bandit, when you get into a furball
… you are going to have to rely on the old glassies to keep tabs
on him.
THREAT IDENTIFICATION
We know
how to find the threat … now how do we identify the threat? I do
not mean, is it a MIG-29 or and SU-27, I mean which item in the
air RIGHT NOW should you be most concerned with. Probably the most
common mistake I see anyone make, and even veterans will get
caught in this trap now and again, is not defending against the
most immediate threat.
|
|
The
missile lock klaxon is going off in your cockpit … you KNOW you
have a missile inbound, but if you hold this line just a couple
more seconds, you can kill this bandit you are tracking. STOP! If
you are certain a missile is tracking you, do nothing else but GET
OUT OF ITS WAY! As soon as you know you have a missile tracking
you, find it using your aircraft’s sensors and your eyes and
begin evasive tactics.
CRASH'S
RULE NUMBER 2: If you have someone or something shooting at you,
get out of it's way before you even think about attacking a
target.
How do
you evade a missile? There are several techniques, some of which
are better and more reliable than others are. They all use the
same basic root principal … "Fight Missiles with
Aspect". What this means is you want to give the missile the
most difficult guidance solutions possible by making it maneuver.
The first thing you want to do is put the missile on your 3/9 line
and "Beam" it.
Your
3/9 line is the imaginary line that goes across your aircraft from
left to right. If you look down at the top of your aircraft, and
imagine it sitting on a clock face nose pointing to 12 o'clock,
you will be able to visualize the "3/9" line. Missiles
fly in Lead Pursuit to increase their range, so by putting the
missile on your 3/9 line you will cause it to pull maximum lead.
As you do this, drop chaff and flares. This may confuse the
missile as it tries to create guidance calculations. Do not try
and let the missile close in and expect to pull a high G turn to
force the missile to over shoot you.
Missiles
are designed to explode if they over shoot, (Now you know why you
keep getting hit even though the missile went past you) your
attempt to pull around the missile will bring you close enough to
it that on explosion, you will take damage. (Note: missile damage
is frequently collateral damage, direct hits are not required to
kill you. A common missile design throws steel bars in a wide ball
shaped area when it explodes). You need to judge timing for a
break away from the missile as you drop chaff and flares. Near the
end of the missile’s flight (after the motor has burned out) you
want to pull a high G turn causing the missile to try and pull a
turn with you. The chaff and flares may confuse the missile as it
tries to track you and it may lock onto that leaving you a get
away. Don’t wait too long or, once again, you will be in the
blast radius of the missile.
I
mentioned motor burn out, once a missile motor is burned out, it
loses maneuvering and any high G turn it is forced to make becomes
unrecoverable energy that causes it to slow down. Most simulators
do not do a very good job of this, but these types of maneuvers
will still work.
Extra
Added Bonus:
In the
EF2000 family of games you can put a missile at your 12 o’clock
and do wide barrel rolls. This will spoof a missile just about
every time. Problem is in EF, you usually have more than one
coming at you at a time.
DEFENSIVE
BFM
Remember
I told you that the first turn, BFM maneuver, in a fight is the
most important? There are a couple of reasons I say that. Pete
Bonanni makes an excellent point in "Art of the Kill",
when you pull that first high G maneuver, not only are you
creating BFM problems for the bandit to resolve, you are making a
clear statement that "I am going to stay alive. If you are
going to kill me … your gonna have to work hard for it."
(Pete said it with a little more flamboyance … "It’s you
and me for all the wine and women in the world".) A mid or
low level G turn is almost a surrender ... at this point you might
as well just fly straight and level and let him shoot you.
The
other reason, as we mentioned, is to create BFM problems for your
new friend back there. We know we want to get to corner velocity.
If you are not there yet, start your maneuver anyway and try to
get there. Slowing down is easy, cut the throttle – pull your
G’s and make your speed. Speeding up is not so easy … good
argument for cruising at or above corner velocity. (I know of no
one that flies slower on purpose, but you should pay attention).
Pull your turn, put your velocity vector ON THE BANDIT. If you do
not, you will create additional turning room for the bandit when
you are trying to take it away. Figure 4-1 shows a defending
aircraft creating turning room for his attacker.

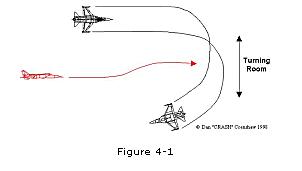
Figure 4-1
OUTSIDE
THE TURN CIRCLE
You
want to begin your BFM turn as soon as possible. If you spot the
bandit early enough and can begin your BFM while he is still out
side of your Turn Circle, you can turn a defensive position into
at least a Head On Pass, or even an offensive position.
So
there is no missile and you have a bandit on your six, you begin
Defensive BFM. How do you know what to do next? How do you know
what you are doing is working? If your turn is moving the bandit
away from your 6 o’clock position and up towards your 3/9 line,
it is working. You want to get the bandit forward of your 3/9
line. If you start your turn while the bandit is outside your turn
circle, and you put your lift vector on him and execute the turn
correctly, you should force the bandit in front of your 3/9 line.
Here is where it gets a little tricky.
If the
bandit pulls a Lead Pursuit while you are executing the turn that
is forcing him in front of your 3/9 line, he will get the
opportunity for a gun shot as he over shoots. Watch out for this.
If he starts to pull Lead Pursuit the best way to defend for this
is to quickly pull out of plane. At this point, you have to judge
when to make your "jink" out of plane. Don’t wait too
long, if you’re too late ... your dead, if your too early, you
just need to "jink" again. Better too early that too
late.
|
|
|
Chapter
Five:
Head on BFM
 Head On BFM, the
most dreaded and difficult of BFM situations. Your aircraft is
"nose on" to the bandit, and he is "nose on"
to you. When used as a Competition set up, you are generally
required to make a clean first pass, no shots fired and once the
3/9 line is cleared, "FIGHTS ON!" Head On BFM, the
most dreaded and difficult of BFM situations. Your aircraft is
"nose on" to the bandit, and he is "nose on"
to you. When used as a Competition set up, you are generally
required to make a clean first pass, no shots fired and once the
3/9 line is cleared, "FIGHTS ON!"
 For this purpose,
a lead turn is excellent. Both combatants are at an equal
advantage/disadvantage and this sort of fight requires more
maneuvering, tactics, skill and luck than any other BFM. For this purpose,
a lead turn is excellent. Both combatants are at an equal
advantage/disadvantage and this sort of fight requires more
maneuvering, tactics, skill and luck than any other BFM.
 But in a WAR
(campaign, custom mission, any actual game situation) chivalry is
dead. There will be no clean first past. Odds are, the yokel
heading at you will start spraying you with bullets the second you
are in range. Of course, the exceptions here are in games that
have realistic load outs. I do not think anyone in their right
mind would start spraying bullets in SU-27. With only 150 bullets,
they all need to count. But in many other sims, with over zealous
bullet loads, expect the "curtain of tracers". But in a WAR
(campaign, custom mission, any actual game situation) chivalry is
dead. There will be no clean first past. Odds are, the yokel
heading at you will start spraying you with bullets the second you
are in range. Of course, the exceptions here are in games that
have realistic load outs. I do not think anyone in their right
mind would start spraying bullets in SU-27. With only 150 bullets,
they all need to count. But in many other sims, with over zealous
bullet loads, expect the "curtain of tracers".
 You have many
decisions to make rather early on in Head On BFM. Do you commit to
a Turning Fight? Do you opt for a "blow through" and
extension and run away? If you commit to the Turn Fight, do you go
for a two circle fight or a single circle fight? All of this must
be decided before you even enter the fight. And in a Head On
fight, closure speeds can easily exceed 1000 KIAS, so you don't
have a lot of time to decide. You have many
decisions to make rather early on in Head On BFM. Do you commit to
a Turning Fight? Do you opt for a "blow through" and
extension and run away? If you commit to the Turn Fight, do you go
for a two circle fight or a single circle fight? All of this must
be decided before you even enter the fight. And in a Head On
fight, closure speeds can easily exceed 1000 KIAS, so you don't
have a lot of time to decide.
There are several
factors that can help you make this decision. We need to remember
that a Turn Fight, or Knife Fight, eats up time and energy. Time
is critical, since if you get tied up in a fight, the longer you
are in the fight, the more time there is for one of your
playmate's friends to show up and sucker punch you. Energy is
obviously needed for maneuvering.
 There are many
reasons to "blow through" and leave a fight. There are
also as many reasons to stay and fight. This lesson will give you
some basic guidelines to help you lay out a strategy for a fight.
The first thing you will need to know and remember is the
"Escape Window" There are many
reasons to "blow through" and leave a fight. There are
also as many reasons to stay and fight. This lesson will give you
some basic guidelines to help you lay out a strategy for a fight.
The first thing you will need to know and remember is the
"Escape Window"
ESCAPE
WINDOW
 A fighter pilots
job is to enter a fight, shoot down the enemy and live to be able
to do it again. A priority when entering a fight is to be aware of
your position in relationship to your "escape window".
What is an escape window? An escape window is a loose
representation of your ability to extract yourself form an
engagement. It is called a window because it can open or close in
varying degrees depending on the current situation, position and
energy level of your aircraft. A fighter pilots
job is to enter a fight, shoot down the enemy and live to be able
to do it again. A priority when entering a fight is to be aware of
your position in relationship to your "escape window".
What is an escape window? An escape window is a loose
representation of your ability to extract yourself form an
engagement. It is called a window because it can open or close in
varying degrees depending on the current situation, position and
energy level of your aircraft.
 If you sneak up on
a bandit that has no clue you are there, your escape window is
enormous. You have the ability to leave the fight at anytime you
want, you have complete control. The window is wide open. But if
the tables are turned and a bandit sneaks up on you, the window is
closed. Any attempt you make to leave the fight will most likely
end in you getting shot down. In between these two extremes the
window can fluctuate in size. The smaller the window, the less
your chance of getting out of a fight alive. In any maneuvering
fight, the window will close completely at some point. You are
then committed to stay in the fight to the conclusion. If you sneak up on
a bandit that has no clue you are there, your escape window is
enormous. You have the ability to leave the fight at anytime you
want, you have complete control. The window is wide open. But if
the tables are turned and a bandit sneaks up on you, the window is
closed. Any attempt you make to leave the fight will most likely
end in you getting shot down. In between these two extremes the
window can fluctuate in size. The smaller the window, the less
your chance of getting out of a fight alive. In any maneuvering
fight, the window will close completely at some point. You are
then committed to stay in the fight to the conclusion.
 In figure 5-1, the
attackers escape window is open. The bandit can not turn and get a
shot on the attacker as he passes through the fight. In figure 5-1, the
attackers escape window is open. The bandit can not turn and get a
shot on the attacker as he passes through the fight.
Figure
5-1
 If the
attacker turns to roll out of the fight, the bandit can not
reverse his turn fast enough to engage. If the attacker
"Blows Through" and extends, by the time the bandit can
come around to engage, the attacker is out of range. If the
attacker turns to roll out of the fight, the bandit can not
reverse his turn fast enough to engage. If the attacker
"Blows Through" and extends, by the time the bandit can
come around to engage, the attacker is out of range.
 In
figure 5-2, the window is closed. An attempt to leave the fight
will give the bandit the opportunity to turn and engage the
attacker. The attacker has tried to leave the fight , and the
bandit has reversed his turn and lined up on the attackers 6. In
figure 5-2, the window is closed. An attempt to leave the fight
will give the bandit the opportunity to turn and engage the
attacker. The attacker has tried to leave the fight , and the
bandit has reversed his turn and lined up on the attackers 6.
Figure
5-2
 If the
attacker reverses to leave the fight, the bandit has plenty of
time to turn and engage from a 6 o'clock position. Any attempt to
"Blow Through" will probably cause an overshoot, or
allow the bandit ample time to reverse and engage. If the
attacker reverses to leave the fight, the bandit has plenty of
time to turn and engage from a 6 o'clock position. Any attempt to
"Blow Through" will probably cause an overshoot, or
allow the bandit ample time to reverse and engage.
 Figure
5-3 shows a classic "Lufbery". In this fight neither
aircraft can leave, both windows are closed. The first one to try
and leave will get shot. Figure
5-3 shows a classic "Lufbery". In this fight neither
aircraft can leave, both windows are closed. The first one to try
and leave will get shot.
Figure
5-3
 While
it is important to know where your escape window is, if you intend
to be successful and shoot down bandits, you will have close your
escape window. Knowing where your escape window is will prevent
you from trying to leave a fight that has a closed escape window. While
it is important to know where your escape window is, if you intend
to be successful and shoot down bandits, you will have close your
escape window. Knowing where your escape window is will prevent
you from trying to leave a fight that has a closed escape window.
Should
I stay, or should I go?
 Providing
you both see each other, there are three main factors that effect
an escape window. Providing
you both see each other, there are three main factors that effect
an escape window.
 Range:
The range between you and the bandit. The greater the range, the
more open the window Range:
The range between you and the bandit. The greater the range, the
more open the window
 Energy:
Energy relative to your opponent. The greater your energy in
relationship to the bandit, the more open your window. Energy:
Energy relative to your opponent. The greater your energy in
relationship to the bandit, the more open your window.
 Angle-Off:
The greater your angle-off, the more open your window. (A head on
pass is the best advantage here). Angle-Off:
The greater your angle-off, the more open your window. (A head on
pass is the best advantage here).
|
|
 All of
these factors combine or cancel each other out to figure the size
of your escape window. All of
these factors combine or cancel each other out to figure the size
of your escape window.
 Should
you decide to stay, you need to decide when to make your move.
Remember, you have decided to stay and fight, so FIGHT TO WIN! To
go aggressive, you have really only one option before the merge.
Lead Turn. Any other maneuver is not going to put you on the
offensive and will probably put you on the defensive pretty quick. Should
you decide to stay, you need to decide when to make your move.
Remember, you have decided to stay and fight, so FIGHT TO WIN! To
go aggressive, you have really only one option before the merge.
Lead Turn. Any other maneuver is not going to put you on the
offensive and will probably put you on the defensive pretty quick.
Lead
Turn
 A Lead
Turn is when you try to decrease the angle-off prior to the merge,
or passing the bandits 3/9 line. Lead TurnS are a critical and
highly important part of BFM and can be used almost anywhere. They
is most frequently used in a HEAD ON Pass. Lead TurnS are the most
efficient way to BFM and are so potent that, if you Lead Turn and
your opponent does not, you will win. A Lead
Turn is when you try to decrease the angle-off prior to the merge,
or passing the bandits 3/9 line. Lead TurnS are a critical and
highly important part of BFM and can be used almost anywhere. They
is most frequently used in a HEAD ON Pass. Lead TurnS are the most
efficient way to BFM and are so potent that, if you Lead Turn and
your opponent does not, you will win.
 How
exactly do you execute a Lead Turn? I will look at this from a
HEAD ON aspect. As you approach your opponent, you will have a
relatively low line of site rate on your bandit. Remember line of
site rate is how fast the bandit is moving across your field of
view. How
exactly do you execute a Lead Turn? I will look at this from a
HEAD ON aspect. As you approach your opponent, you will have a
relatively low line of site rate on your bandit. Remember line of
site rate is how fast the bandit is moving across your field of
view.
 In a
HEAD ON, the bandit is almost stationary, almost no line of site
rate at all. However as you close with the bandit, he will start
to slowly move towards the rear of your aircraft. You will be able
to watch him move from the center or near center of your HUD to
the edge and then out of it and aft on your canopy. As this
happens the line of site rate increase. In a
HEAD ON, the bandit is almost stationary, almost no line of site
rate at all. However as you close with the bandit, he will start
to slowly move towards the rear of your aircraft. You will be able
to watch him move from the center or near center of your HUD to
the edge and then out of it and aft on your canopy. As this
happens the line of site rate increase.
In a
HEAD ON Pass, closure speeds can easily meet or exceed 1000 knots.
Your closure speed, velocity of closure, is VC. This is the sum of
your speed and that of your opponent. In a HEAD ON Pass, it is
pure addition. If you are going 500 knots and your opponent is
going 500 knots, your VC is 1000 knots. When your 3/9 line is even
with his 3/9 line, your VC will rapidly change from 1000 knots to
negative 1000 knots. It is at this point, when your 3/9 lines are
even, that you want to start your Lead Turn.
 You can
not wait until this point is reached to begin your turn. If you
do, you are too late in executing your turn. You must remember,
the further back the bandit moves on your canopy, the faster his
line of site rate will increase. Before you know it, he will be
blasting past you, and if he is smart, will be making his own Lead
Turn. You need to anticipate when to begin your turn. You can
not wait until this point is reached to begin your turn. If you
do, you are too late in executing your turn. You must remember,
the further back the bandit moves on your canopy, the faster his
line of site rate will increase. Before you know it, he will be
blasting past you, and if he is smart, will be making his own Lead
Turn. You need to anticipate when to begin your turn.
 The
best place to begin your turn is where the line of site rate
begins to increase very rapidly. This happens usually around 30°
off of your nose in a good turning aircraft (some slower turning
aircraft may have to start sooner than this). As you practice
this, you will begin to notice when this happens and can then pick
a reference point in your cockpit to use as a "start your
Lead Turn here" indicator. The
best place to begin your turn is where the line of site rate
begins to increase very rapidly. This happens usually around 30°
off of your nose in a good turning aircraft (some slower turning
aircraft may have to start sooner than this). As you practice
this, you will begin to notice when this happens and can then pick
a reference point in your cockpit to use as a "start your
Lead Turn here" indicator.
Figure
5-4 shows a Lead Turn.
Figure
5-4
Figure
5-5 shows from a cockpit view approximately where you would begin
a Lead Turn.
Figure
5-5
 Now we
have a pretty good idea when to begin the turn, what about the
turn? Well, we are back to the CRASH SCHOOL of BFM … Pull as
many G's as you can. Pull for all your worth. When you make a Lead
Turn, you are committing yourself to the fight. You have closed
your escape window and the only way to open it again is kill your
opponent (O'kay, there may be a few other ways if the bandit
really makes a mistake, but odds are you will not get that lucky). Now we
have a pretty good idea when to begin the turn, what about the
turn? Well, we are back to the CRASH SCHOOL of BFM … Pull as
many G's as you can. Pull for all your worth. When you make a Lead
Turn, you are committing yourself to the fight. You have closed
your escape window and the only way to open it again is kill your
opponent (O'kay, there may be a few other ways if the bandit
really makes a mistake, but odds are you will not get that lucky).
 Lead
Turns do not have to be executed in HEAD ON. They can be used from
any aspect and angle-off. You must be able to predict the bandits
flight path and take great care not to fly out in front of the
bandit when you pull your turn. Lead
Turns do not have to be executed in HEAD ON. They can be used from
any aspect and angle-off. You must be able to predict the bandits
flight path and take great care not to fly out in front of the
bandit when you pull your turn.
 As I
said before, a Lead Turn is an incredibly powerful BFM tool. And
you can bet, your bandit will know this as well. I also told you
that if you Lead Turn and your opponent does not, you will win.
Likewise, if he Lead TurnS and you do not, he will win. In similar
aircraft fights, a Lead Turn will not give you the advantage if
you both execute them, but if you both do a Lead Turn, he will not
get the advantage either. As I
said before, a Lead Turn is an incredibly powerful BFM tool. And
you can bet, your bandit will know this as well. I also told you
that if you Lead Turn and your opponent does not, you will win.
Likewise, if he Lead TurnS and you do not, he will win. In similar
aircraft fights, a Lead Turn will not give you the advantage if
you both execute them, but if you both do a Lead Turn, he will not
get the advantage either.
 In
aircraft with distinctive handling differences, a Lead Turn vs.
Lead Turn will gain you the advantage if your aircraft is the
better of the two. If you are in an F-16 and entering a fight with
a MIG-29, you will more than likely gain an advantage in the Lead
Turn fight. If you are in an F-14 and fighting the same MIG-29 …
I truly hope you have planned a high speed "blow though"
and acceleration, or have your have your hand poised on the
"seat popper". In
aircraft with distinctive handling differences, a Lead Turn vs.
Lead Turn will gain you the advantage if your aircraft is the
better of the two. If you are in an F-16 and entering a fight with
a MIG-29, you will more than likely gain an advantage in the Lead
Turn fight. If you are in an F-14 and fighting the same MIG-29 …
I truly hope you have planned a high speed "blow though"
and acceleration, or have your have your hand poised on the
"seat popper".
 If you
are ever find yourself "Nose High" while the bandit is
closing "Nose Low", you're either very lucky or very
good. (Remember, Nose High and Nose Low refer to aircraft nose
position relative to the horizon). You are in a prime spot to pull
a high G Lead Turn going high and getting help from the Radial G
effect discussed in previous lessons. If you pull a Lead Turn
here, you can quickly gain the 3/9 line advantage, get behind your
bandit and score a kill. If you
are ever find yourself "Nose High" while the bandit is
closing "Nose Low", you're either very lucky or very
good. (Remember, Nose High and Nose Low refer to aircraft nose
position relative to the horizon). You are in a prime spot to pull
a high G Lead Turn going high and getting help from the Radial G
effect discussed in previous lessons. If you pull a Lead Turn
here, you can quickly gain the 3/9 line advantage, get behind your
bandit and score a kill.
Figure
5-6 shows a Nose High/Low Pass Lead Turn and a subsequent Vertical
Lead Turn.
Figure
5-6
|
|
|
Chapter
Six:
Beyond Visual Range BFM
 So far we have
looked at close up and personal air combat. Those techniques and
practices are the fundamental roots of air combat. All air combat
is based on BFM, the modern day "joust" between knights
of the sky in visual range. So far we have
looked at close up and personal air combat. Those techniques and
practices are the fundamental roots of air combat. All air combat
is based on BFM, the modern day "joust" between knights
of the sky in visual range.
 Once a pilot is
trained how to handle a dogfight where the aircraft are in visual
range, he must be taught how to avoid getting this close in the
first place. He must learn how to maneuver against an aircraft
that is BVR (beyond visual range). Once a pilot is
trained how to handle a dogfight where the aircraft are in visual
range, he must be taught how to avoid getting this close in the
first place. He must learn how to maneuver against an aircraft
that is BVR (beyond visual range).
 The amount of
information in this area is vast. The next chapter (Wingman
Tactics) will go into a great deal more detail on how to set up
for a BVR missile shot. In this chapter I will go into the basic
steps of BVR combat and how to prep for a shot. The amount of
information in this area is vast. The next chapter (Wingman
Tactics) will go into a great deal more detail on how to set up
for a BVR missile shot. In this chapter I will go into the basic
steps of BVR combat and how to prep for a shot.
 Modern simulations
present different levels of realism in the RADAR avionics. As a
result of developers desire to present balanced game play, many of
these RADAR models are overly powerful and extra accurate in order
to compensate for the lack of real world situational awareness you
would have if you were actually in the aircraft. Modern simulations
present different levels of realism in the RADAR avionics. As a
result of developers desire to present balanced game play, many of
these RADAR models are overly powerful and extra accurate in order
to compensate for the lack of real world situational awareness you
would have if you were actually in the aircraft.
 Because of this,
they are rarely realistic and give away entirely too much
information. There are a handful of simulations out, or due out,
that have incredibly well modeled avionics packages that actually
act as a real aircraft avionics package would. The key here is to
also have the enemy AI RADAR function in a similar fashion. It is
not a lot of fun to go up against an enemy fitted with KLINGON
technology in a fighter of the late 20th century, especially when
your own radar functions in a realistic manner. Because of this,
they are rarely realistic and give away entirely too much
information. There are a handful of simulations out, or due out,
that have incredibly well modeled avionics packages that actually
act as a real aircraft avionics package would. The key here is to
also have the enemy AI RADAR function in a similar fashion. It is
not a lot of fun to go up against an enemy fitted with KLINGON
technology in a fighter of the late 20th century, especially when
your own radar functions in a realistic manner.
 Based on all of
this, you have probably figured out that the RADAR is the primary
sensor for detecting bogeys BVR. It may also be possible to get
data from air borne sensor platforms such as an AWACS. Regardless
of where this data comes from initially, you must act upon the
information and begin to take measures to put yourself at a
tactical advantage. To accomplish this, there are 6 basic steps
that must be set into motion: Based on all of
this, you have probably figured out that the RADAR is the primary
sensor for detecting bogeys BVR. It may also be possible to get
data from air borne sensor platforms such as an AWACS. Regardless
of where this data comes from initially, you must act upon the
information and begin to take measures to put yourself at a
tactical advantage. To accomplish this, there are 6 basic steps
that must be set into motion:
- 1.
Detection
- 2.
Sorting
- 3.
Targeting
- 4.
Intercept
- 5.
Engage
- 6.
Separate
 These are not
different items you can execute; they are steps that must all be
executed in this order to avoid a breakdown of the tactical plan.
You must understand and be familiar with each step. These are not
different items you can execute; they are steps that must all be
executed in this order to avoid a breakdown of the tactical plan.
You must understand and be familiar with each step.
Detection
 Until you know the
bandit is there, you can do anything. It is quite possible, and
does happen, that flights of opposing sides may fly right by each
other. "But I have my RADAR on," you are thinking. Well,
that is great, but real RADAR, and thus a well-modeled RADAR
package, is not the all seeing "RADAR of GOD". There are
parameters you must meet to be able to even get another aircraft
to show up on your scope. Until you know the
bandit is there, you can do anything. It is quite possible, and
does happen, that flights of opposing sides may fly right by each
other. "But I have my RADAR on," you are thinking. Well,
that is great, but real RADAR, and thus a well-modeled RADAR
package, is not the all seeing "RADAR of GOD". There are
parameters you must meet to be able to even get another aircraft
to show up on your scope.
 RADARS have what
are called "search volumes", or "areas of
scan". Modern fighters have a "sweep" or side to
side scan of 120° . This single sweep is called a bar. There are
normally between 4 to 6 bars that you have the ability to adjust.
Figure 6-1 shows a 1 bar scan and a 4 bar scan pattern. RADARS have what
are called "search volumes", or "areas of
scan". Modern fighters have a "sweep" or side to
side scan of 120° . This single sweep is called a bar. There are
normally between 4 to 6 bars that you have the ability to adjust.
Figure 6-1 shows a 1 bar scan and a 4 bar scan pattern.
Figure 6-1
 So if
one bar is so limited, why not always use 4 bar scans? A one bar
scan allows the RADAR to get back to a detected object 4 times
faster than a 4 bar scan, thus updating your screen that much
faster. In the period of time RADAR scans 4 bars, a bandit could
easily move out of the RADAR scan area. Remember, most modern
aircraft have on board sensors to alert them if they are
"pinged" or "painted" by RADAR.
("ping" and "paint" are terms used to denote
being scanned and/or detected by RADAR.) So if
one bar is so limited, why not always use 4 bar scans? A one bar
scan allows the RADAR to get back to a detected object 4 times
faster than a 4 bar scan, thus updating your screen that much
faster. In the period of time RADAR scans 4 bars, a bandit could
easily move out of the RADAR scan area. Remember, most modern
aircraft have on board sensors to alert them if they are
"pinged" or "painted" by RADAR.
("ping" and "paint" are terms used to denote
being scanned and/or detected by RADAR.)
 As a
result, once you detect a bandit, he may have enough time to move
out of scan range. Also, a smaller scan elevation (number of
bars), thus more frequent updates, usually increase the odds that
you will be able to "Lock" onto the bandit. As a
result, once you detect a bandit, he may have enough time to move
out of scan range. Also, a smaller scan elevation (number of
bars), thus more frequent updates, usually increase the odds that
you will be able to "Lock" onto the bandit.
 A 4 bar
scan is useful when you are "sweeping" (generally
scanning) an area for unknown aircraft. Once you have a general
fix on the bearing and altitude of the bogeys, you would want to
go to a smaller scan. In addition to the selection of number of
scan bars, you are generally able to point the RADAR cone up or
down as well. A 4 bar
scan is useful when you are "sweeping" (generally
scanning) an area for unknown aircraft. Once you have a general
fix on the bearing and altitude of the bogeys, you would want to
go to a smaller scan. In addition to the selection of number of
scan bars, you are generally able to point the RADAR cone up or
down as well.
|
|
 If you
are searching for bogeys you believe or close to the ground, you
can crank down the RADAR scan cone and use 1 bar, giving you
faster and more accurate updates. Figure 6-2 shows the difference
in scan areas of a RADAR cone depending on where it is pointed. If you
are searching for bogeys you believe or close to the ground, you
can crank down the RADAR scan cone and use 1 bar, giving you
faster and more accurate updates. Figure 6-2 shows the difference
in scan areas of a RADAR cone depending on where it is pointed.
Figure 6-2.
 You do
not want all aircraft in your flight to search the same area with
RADAR. AWACS or GCI may vector you towards a group of bogeys. If
you have their bearing and altitude, you can use a small RADAR
search pattern. Otherwise, you generally want to search the
greatest volume of air space possible. You should work out search
patterns with your flight so that you cover the widest are with as
little overlap as possible. You do
not want all aircraft in your flight to search the same area with
RADAR. AWACS or GCI may vector you towards a group of bogeys. If
you have their bearing and altitude, you can use a small RADAR
search pattern. Otherwise, you generally want to search the
greatest volume of air space possible. You should work out search
patterns with your flight so that you cover the widest are with as
little overlap as possible.
 Figures
6-3 and 6-4 show examples of search patterns for flights. Figure
6-3 shows a flight of 4 using the "Finger Four"
formation which allows each aircraft to search a different area of
airspace and also allows good visual coverage of the other
aircraft in the flights "6" position. Figure 6-4 shows a
2-ship flight flying "Line Abreast" and the area they
would sweep their RADAR cones in to get maximum coverage. Figures
6-3 and 6-4 show examples of search patterns for flights. Figure
6-3 shows a flight of 4 using the "Finger Four"
formation which allows each aircraft to search a different area of
airspace and also allows good visual coverage of the other
aircraft in the flights "6" position. Figure 6-4 shows a
2-ship flight flying "Line Abreast" and the area they
would sweep their RADAR cones in to get maximum coverage.
The
difference in scan areas of a RADAR cone depending on where it is
pointed.
Figure 6-3
Figure 6-4
Sorting
 Once
you have detected bogeys, you need to sort them. To sort them is
to answer 4 primary questions: Once
you have detected bogeys, you need to sort them. To sort them is
to answer 4 primary questions:
- 1.
Are they Friend or Foe?
- 2.
How many are there?
- 3.
What formation are they in?
- 4.
What are they doing?
 The
first thing you must do when you detect a bogey is to alert the
other aircraft in your flight. This is first, foremost, and
paramount. You want to let everyone with you know what you see,
where you see it, and make sure they all see it too. You can then
confirm or deny each other's findings and insure you really know
what is out there. The
first thing you must do when you detect a bogey is to alert the
other aircraft in your flight. This is first, foremost, and
paramount. You want to let everyone with you know what you see,
where you see it, and make sure they all see it too. You can then
confirm or deny each other's findings and insure you really know
what is out there.
 "Hawk11,
Hawk12 …2 bogeys at 10 o'clock, low aspect, line astern, range
23 miles, angels' 20" "Hawk11,
Hawk12 …2 bogeys at 10 o'clock, low aspect, line astern, range
23 miles, angels' 20"
 "Hawk12,
Hawk11 confirming 2 bogeys, 10 0'clock, low aspect, line astern,
23 miles, angels 20" "Hawk12,
Hawk11 confirming 2 bogeys, 10 0'clock, low aspect, line astern,
23 miles, angels 20"
 Hawk
11, lead, has just confirmed he sees the same aircraft on his
RADAR scope as you do. Now you both know where the bogeys are, how
many there are, and what they are doing (heading straight for
you). While you are doing this, you can be checking them with IFF
or NCTR (devices to identify if an aircraft is friendly or not). Hawk
11, lead, has just confirmed he sees the same aircraft on his
RADAR scope as you do. Now you both know where the bogeys are, how
many there are, and what they are doing (heading straight for
you). While you are doing this, you can be checking them with IFF
or NCTR (devices to identify if an aircraft is friendly or not).
 "Hawk11,
Hawk12 …2 bogeys at 10 o'clock, nose on, line astern, range 23
miles, angles 20" "Hawk11,
Hawk12 …2 bogeys at 10 o'clock, nose on, line astern, range 23
miles, angles 20"
 "Hawk12,
Hawk11 confirming 2 bogeys, 10 0'clock, nose on, line astern, 23
miles, angles 20" "Hawk12,
Hawk11 confirming 2 bogeys, 10 0'clock, nose on, line astern, 23
miles, angles 20"
 "Hawk11,
Hawk12, bogeys are not responding to NCTR" "Hawk11,
Hawk12, bogeys are not responding to NCTR"
 "Hawk12,
Hawk11 confirms bogeys are probably hostile" "Hawk12,
Hawk11 confirms bogeys are probably hostile"
 Hawk11
is checking IFF/NCTR as well. The odds that these are bandits has
just increased since you both got negative readings. This last
line would probably be followed by an order for a maneuver to
align the newly determined bandits up for a shot. See Chapter 7
for more detail. Hawk11
is checking IFF/NCTR as well. The odds that these are bandits has
just increased since you both got negative readings. This last
line would probably be followed by an order for a maneuver to
align the newly determined bandits up for a shot. See Chapter 7
for more detail.
|
|
|
CHAPTER
7:WINGMAN TACTICS
 With the advent of LAN
play, which has been around for quite some time, and now Internet
multi-player options, wingman responsibilities and wingman tactics are
more important than ever. Many sims have fairly comprehensive wingman
instruction menus, but many people are not really sure what they are
commanding the wingman to do or when to use these commands. While this
article will emphasize tactics for multi-player situations, many of the
basics here will easily and readily apply to solo player situations as
well. With the advent of LAN
play, which has been around for quite some time, and now Internet
multi-player options, wingman responsibilities and wingman tactics are
more important than ever. Many sims have fairly comprehensive wingman
instruction menus, but many people are not really sure what they are
commanding the wingman to do or when to use these commands. While this
article will emphasize tactics for multi-player situations, many of the
basics here will easily and readily apply to solo player situations as
well.
 First I want to start
out with an excerpt from an actual Air Force Training manual: First I want to start
out with an excerpt from an actual Air Force Training manual:
"
Wingman Responsibilities "
 " Wingmen have the
supporting role in a flight. They help the leader plan and organize the
mission. They have visual lookout and radar responsibilities, and
perform backup navigation tasks. Wingmen engage as briefed or when
directed by the leader and support when the leader engages. It is
essential that the wingmen understand their briefed responsibilities and
execute their offensive or defensive contract in a disciplined manner.
" " Wingmen have the
supporting role in a flight. They help the leader plan and organize the
mission. They have visual lookout and radar responsibilities, and
perform backup navigation tasks. Wingmen engage as briefed or when
directed by the leader and support when the leader engages. It is
essential that the wingmen understand their briefed responsibilities and
execute their offensive or defensive contract in a disciplined manner.
"
 What I would like to
emphasize from this short paragraph is the "SUPPORT" function.
Many of us play solo play like we are "MAVERICK" from the
movie TOPGUN. And we do it quite successfully despite the likelihood
that it would not work in real life. But if you coordinate and plan
attacks, you will be stunned how much easier the same exact situation
becomes. What I would like to
emphasize from this short paragraph is the "SUPPORT" function.
Many of us play solo play like we are "MAVERICK" from the
movie TOPGUN. And we do it quite successfully despite the likelihood
that it would not work in real life. But if you coordinate and plan
attacks, you will be stunned how much easier the same exact situation
becomes.
 Prime example here is
the many Usenet posts on the Internet from people that have a difficult
time winning a campaign in the EF2000 family of products. Solo players
get the feeling of me against the world. In LAN play, the feeling is
still there, except for a slight twist … now it's you and 7 or more of
your friends against the world. But if we all decide we are a hot shot
pilot that will win the war on our own … we will fail. If we work as a
team, victory becomes much more likely. Prime example here is
the many Usenet posts on the Internet from people that have a difficult
time winning a campaign in the EF2000 family of products. Solo players
get the feeling of me against the world. In LAN play, the feeling is
still there, except for a slight twist … now it's you and 7 or more of
your friends against the world. But if we all decide we are a hot shot
pilot that will win the war on our own … we will fail. If we work as a
team, victory becomes much more likely.
 The 209th VFS Delta
Hawks operate as "2-ship elements" and "4-ship
flights". Missions are picked by the lead based on what would be
the most effective mission at this point in the war. Formations are
formed and tasked based on pilot mission preferences and flight
requirements. Each 4-ship flight has a flight leader. The flight leader
is considered the primary point of contact for any information. The 209th VFS Delta
Hawks operate as "2-ship elements" and "4-ship
flights". Missions are picked by the lead based on what would be
the most effective mission at this point in the war. Formations are
formed and tasked based on pilot mission preferences and flight
requirements. Each 4-ship flight has a flight leader. The flight leader
is considered the primary point of contact for any information.
 Flight leaders
communicate between themselves and then pass this information along to
their respective flights (flight leads usually have at least a 2 radio
set up at our meets, command uses a different frequency from the
flights, and each wing has a specified frequency. This helps eliminate
cross-talking and mass confusion during A2A contact or strike actions). Flight leaders
communicate between themselves and then pass this information along to
their respective flights (flight leads usually have at least a 2 radio
set up at our meets, command uses a different frequency from the
flights, and each wing has a specified frequency. This helps eliminate
cross-talking and mass confusion during A2A contact or strike actions).
 During our meets, the
wingman offers information from their radar sweeps, and visual
information. They take commands from the flight lead for various tasks
(Radar Sweeps, formations, Drag or Bracket Engage, etc.). Wingmen will
also offer up suggestions during missions (when to perform radar sweeps,
potential tactics, terrain features that may prove beneficial, etc.) We
switch off Flight Lead responsibilities so everyone that wants the
responsibility of Flight Lead gets the opportunity. During our meets, the
wingman offers information from their radar sweeps, and visual
information. They take commands from the flight lead for various tasks
(Radar Sweeps, formations, Drag or Bracket Engage, etc.). Wingmen will
also offer up suggestions during missions (when to perform radar sweeps,
potential tactics, terrain features that may prove beneficial, etc.) We
switch off Flight Lead responsibilities so everyone that wants the
responsibility of Flight Lead gets the opportunity.
 Hopefully you now
understand from the above, that discipline needs to play an important
part of your multi-player experiences to gain the full benefit. Your
human wingmen have a latitude and flexibility that computer wingmen do
not have. Use this feature to your advantage. If the situation changes,
change your tactics immediately. Hopefully you now
understand from the above, that discipline needs to play an important
part of your multi-player experiences to gain the full benefit. Your
human wingmen have a latitude and flexibility that computer wingmen do
not have. Use this feature to your advantage. If the situation changes,
change your tactics immediately.
 Much of the information
included in this chapter has been derived from several actual Air Force
and Navy combat manuals as well as various strategy guides written for
some of the flight sims current and past. Most of these tactics are used
very effectively in LAN play by the 209th VFS Delta Hawks. Since many
flight simulations model various aspects better than others do, I am
trying to include everything that may be pertinent. Much of the information
included in this chapter has been derived from several actual Air Force
and Navy combat manuals as well as various strategy guides written for
some of the flight sims current and past. Most of these tactics are used
very effectively in LAN play by the 209th VFS Delta Hawks. Since many
flight simulations model various aspects better than others do, I am
trying to include everything that may be pertinent.
 Some of the cautions
taken on various maneuvers may be executed in vain in some sims, while
mandatory in others. These tactics would work very well in actual air
combat. It should also be noted that ranges are based upon accurate
weapons modeling. Increase ranges accordingly for weapons carried that
have a greater accurate kill range. (Note: Even S225's in EF2000/TACTCOM
have a relatively low Pk at long range. I regularly wait until about
15NM before launching even these missiles. They do get the bandits
attention at long range and may buy you precious time, but do not count
on a kill. At 15NM or less, they are almost a certain kill. The same
goes for AIM -120's in EF2000.) Some of the cautions
taken on various maneuvers may be executed in vain in some sims, while
mandatory in others. These tactics would work very well in actual air
combat. It should also be noted that ranges are based upon accurate
weapons modeling. Increase ranges accordingly for weapons carried that
have a greater accurate kill range. (Note: Even S225's in EF2000/TACTCOM
have a relatively low Pk at long range. I regularly wait until about
15NM before launching even these missiles. They do get the bandits
attention at long range and may buy you precious time, but do not count
on a kill. At 15NM or less, they are almost a certain kill. The same
goes for AIM -120's in EF2000.)
While not stated in the
actual maneuvers, fighters should maintain about 3,000 feet or so of
separation between each other during an intercept. Formation placement
is offered as a positional reference. A good example of this is to watch
your computer run wingmen in EF2000/TACTCOM when you give the
"COMBAT SPREAD" maneuver command from flight formation. Watch
the fighters develop vertical and horizontal separation, but the
formations stays pretty much the same.
TACTICS
 I will focus on a
standard 2-ship element. These tactics can easily be applied to a 4-ship
flight. In a 4-ship, each 2-ship element would perform as 1 fighter of a
2-ship element. This would then be evaluated after the first break where
each 2-ship would then determine the best tactic to use for the current
situation. A general and basic rule of thumb here, and this is really
simplifying things: I will focus on a
standard 2-ship element. These tactics can easily be applied to a 4-ship
flight. In a 4-ship, each 2-ship element would perform as 1 fighter of a
2-ship element. This would then be evaluated after the first break where
each 2-ship would then determine the best tactic to use for the current
situation. A general and basic rule of thumb here, and this is really
simplifying things:
1.
If you are a strike package and have an Escort … let the Escort do
their job. Do not engage until all other available options are
exhausted. 2. If you are required to engage before IP, both 2-ship
elements should engage. 3. If you are required to engage after IP, only
the threatened 2-ship element should respond. The non-threatened 2-ship
element should follow through with its mission.
 I will not go into great
detail about how to execute these maneuvers except where necessary.
Communication between these 2 elements is essential during this entire
combat phase. There are many 2-ship intercept options, but most are
variations on three basic profiles: the Bracket, the Single Side Offset,
and the Inside Out. I will not go into great
detail about how to execute these maneuvers except where necessary.
Communication between these 2 elements is essential during this entire
combat phase. There are many 2-ship intercept options, but most are
variations on three basic profiles: the Bracket, the Single Side Offset,
and the Inside Out.
The
Bracket
The Bracket intercept is
intended to envelop or "squeeze" the target formation from
both sides after a front quarter merge. In many instances, a Bracket
maneuver will be initiated from a full head on or "High
Aspect" merge.
1.
Entry into a Bracket maneuver is initiated with an offset turn meant to
bracket the bandit formation. This offset turn should be initiated about
20 miles out (this is assuming the use of AIM-120's as a long-range
missile). Maintain contact with your wingman. Make sure you know where
he is.
|
|
CHAPTER
8: Air Combat Manouvers
 We have learned
basic Flight Dynamics. We have learned BFM, what it is and how to
use it. We have learned basic Intercept Maneuvers for BVR missile
attacks. Now we are going to learn some of the most common Air
Combat Maneuvers that are used during these situations. This is
not an exhaustive list of maneuvers that you can use, but the most
useful maneuvers you will need. There are many maneuvers that,
while great for air shows, have little or no practical use in
combat. Using some of these maneuvers may actually make you an
easier target and get you killed. We will stick to maneuvers that
will benefit you in air combat. We have learned
basic Flight Dynamics. We have learned BFM, what it is and how to
use it. We have learned basic Intercept Maneuvers for BVR missile
attacks. Now we are going to learn some of the most common Air
Combat Maneuvers that are used during these situations. This is
not an exhaustive list of maneuvers that you can use, but the most
useful maneuvers you will need. There are many maneuvers that,
while great for air shows, have little or no practical use in
combat. Using some of these maneuvers may actually make you an
easier target and get you killed. We will stick to maneuvers that
will benefit you in air combat.
Break
Turn
 Your most basic,
and fundamental maneuver is the BREAK TURN. The BREAK TURN will
increase the Angle Off Tail between you and your adversary as he
attempts to line up to take a shot. Figure 8-1 shows a BREAK TURN
from a "GODS EYE" view as well as rear views of
variations of a BREAK TURN "Out of Plane". Your most basic,
and fundamental maneuver is the BREAK TURN. The BREAK TURN will
increase the Angle Off Tail between you and your adversary as he
attempts to line up to take a shot. Figure 8-1 shows a BREAK TURN
from a "GODS EYE" view as well as rear views of
variations of a BREAK TURN "Out of Plane".
Figure 8 - 1
 To
initiate a BREAK TURN, bank your aircraft to one side and pull
back on the stick. This is a HIGH G maneuver that will take
advantage of a high turn rate and force your attacker into a high
angle off position. It is important to be at or near your rated
Corner Velocity to take maximum advantage of this maneuver. To
initiate a BREAK TURN, bank your aircraft to one side and pull
back on the stick. This is a HIGH G maneuver that will take
advantage of a high turn rate and force your attacker into a high
angle off position. It is important to be at or near your rated
Corner Velocity to take maximum advantage of this maneuver.
There
are two basic types of BREAK TURNS, Instantaneous and Sustained.
An Instantaneous BREAK TURN is a tight, high G turn that will
bleed speed rapidly, but will also offer maximum gain in Angle Off
Tail. A Sustained BREAK TURN will not bleed speed as rapidly but
will also not change your AoT nearly as fast.
 A
Sustained BREAK TURN will also put you in a fairly predictable
flight path, thus making it easier for your adversary to line up a
shot. To avoid this in any type of turn is to immediately follow a
BREAK TURN with another BREAK TURN. This turn should take you even
further out of the weapons envelope of your attacker. You could
for example BREAK HIGH RIGHT, BREAK HIGH LEFT, BREAK LOW LEFT,
BREAK HIGH RIGHT etc. The key here is not to break in a
predictable manner. A
Sustained BREAK TURN will also put you in a fairly predictable
flight path, thus making it easier for your adversary to line up a
shot. To avoid this in any type of turn is to immediately follow a
BREAK TURN with another BREAK TURN. This turn should take you even
further out of the weapons envelope of your attacker. You could
for example BREAK HIGH RIGHT, BREAK HIGH LEFT, BREAK LOW LEFT,
BREAK HIGH RIGHT etc. The key here is not to break in a
predictable manner.
Barrel
Roll
 The
BARREL ROLL is a maneuver that causes the aircraft to roll around
a central axis (usually the previous flight path), thus making a
shape somewhat like a barrel. This maneuver has very powerful
effects on energy management. Because of this, it can be used in
both an offensive or defensive manner. The
BARREL ROLL is a maneuver that causes the aircraft to roll around
a central axis (usually the previous flight path), thus making a
shape somewhat like a barrel. This maneuver has very powerful
effects on energy management. Because of this, it can be used in
both an offensive or defensive manner.
Figure 8 - 2
Offensive
Barrel Roll
 The
Offensive Barrel Roll is typically used to slow down to prevent an
over shoot. I talked in Chapter 4 about bleeding speed, using
flaps, air brakes even landing gear for drag, this is another
effective way to bleed speed. However, if you do not bleed speed
fast enough, this will almost certainly put you into a Scissors
fight. (The area of Chapter 4 that we discussed bleeding speed). The
Offensive Barrel Roll is typically used to slow down to prevent an
over shoot. I talked in Chapter 4 about bleeding speed, using
flaps, air brakes even landing gear for drag, this is another
effective way to bleed speed. However, if you do not bleed speed
fast enough, this will almost certainly put you into a Scissors
fight. (The area of Chapter 4 that we discussed bleeding speed).
You may
be able to avoid this situation by pulling even harder on the
stick and reversing your turn. This will turn you away from the
target, and prevent you from overshooting. As you finish the turn,
you should be back on your original heading, but slower.
Defensive
Barrel Roll
 While
you can offensively use the Barrel Roll to bleed speed, you can
use it the same way defensively. You can cause the attacker to
overshoot, or at least force him into a Scissors fight - a much
better option verses having him on your six. (There will be those
that disagree with this, but I would much rather have a bandit on
my 3 than on my 6). You may use the Barrel Roll to keep your
aircraft out of the attackers fire cone. While
you can offensively use the Barrel Roll to bleed speed, you can
use it the same way defensively. You can cause the attacker to
overshoot, or at least force him into a Scissors fight - a much
better option verses having him on your six. (There will be those
that disagree with this, but I would much rather have a bandit on
my 3 than on my 6). You may use the Barrel Roll to keep your
aircraft out of the attackers fire cone.
 The
biggest difference between offensive and defensive is that the
defensive maneuver must be timed carefully. Too soon, and your
little playmate will just follow you through the maneuver. Too
late and he may have already had several shots at you. Timing for
surprise is critical. Do not count on this to get your attacker to
over shoot, this is no where near as effective as the movies makes
it look. The
biggest difference between offensive and defensive is that the
defensive maneuver must be timed carefully. Too soon, and your
little playmate will just follow you through the maneuver. Too
late and he may have already had several shots at you. Timing for
surprise is critical. Do not count on this to get your attacker to
over shoot, this is no where near as effective as the movies makes
it look.
Scissors
Scissoring
is caused when an attacker overshoots his target and the target
reverses his turn before the attacker has passed into weapons
parameters.
|
|
While
it is generally accepted that you should never enter a Scissors
fight, I already mentioned one instance where I would rather be in
a Scissors fight (at least in a Scissors, he is not on my 6).
Scissors fights bleed speed and altitude rapidly and can put one
or both of the participants in very compromising situations.
Figure 8 - 3
As
Figure 8 - 3 shows, a Scissors fight is a series of reversing
break turns into the opponent. The idea behind these turns is to
slow down faster than the opponent does in order to force him out
front. In Figure 8 - 3, the F-15 has over shot the F-16. The
Scissoring action has allowed the F-16 to force the F-15 in front,
thus allowing the F-16 the advantage. Think of this as a
"brake race". The aircraft that can slow down quicker,
wins.
A
Scissors fight is begun when the defender does the right thing, at
the wrong time. The defender turns into the attacker, but begins
his maneuver too soon. The defender should wait for the attacker
to over shoot and cross into his weapons envelope before turning
into the attacker. If you're the attacker, you can cause the
initiation of a Scissors fight by starting your maneuver too late,
and then over shooting.
Once
you are in a Scissors fight, you are locked in. There is really
nothing else you can do but continue turning into the opponent. A
Scissors fight will slow forward velocity as each turn is
executed, compound this with the fact that your goal here is to
slow down faster than the other guy, and you can drop into a stall
pretty quick. The winner will be the pilot that can force the
opponent out in front while conserving enough energy to pull his
nose around and take a shot. It is not uncommon for a turning
fight to end with one aircraft stalling and falling out of the
fight. If his opponent has enough energy conserved, he can then
roll over and dive for the kill.
You may
be able to disengage from a Scissors fight by not reversing your
turn and pulling away very hard. I would watch my opponent, and as
he starts his next Break Turn into me, I would continue my pull
through without turning back into him. I would also point my nose
towards the ground for an increase in speed, which by this point
is probably pretty low. This tactic is very dangerous, and your
only real hope of it working is your opponent is too low on energy
to compensate for the change, or he is clueless.
This
maneuver gives you the maximum amount of time before my opponent
can recover from my ruse and pursue me once again. Your only other
option would be a Split S maneuver (described later in this
chapter). However, this will not work unless your opponent is
"Winchester" missiles. If he is guns only, you can use
"GODs G" to pull away. The increased acceleration you
generate in a Spit S will allow you to out run his guns range. If
your opponent has a Heat Seeker, you will get one stuffed up your
exhaust pipe when you try this maneuver.
Last
comment on Scissors fights. There is a high level of danger during
a Scissors fight for a mid air collision. If you create more
separation to lessen the potential of a mid air, you increase the
opportunity for a shot by your opponent. There is a fine line here
that you will need to practice to find. You may be able to play
"chicken" with your human adversaries by trying to get
in close. As he maneuvers to keep separation, he will not be
honoring the threat.
Spiral
Dive
A
Spiral Dive is usually not the best choice of maneuvers. You
should only consider this if you have a better turning radius. To
execute, you must drop into a steep dive and pull very high G's.
Throttle back about mid way through your turn and then roll your
lift vector onto the bandit and pull as hard as you can (CRASH
Rule of Pulling G's). This should hopefully put you on the tail of
your opponent.
Figure 8 - 4
When do
you want to use this maneuver? First, have you tried everything
else you know to shake this opponent? Do you have a superior turn
radius? Once you start this dive, plan to pull out of it soon, it
won't take long for him to re-acquire a position of or possible
attack. Watch as he follows you into your dive, as he crosses to
one side of your tail and begins to go into an overshoot
situation, he will not have a shot at you. But again, this will
not last for very long.
Dive
like this for only a very short time, then end it sharply by
pulling back hard, but not so hard that you bleed to much speed or
sacrifice maneuverability. You will be decreasing the turn circle
as you do this. The slower turning opponent will start to drift
out wide. At this point, your attacker probably has not noticed
that you have slowed down considerably and will be forced into an
overshoot.
As you
pull out of the turn, reduce throttle, and invert (roll a complete
180°) and pull hard again, this will be back into the bandit.
Your opponent will get a sudden jolt when he sees you reverse and
realizes he is helpless to counter it. At this point you can use
your reverse to come back around on the bandit and line HIM up for
a shot.
|
|
|
JetStorms Hanger is dedicated to F22 Lightning 3 |
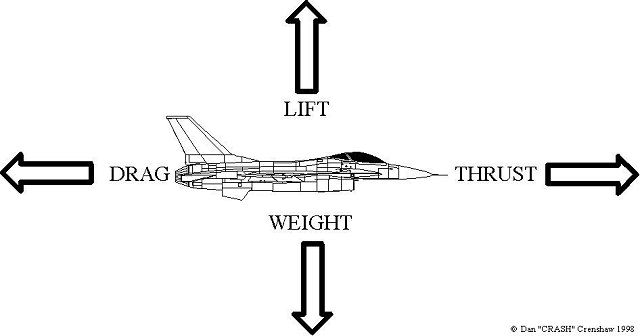
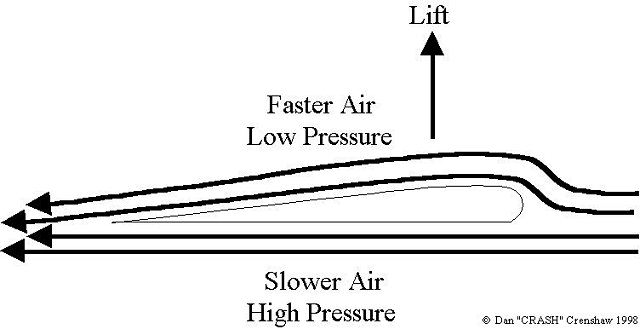
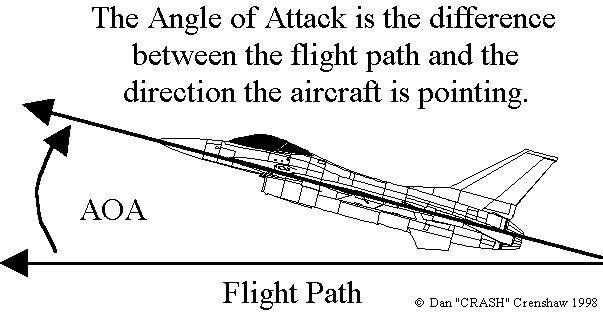
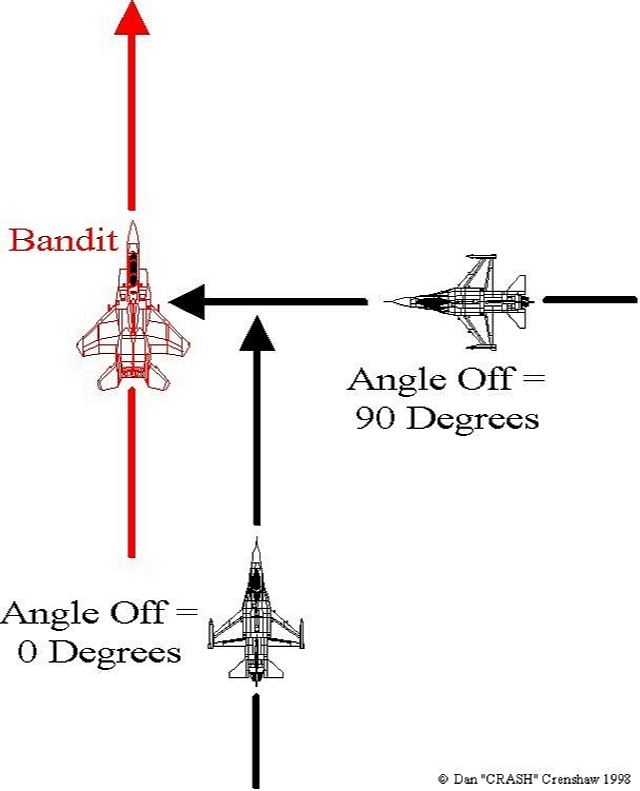
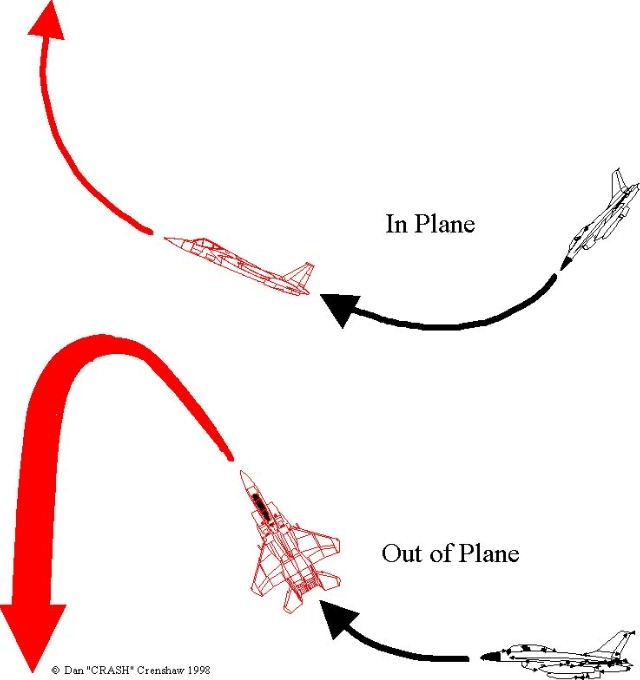
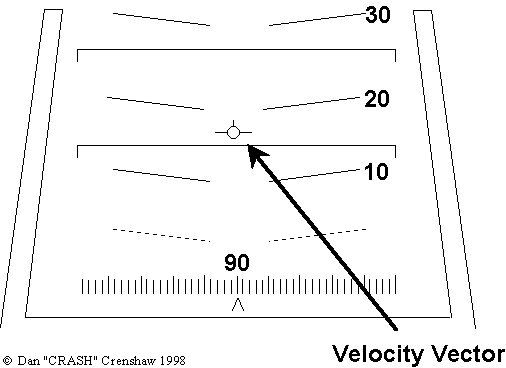
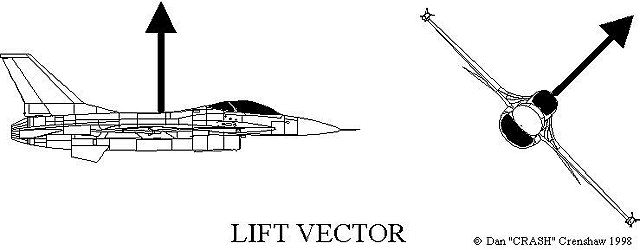
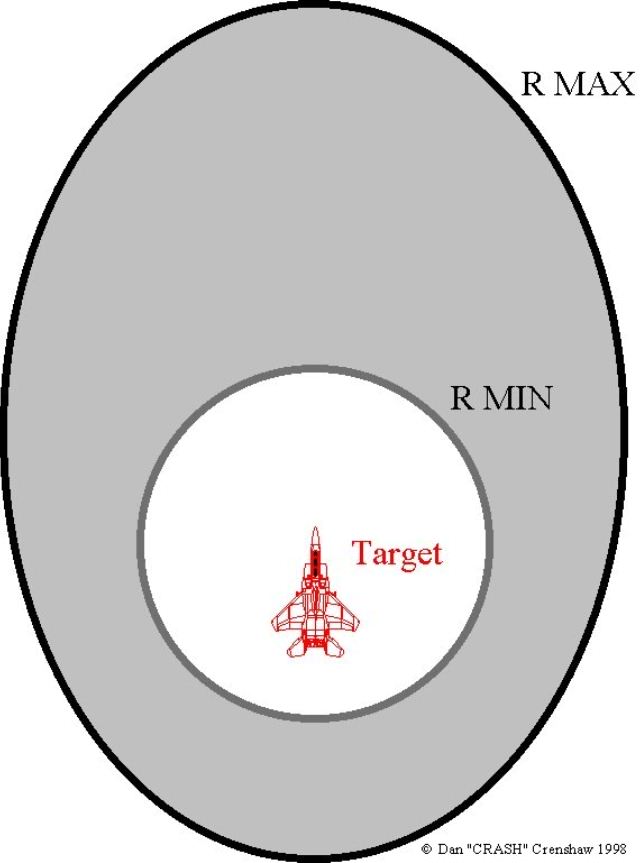
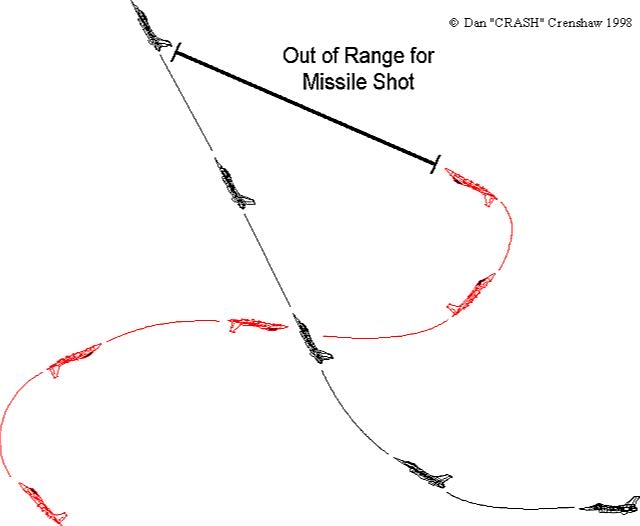
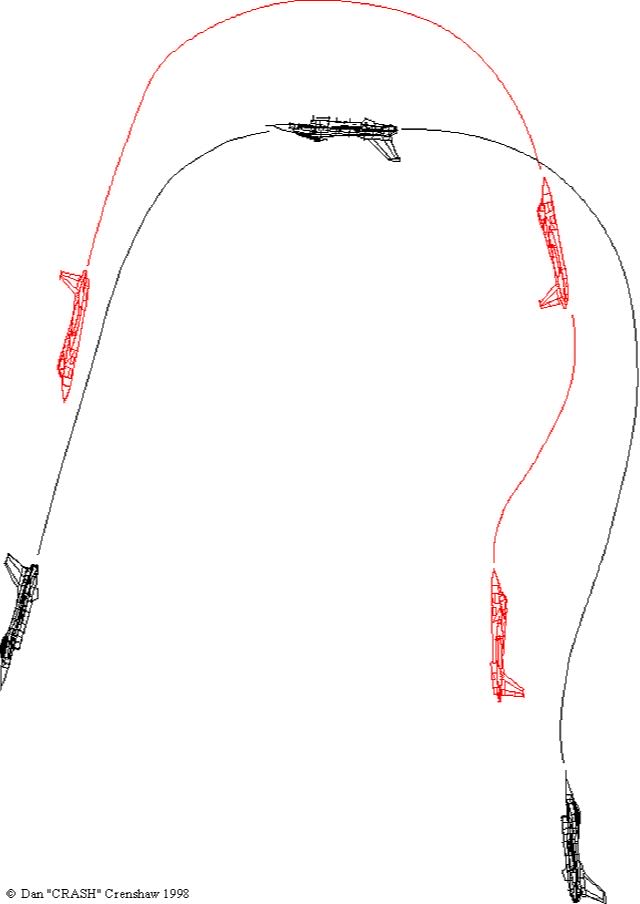
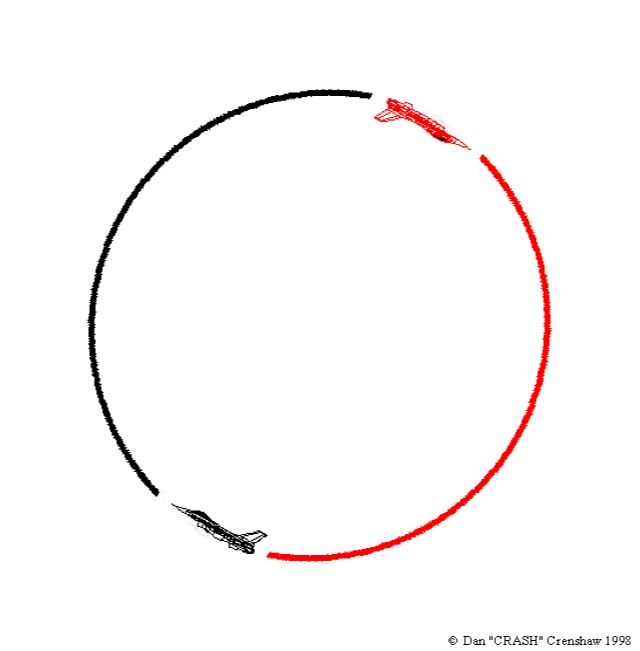
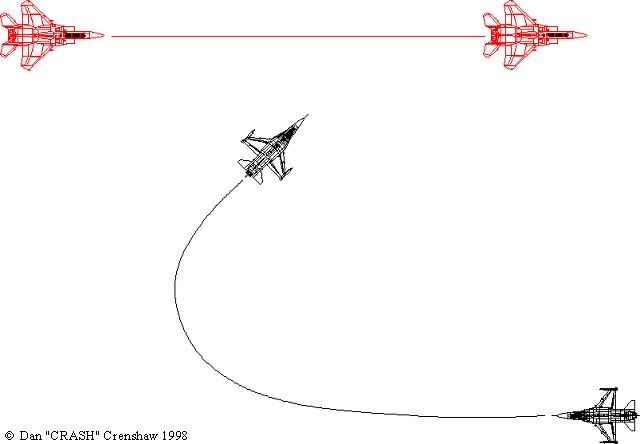
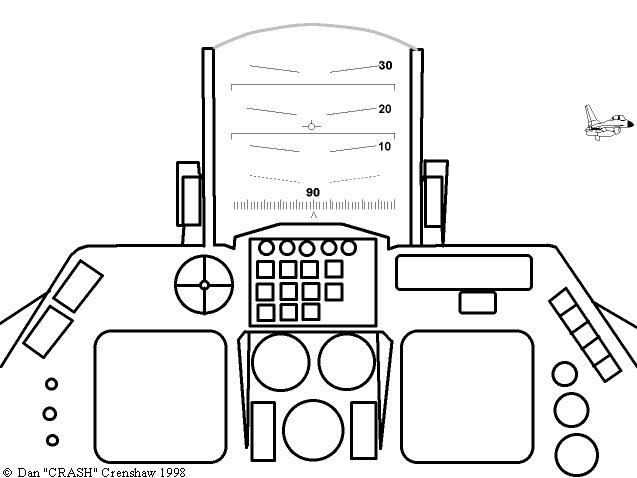
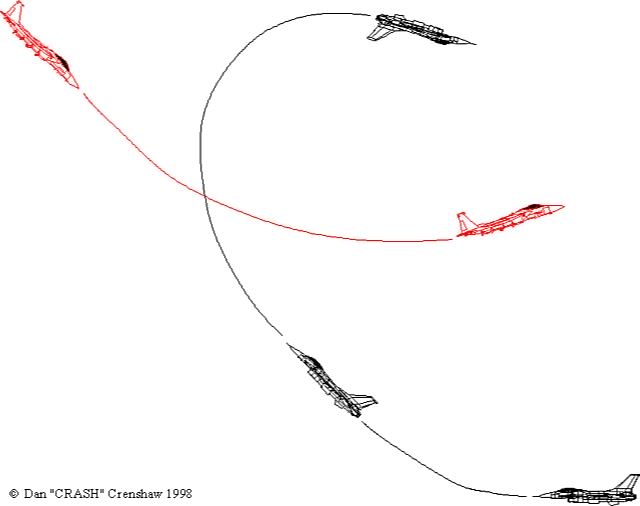
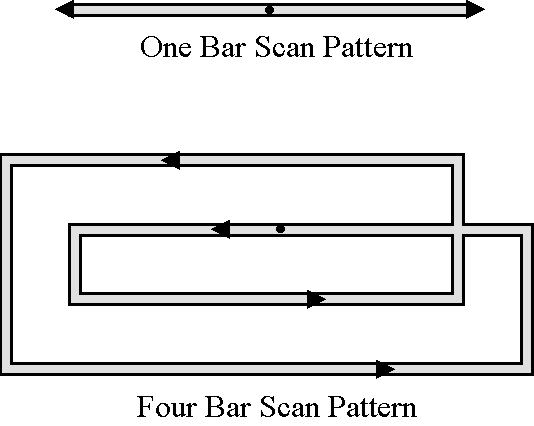
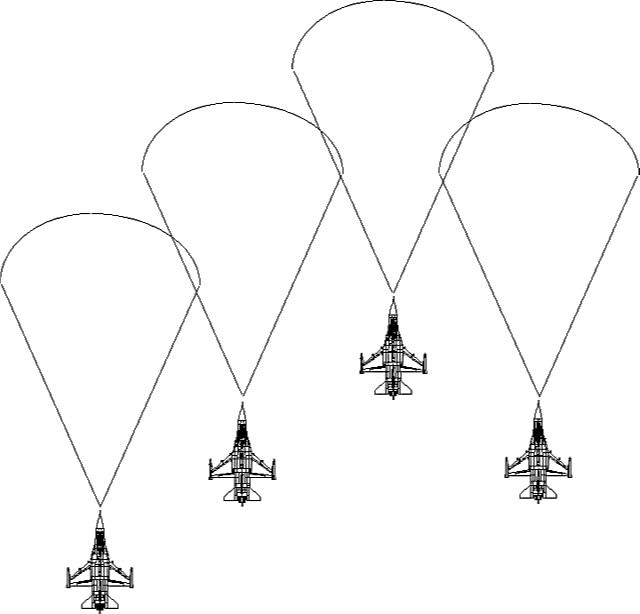
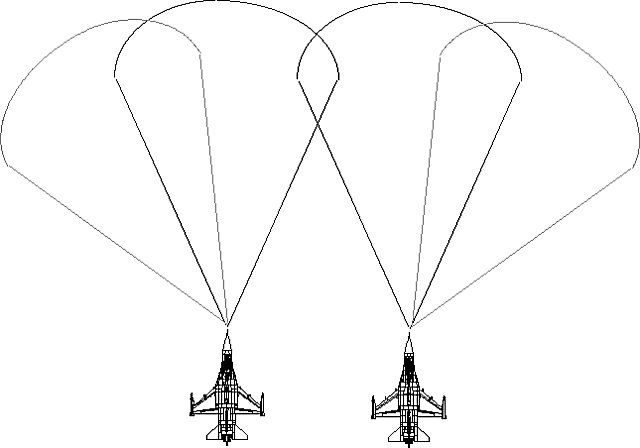
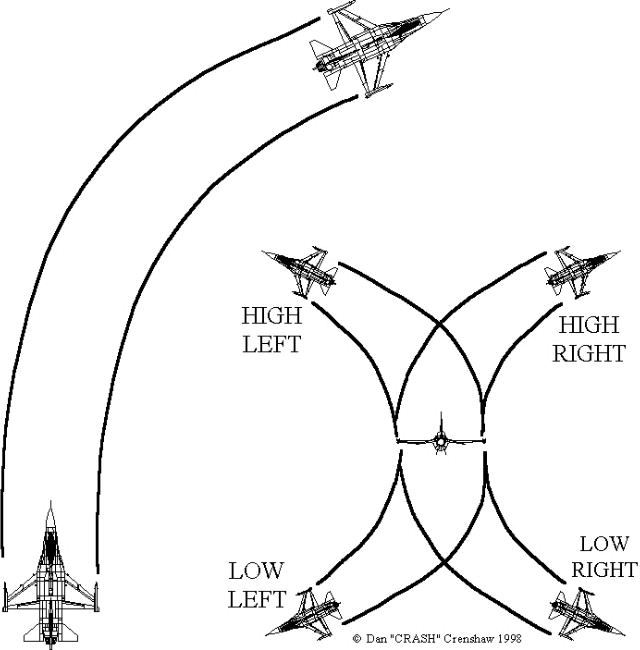
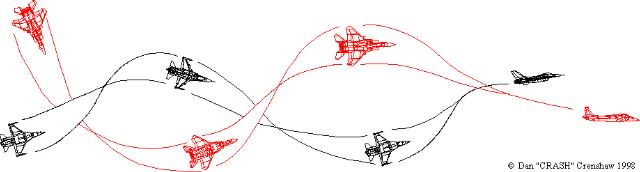
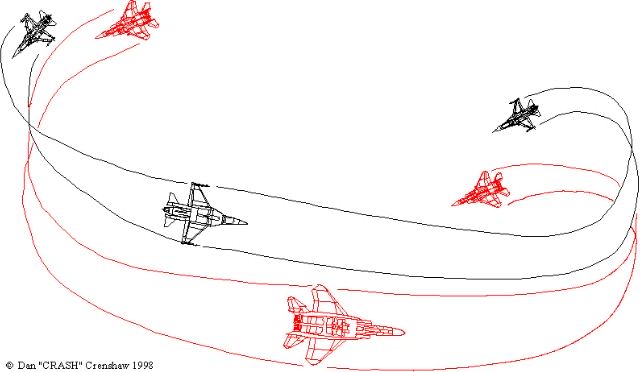