 |
|
|
|
|
|
|
|
|
|
|
|
|
|
|
|
|
|
|
|
|
|
|
|
|
|
|
|
|
|
|
|
|
|
|
|
|
|
|
|
|
|
|
|
|
|
|
|
|
|
|
|
|
|
|
|
| Basic Painting |
|
|
 |
|
|
| Step1 : Preparing the model |
|
|
| a.Fill up any gaps with green stuff/milliput (the latter can be bought in most hobby modeling shops). When applying into the gaps, a worn-out brush that is dampened can be used to push the putty into the gaps. |
|
|
| b.File up any mould lines and excess filler |
|
|
| c.Wash the model with light soap/detergent. This will remove any oil or mould release agent still left on the model, allowing for better adhesion of paint to model. |
|
|
|
d.Prime the model. Spray the model in a base coat. A base coat is a flat (ie. non glossy) coat of paint that is applied before the actual colors are applied to the model. Typical colors for a base coat are white & black, though other colors are also fine if a large portion of the model is that color (eg. Flat green for orcs).� This is usually applied using a spray, as it is faster. One thing to note is that many ?cheapo? brands of acrylic spray paint can be used, so long as they meet the following criteria |
|
|
| d1. It is acrylic paint (so that there will be no paint adhesion problems) |
|
|
| d2. The nozzle dispensing of the spray is satisfactory; beware of sprays out there that spurt blotches of paint rather than dispensing them properly. |
|
|
| d3. The paint is matte not glossy |
|
|
| d4. The paint is plastic safe (does not melt the models) |
|
|
| All these can be tested out prior to spraying on the model by spraying on some plastic sprue or cardboard. |
|
|
| Step2 : Base color |
|
|
| a. When painting the model, it is usually easier to paint from the ?inside out?. What this means is that the inner most of the model is painted 1st . A typical sequence would be skin, clothes, ornaments on clothes, etc. This will reduce the chances of smearing paint on the painted portions of the model. |
|
|
| b.The 1st coat of color paint is the base color. This is basically the color of the different parts of the model without shading. For example, for a human in blue tunic, his base color is elf flesh on skin areas, enchanting blue on the tunic and brown for the boots. |
|
|
|
 |
|
|
|
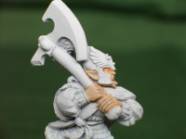
Here the model has been base coated white & the face is painted with a base color of Elf Flesh. |
|
|
| c.Once finished, the model looks painted, but uninspiring. To make the model stand out, contrast is to be added to the model. This is achieved through highlighting, which can be broken into a few techniques that is cover in step 3. |
|
|
|
Step3 : Basic Highlights |
|
|
|
1. Dry Brushing |
|
|
|
Dry brushing is a simple technique that produces good results. Dip a portion of the brush into the paint. Using the paintbrush, start brushing on a piece of unwanted newspaper or tissue. Once almost all the paint on the brush has been removed, brush the paintbrush onto the area of the model that you want dry brushed. This process deposits paint on raised areas of the model only, resulting in a highlighting effect between the raised areas and depressed areas. The color to be drybrushed is usually� a lighter shade of the base color of the area to be drybrushed . |
|
|
|
Example1: Dark Flesh base color on the face , followed by drybrush with Dwarf Flesh.) Example2: Boltgun metal base color on chain mail armor, followed by Mithril Silver drybrush |
|
|
|
 |
|
|
|
 |
|
|
|
|
|
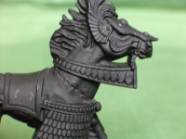
Here the model is base coated black. |
|
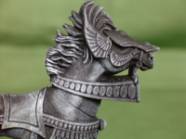
By running a dry brush of white over the model, the raised areas have picked up the paint and has become� highlighted |
|
|
|
| Advantages : |
|
|
|
|
| .Easy |
|
|
| .Fast results |
|
|
| .Generally good results for most models with� minimal effort |
|
|
| Disadvantage : |
|
|
| .Less control compared to other techniques |
|
|
| .Does not work on all types of models (Eg. The results given by this method may be considered too "dirty" for certain models or army types like High Elves) |
|
|
| 2. Washing |
|
|
| Washing involves applying diluted paint or ink to the model. Thinned down paint works very well, and offers a variety of color choices over inks. To get a wash mixture, simply dilute the paint in the ration of 1 part paint to 3-5 parts water. The amount of water depends on the color used and effect desired. Generally, a darker color can be diluted more (Eg. black). The amount of water will affect how much the color is left on raised areas (less water = more colored raised area). Color used in the wash is usually a darker tone to the base color. |
|
|
| Example1: Dwarf Flesh base color on the face , followed by wash with diluted Dark Flesh.) Example2: Mithril Silver base color on chain mail armor, followed by diluted Boltgun Metal wash |
|
|
|
 |
|
 |
|
|
|
|
|
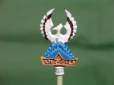
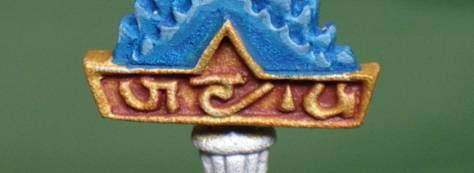
Here is an example of a wash. The icon was 1st painted burnished gold. After that, a wash made from diluting one part dark brown to 4 parts water was painted on the gold area. The result is a contrast between raised and recessed areas. |
|
|
| Advantages : |
|
|
|
.Easy |
|
|
|
.Fast results |
|
|
|
.Generally good results for most models with� minimal effort |
|
|
|
Disadvantage : |
|
|
|
.Less control compared to blending/shading |
|
|
|
.Usually will need to be touched up as the dried up wash can be blotchy |
|
|
| 3. Blending/Shading |
|
|
| Blending or more rightly shading (since most acrylics dry too quickly to be blended) is a slightly more advanced technique. The idea is to create shadows and outlines using a graduation of colors that are 1 to 2 shades different from the previous shade. The final effect is a gradual change from shadow to lit-up areas on the model that is well controlled. |
|
|
| Example1: The recess areas on a white robe is painted first codex grey followed by 1part codex grey + 1part white, 2 part white + 1 part codex grey, and finally white. |
|
|
|
 |
|
|
 |
|
|
|
|
|
|
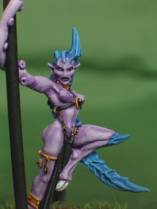
This close-up shows the different blends that make up the shading of the model, from darkest to lightest purple |
|
| Advantages : |
|
|
|
|
| .Good results |
|
|
| .Good control |
|
|
| Disadvantage : |
|
|
| .Time consuming |
|