Articles
“At-Last”
by Thomas Meara
| Alacrity Articles |
|
|
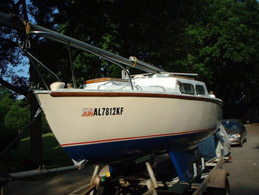
| The Restauration of Aalacrity “At-Last” by Thomas Meara |
| <>PURPOSE: Great twin-keel sailboats
like the Alacrity are now getting old. For those of us who have
an affinity for them some maintenance is always ongoing. For
those interested in buying one of these boats, restoration or heavy
maintenance might be a necessity. In either case, knowing what
might be possible for the average person to accomplish restoring one of
these great boats might be helpful. When I started my project I
had no special skills just a passion for sailing the old boat and not a
great deal of money to restore it. Do-it-yourself for me was the
only option. I accomplished a great restoration and picked up
some skills on the way. For those of you contemplating
significant maintenance or a restoration I hope this article might be
of some help or encouragement. These are great boats, fun to sail, and
well worth the time and effort. HISTORY: A brief history of my boat and how it came to need a restoration is in order. My boat is was built in 1968. It has been in the water on the Intercoastal Waterway for its entire life. My father, a great sailor himself, purchased it in 1973. It was used heavily by the family for many years until I departed for my military career in 1983. It then sat in a slip in the neighborhood marina used only occasionally until 2000. If you are counting, that is thirty-two years in the salt water! During that time, the boat did not come out of the water more than four times for a few days each for bottom cleaning/painting. After many years of seeing the boat slowly rot away I finally had an assignment which allowed me the time to take on a restoration of my great boat. SELF-SURVEY: I began by taking her out while visiting my parents and then doing the best survey I could. The boat was in unbelievably bad condition and I seriously considered scrapping the idea of restoring her. However, my many years of sailing the Intercoastal day and night would not allow me to see her towed away and scrapped. As briefly as I can state this was the condition of the boat: INTERIOR: All ribs (heavy construction because it had an inboard at one time) were completely rotted away except for one, All bulkheads and bunk framework were rotted beyond repair, interior paint peeling off, front hatch missing, electrical wiring and cushions were also rotted away. In short there were only two salvageable pieces of wood in the boat: the companionway threshold, and one rib. All else had to be removed. 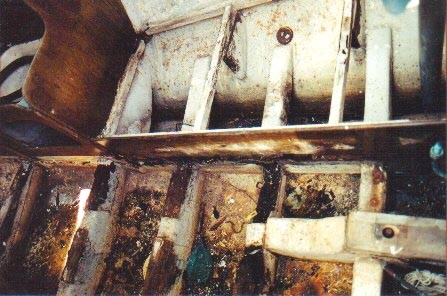 HULL: Under the waterline it was also a very bad story. There were no fewer than 28 sizable and deep osmotic blisters, the average being baseball sized. RIGGING: The original heavy cotton jib sheet was salvageable. All other running rigging and halyards were rotted beyond repair. The standing rigging was OK and required only new turnbuckles and a few rivets on the spar plates. HULL SIDES: Chalky and beyond buffing. It would require painting or a miracle of some kind (more on that later). TOPSIDE: Heavily cracked jell coat, which needed to be filled and painted. That’s it... PLAN: 1. Research. How do I fix these things? 2. Buy a used trailer with an extendable tongue for ease in launching; have it modified to fit the boat. Bring the boat home to Alabama and begin restoration; restore interior, hull, rigging, and re-fit. 3. Complete to 90% and begin trailer sailing. 4. Complete the remaining 10% while enjoying the boat. EXECUTION: For the most part, the restoration of the boat went according to my basic plan. I began with the interior. Just cleaning it out after getting it home was a hazard. It contained the following communities: A huge bull ant colony living in the rotten wood under the R/S bunk, several wasp nests, a roach colony, moss and a sizable snake skin. Save the snakeskin none of the above was happy about being transported the 500 miles to my home in Alabama. After a few hours and cans of Raid my son and I managed to get all of the removable items out. I left the boat open to dry inside over the next few days. Next came what was the most difficult stage; stripping out the inside wood, making replacements, fitting and bonding them, finishing, and painting. Safety! Fiberglass is not healthy stuff. For that reason I used a respirator, coveralls and a box fan on the front hatch to suck out all of the fiberglass dust generated during cutting. The most indispensable tool I had for this restoration was a RotoZip. I used it to cut the wood bulkheads and ribs out of the fiberglass tape bonding them to the hull. Cutting through the surface of the tape close to the hull, I was able to slowly cut all of the wood and ribs out of the boat). 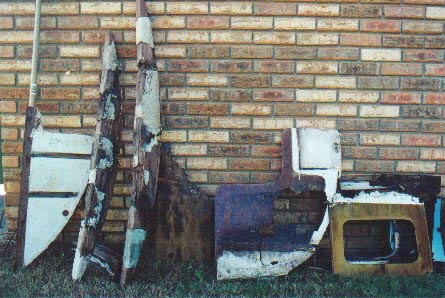 This took many, many hours and ten or fifteen RotoZip blades. After removing all of the rotten wood, I rented a pressure sprayer took it inside and blew off all the interior paint, mildew and filth. I had to stop frequently to bilge out the boat before it overloaded the trailer. When I finished I had a clean interior with only two pieces of original wood left (pic 2a, 2b). I was now ready to build the new interior. 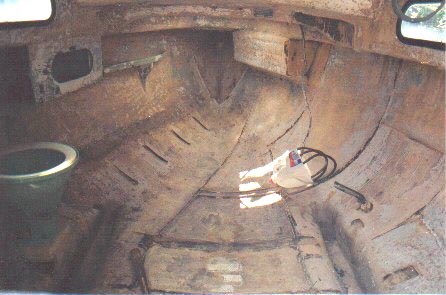 I decided to stay with the original cabin layout using the same construction methods and detail because it was both simple and strong. I was not able to find or afford the original marine grade mahogany and teak so I opted for 1/2” Oak plywood. Now came the task of re-creating all of the original wood pieces, bulkheads, etc... In some cases I was able to use the remnants of wood I had cut out for a template. I used a thin wood batten and pencil to re-create the curves destroyed by rotting and my saw. For many other pieces though I had to loft them on cardboard, set the data points on the cardboard, connect the dots with a batten, then cut it out and use for a template. Lofting was not really difficult. I had never done it before but got pretty good after just a little practice. Eventually I got all the replacement pieces completed and test-fitted. 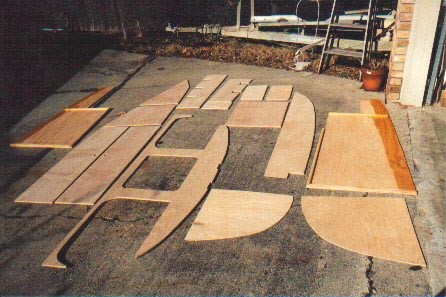 I then coated the edges that would be in contact with the hull in West System Epoxy Resin. The finish would be two rubbings of MINWAX #211 Provincial stain, and four coats of spar urethane. The only wood I had to get from a mill and could not cut myself were the ribs. The originals were teak. I replaced them with 2” thick ash. After drawing in the correct dimensions I had a friend cut them out using his large band saw. Bonding the new wood pieces inside the hull was fairly straightforward. I used West System Epoxy Resin and 4” wide fiberglass tape. This is similar to the original bonding method but epoxy is much stronger and provides a better bond. A light sanding of the finished wood where the fiberglass tape would contact it is the only preparation I did. Once the wood and cabinetry is fit in place bonding it to the hull was fairly simple. I pre-cut the fiberglass tape, wet out the hull and wood contact surfaces, applied the tape, and wet out again to ensure it was saturated then followed-up with a second coat after it dried. I did this on both sides of all bulkheads and ribs. I cannot say enough about the West System products. I found them exceptionally easy to use. I do recommend getting the pumps for the resin and hardener. It makes life a lot easier. I violated the temperature guidelines a few times and found it very forgiving. As a testament to the system, I have trailored the boat at least 4,000 miles since I restored it, sometimes over rough roads and have not had a single bond come loose, or crack on the wood or fiberglass. Finally, I completed the job by painting the inside hull with single part white urethane) 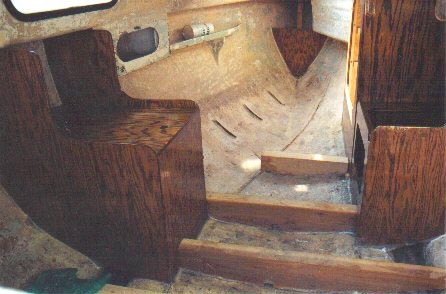 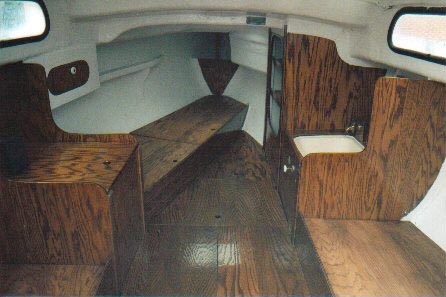 . The next phase of the project was the hull. It was a complete disaster. The osmotic blisters were serious. I had previously punctured all of them. They were all under a great deal of pressure (wear safety glasses). After they drained, I ground them off with a drill and a #80 sanding wheel. Several of these were so deep I nearly ground through the hull before I got to the end of the un-cured resin. 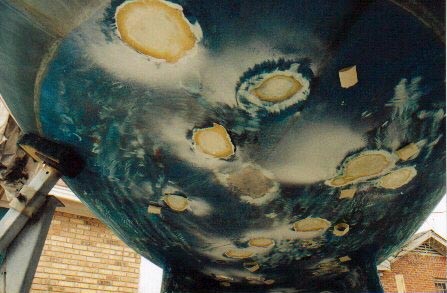 I let them dry. Everyone has an opinion on fixing these. I read as much as I could and decided on an approach that was both easy and likely to last (which it has). I began by cutting out fiberglass cloth patch in slightly smaller dimensions than the ground out area (cut from 4” FG tape strips). I taped each one next to its hole with scotch tape so they would be ready to apply when I wetted out the hole. I began by wetting each hole with epoxy resin and let it dry. Next I lightly sanded it, wetted it out and applied the patch and wetted it out again. To fill the rest of the void I mixed another batch of epoxy resin combined with colloidal silica additive (West System again) and trawled it on with a flexible plastic applicator. I sanded all of them fair with a palm sander. All of this is easy to explain and do, but it is a great deal of hard work... Now that the blisters were fixed the easier part was next, painting below the waterline. Since the boat would be a trailer sailor for the foreseeable future I decided to paint the bottom with single part urethane (midnight blue). If I ever have the boat in the water on a semi-permanent basis I will seal below the waterline with epoxy paint for an impervious coating. I did not do it this time because I figured it would take a year or two for the hull to completely dry out. I did not want to seal in the moisture with epoxy. Once painted I completed the job with a thin red boot stripe. It looked great. 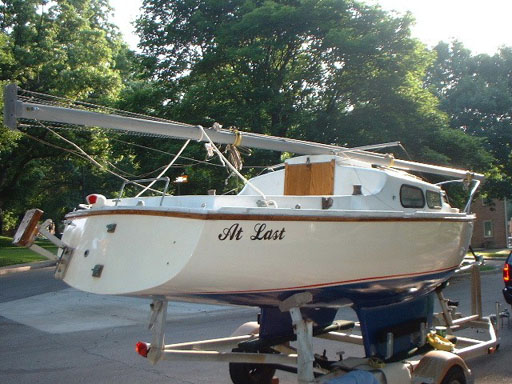 I was now beginning to see the light at the end of the tunnel in this restoration. The work was somewhat less tedious (compared to the interior). My pace was picking up too. The next part of the exterior was the sides of the hull. The hull sides were in good shape but the gel coat had deteriorated significantly. Rubbing my hand down the side for just a couple of feet yielded a hand covered in chalk. The condition was so bad that it was beyond the capabilities of rubbing compound and wax. Painting seemed the only possibility. I did some more research and found a product called Polyglow. It was lauded by those who had used it. I figured I had nothing to lose so I gave it a try. It is one of the few products I have used that easily fulfils all its claims. In fact, I think it yields better results than advertised. No rubbing, just prepare and follow the instructions. I did the entire hull in two or three hours. The difference is truly remarkable. I have re-applied only twice in the four years since I finished the boat. The topside looked OK and had recently been painted with two coats of alkoid enamel. Stripping it would have been an undertaking. I decided to let it continue to deteriorate to the point where I could sand it off easily. It would be good enough for a couple of more years. 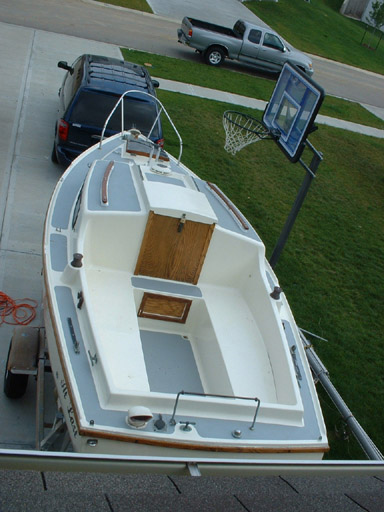 For the standing and running rigging the work was fairly simple. I replaced nearly everything. All of the wire for the stays and shrouds were in good shape but the turnbuckles were in poor condition and unusable. I replaced all of them with stainless steel units. Additionally the spreader plates had lost some rivets, which I easily replaced using a simple inexpensive rivet gun. I replaced all of the running rigging except for the jib sheet. All three headsails were original. They had steel cable sewn into the luff and after many years of poor maintenance the sails were covered in very dark rust stains. I tried all of the traditional methods for cleaning them but nothing worked. Time for more research... I tried many products until I found one that worked exceptionally well, Iron-Out. Soaking the sails for an hour or two removed every single stain no matter how dark and did not harm the sail material either. I’d be cautious on newer sails though. I have no idea what effect it might have on the resin coatings of newer sails. For mine, I had nothing to lose. They are heavily worn. They turned out great. After repairing a few stitches they looked new again. I will probably get a few more seasons out of them easily. All of the above work took me about seven months working two or three evenings during weekdays and a day and a half or so on weekends. Some of it was very hard work, some of it was very tedious (framework for bunks etc...). I learned a lot from the entire process and in the end it was quite rewarding. The above represents only the basics of my restoration project. There is much in the details. There was an occasion or two when I considered giving up on the project but perseverance brought solutions to difficult problems and more confidence. Reflecting on all of the good times I had on the boat and the new adventures my family and I were going to have in the future helped a lot too. I am truly convinced that if I was able to do this project then most any one else can, too. My only caution to anyone contemplating this kind of undertaking is that if you do not have a passion for sailing, the boat you are going to restore, and a vision of future sailing adventures, then pay someone to do it for you or sell the boat and buy a newer one otherwise you may loose the fun of sailing forever to what might become the misery of your work. I considered the project for a long time before deciding. See if you can figure out the meaning of the boat’s name: At Last. In the end my decision was mostly based on my memories of my father’s boat and the endless hours I had spent on it as a young kid, teenager, and adult. Add to this some fairly long cruising quests as a young man, getting caught in a couple of serious storms and all of the other adventures the boat had faithfully and safely seen me through I could make no other choice. I could not have done a project like this on a boat I had no history with or great plans for in the future. For me the project and its completion were part of the fun. I would also be quite remiss if I did not mention the last but most important element: The support of my wife and kids. This project took a serious bite out of family time. I could not have done it without their support and assistance. SAILING: Finally after all of the work it came time for the christening and launch of At Last. The place was Lake Martin Alabama. I rigged the boat and backed it down to the ramp. Being of proud Irish descent I opted for a good bottle of Harp Beer instead of traditional Champaign. My daughter broke the bottle over the bow and we pushed the boat out for a great day of sailing and island exploring. It was a truly great day for the family who put up with my endless project and me too. Our trailer sailing has not abated. Several other adventures to Lake Martin and even a trip back to the Florida Intercoastal were accomplished before we moved to Kansas. We have continued on sailing a few of the many good sailing lakes here in Kansas, nearly each time an over-nighter. I continue to make minor improvements and changes to the boat. The adventure continues. A long-term goal is to sail Yellowstone Lake. Below are some references and products I relied on heavily for this project. There are probably many other substitutes. Key Tools: - Roto Zip to cut wood out of fiberglass tape. (I also cut out all of my wood with it but I recommend an inexpensive jigsaw for that task) - Powerful hand drill with sanding wheel - Combination hand saw/miter - Plane - Orbital sander Key Products: - West System epoxy resin and additives - Interlux single part urethane paint - PolyGlow If anyone is contemplating a similar or smaller project I hope my experiences above are helpful. In my opinion, these boats are not nearly as difficult to work on as newer models. I also believe they are better and heavier constructed too. I have been on many sailboats of similar size. I cannot think of a one that has a better balance of performance, stability, and layout. It may not be fast but I can comfortably sail with full main and storm jib in winds that cause newer boats to either be knocked down, or have to go ‘bare poles’ under motor. In my experience the Alacrity will easily forgive many acts of foolishness (over canvassing in particular). These boats are well worth restoring. Finally, I cannot say enough about safety. I did this project thankfully with no injuries. I carefully considered every step or operation before I did it. There are many opportunities to severely injure yourself. I also read every label on all of the chemical products I used too. Get plenty of rubber gloves and eye protection. For interior cutting work always have plenty of ventilation, protect your lungs with a good respirator and skin with coveralls. Practice each unfamiliar operation before you do it on the boat (e.g. using the RotoZip, applying and coating fiberglass tape etc...). When you are done and get the boat back in the water I can assure you that the hard work of the project will fade almost immediately. You will be left with a new boat capable of getting you though almost any conditions you will encounter that is easy to launch, rig trailer, and sail. The boat is capable of handling almost any adventure your imagination can take you to. GOOD LUCK. 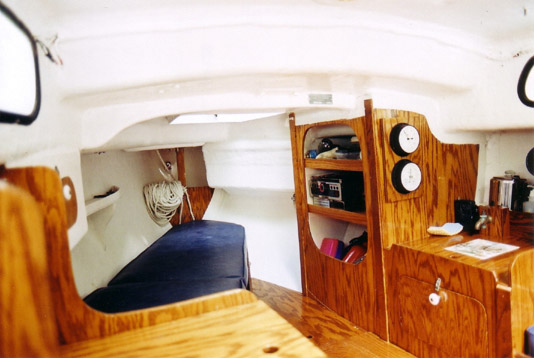 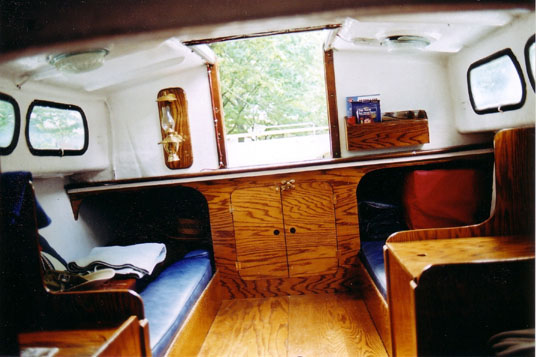 (This article was previously published in Twin Keeler Newsletter) |
