Notes from 6/21/02 class
Detailing and Completing Your Model
First of all, apply a Blinn or Phong shader to your model. This will give the model a shiny appearance, which makes it easier to spot flaws. When you light and render your model, every little flaw will show up, so it’s best that you catch them early!!
-
Detailing your model
o Nose
§ There’s a little “shelf” that sets off the underside of your nostril, the part that’s closest to the mouth.
o Corners of mouth
§ You’ve already created two rows of edges for the borders of the lips and probably a third row for the middle of the lips. At the mouth corner, let the CV’s from the border rows be the actual corners of the mouth. Drag the CV from the middle row into the mouth. This will round out the mouth corner depth-wise and make it look more natural. You could also drag the inner border CV just a little as well.
o Divet above lip
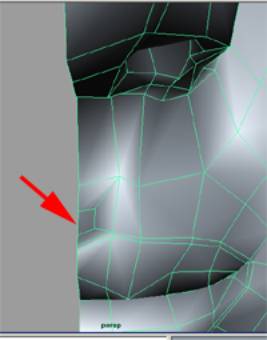
§ Here’s a trick for making a juicy little divet: Create a poly within a poly that’s connected by diagonal edges. Sounds confusing? Okay, do this. Split the polygon down the middle in y. Then split it into thirds in x. Next, split the resulting upper right polygon diagonally from lower left to upper right. Do the same for the lower right polygon, except split it diagonally from upper left to lower right. Finally delete the uppermost and lowermost vertical edges and the rightmost horizontal edges. And, voila!! Here’s picture to explain further:
o Eyelids and corners of eyes
§ Make sure your eyelids are a natural thickness and that the corners are slightly rounded. Create a spherical eyeball and shape the eyelids around while in Sub-D, in order to get a perfect match. To make the eye, create a NURBS sphere. Line up the outer pole with the pupil of the eye in your photograph. Insert two isoparms at the border of your pupil. Drag the resulting inner hull (and all CV’s within that) out slightly to create the appearance of a pupil. This is just for the look. Not real at all.
-
Economizing polygons, cleaning up your model
o Every polygon in your model should be quadratic. If that is not possible, then you may allow some to be triangular. You don’t really want 5-sided polys. If there is one that you can’t resolve, it’s best that it is a flat plane that has only four obvious sides, resembling a quad.
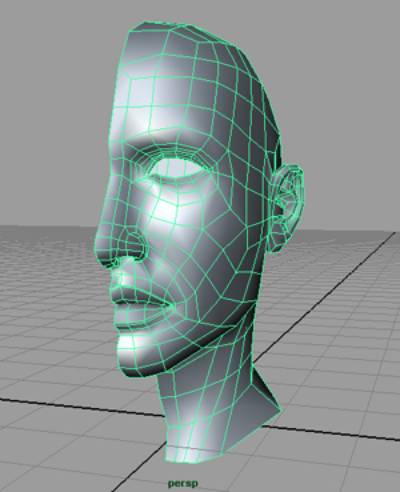
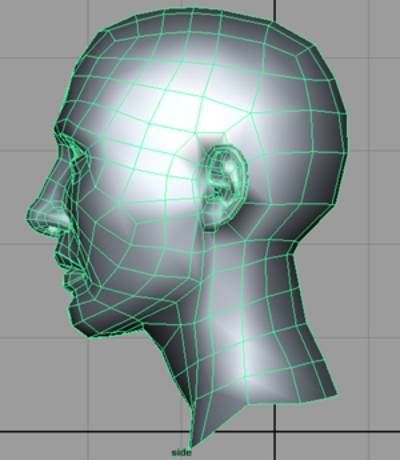
o Here’s an example of a clean head model:
-
Mirror geometry
o Prior to mirroring your geometry, you want to make sure all the center CV’s are perfectly lined up. If they’re not, additional faces will be created where there is space between the original half and the mirrored half. Comprende? Anyway, in the Front view, select all the CV’s in the center of your model vertically. Use the Scale tool to scale the CV’s in x until they are all in a perfectly straight line. Zoom in and scale again. Then zoom in really really close and repeat. You can see the scaling better when you’re very close up.
o Select
your model. Select Edit Polygons >
Fill Hole. This will create temporary
faces inside your eyes and other open holes, which you will delete after your
mirror the geometry. Delete the face
that is created at the head’s cross-section.
Select Polygons > Mirror Geometry (and the little righthand
box). Check the appropriate direction
(for instance, if your model is in x, then –x should be checked). Make sure Merge With Original is
checked. Click Mirror.
o Now,
you can see what your model looks like whole.
There will probably be a LOT of things you’ll see that need work. So, fix that.
o IMPERFECT
YOUR MODEL!!! Nobody’s head is
completely symmetrical. We all have
little nuances on both sides of the face.
Some people have one eye that is slightly larger than the other. Some people have a crooked mouth or
nose. In other words, MESS YOUR HEAD
UP! J
- Super basic three point lighting
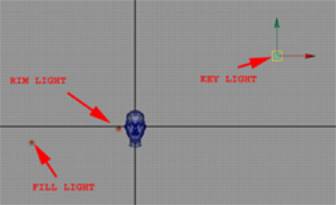
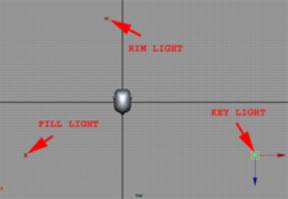
o You will need a KEY light, a FILL light and a RIM light. The key light is your main light. It is usually set up in front, to the side and above the model. The fill light is supposed to fill in all the shadows created by the key light. It is usually not as intense and is naturally set up opposite the key light. The rim light highlights the edges of the model so that they don’t get lost in the background. It is usually as or more intense than the key light and is placed behind the model and opposite the key light. Play around with the placement of all the lights depending on the camera view you’re going to render.
o Here’s some pictures to help you:
And I think that’s about it!! If I think of anything else, I will post it!
Jenga Mwendo for 3D Modeling Class. June 25, 2002