NOTES:
Powerpoint notes here.
This lab must be done in 2170 Etcheverry because it uses hardware.
For any parts of the lab that require you to observe the PWM output on an oscilloscope, I will have a working setup on one of the computers for everyone to observe. There are too many people and there is not enough equipment for everyone to setup the oscilloscope individually. Take turns playing with it.
Join the class mailing list. 20 People still haven't joined yet.
INSTRUCTIONS:
Use a computer with a bluebox and motor attached.
Download mechcontrolanddll.zip from the course web page (under "Laboratory Assignments") Extract the zip file.
Start InstaCal from the Start menu >> Programs >> Measurement Computing >> Instacal
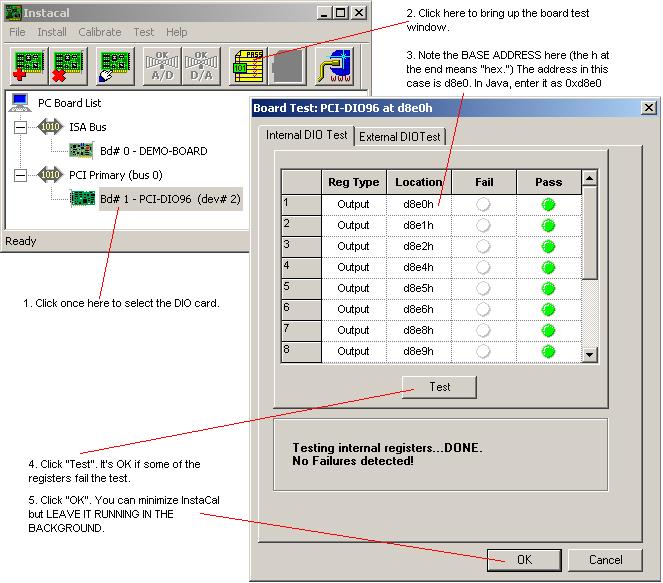
"Test" the DIO interface card (as shown in class). Note of the base address. Minimize InstaCal but don't close it! It must be running in the background for the DIO card to work. See a screenshot here.
Start Netbeans 3.6 from the Start menu >> Programs >> Netbeans IDE
If necessary, create a new project: Projects >> Project Manager >> New
Mount the following directories:
- MechControlAndDLL\Diagnostic\Blue (you are mounting this directory because it contains the file BlueboxTest.java, which contains your Java code for this lab)
- MechControlAndDLL (you are mounting this directory because it is the parent directory of the directory called MechControl, which is a Java "package" that is referred to in BlueboxTest.java)
Set working directory (Tools >> Options >> Debugging and Executing >> Execution Types >> External Execution >> Expert >> Working Directory) to:
MechControlAndDLL\DLLs files (Netbeans looks in the working directory for any DLL files that are required to run your code.)
Add this file to the project (right click on files, choose "Add to Project"):
- MechControlAndDLL\Diagnostic\Blue\BlueboxTest.java
Set the project main class to be BlueboxTest.java (right click on file, choose "Set as project main class").
Read over the code. Be sure the base address (from InstaCal) is set correctly and is entered in Java sytax without the "h" on the end that InstaCal shows (example: 0xd8e0). Make any changes to the code that you want to (e.g., vary the PWM period, Duty Cycle, total run time, etc.). Note that the code for the PWM is already done for you.
Turn on the BlueBox. Be sure the motor is attached correctly to the BlueBox.
Execute project (Project >> Execute Project). This will save and rebuild/recompile all the files in your project (i.e., the ones for which you did "Add to project") and will run the main(...) method of your main class file (i.e., the file for which you did "Set as project main class").
Please be careful with the hardware. If the slider goes too far (all the way to either end) and the motor isn't stopping, turn off the BlueBox to stop the motor and move the slider away from the edge by hand. Then turn the BlueBox back on.