1995 Toyota Tercel Timing Belt Change
Engine Code 5EFE
Cautions
- The
author of this document assumes no liability for these directions. Use at
your own risk.
- When it is necessary to turn either the crankshaft or camshaft, only turn them clockwise. Never turn them counterclockwise!
- The Toyota service manual indicates the need to jack the engine up slightly, and remove the right-hand motor mount. However, on my car I found there is sufficient clearance that this was not necessary. Obviously, raising the engine and removing a motor mount increases the risk of accident/injury to yourself.
Tools you will need
- 1/4" drive ratchet with metric socket set
- 1/4" drive universal joint
- 3/8” drive ratchet with metric socket set.
- 14mm deep socket with a 3/8” drive
- 1/2" drive ratchet with a 19mm socket
- Set of
Metric combination wrenches

- Chain
wrench with at least a 19” chain

- A gear
puller
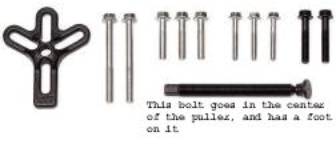
Make sure your kit has Metric bolts. You will need two 8mm standard-pitch bolts, 40mm long, to thread into the crankshaft pulley
- A friend to drive you to the car parts store when something goes wrong in the middle of the job.
Overview
This picture shows an overview of the timing belt:
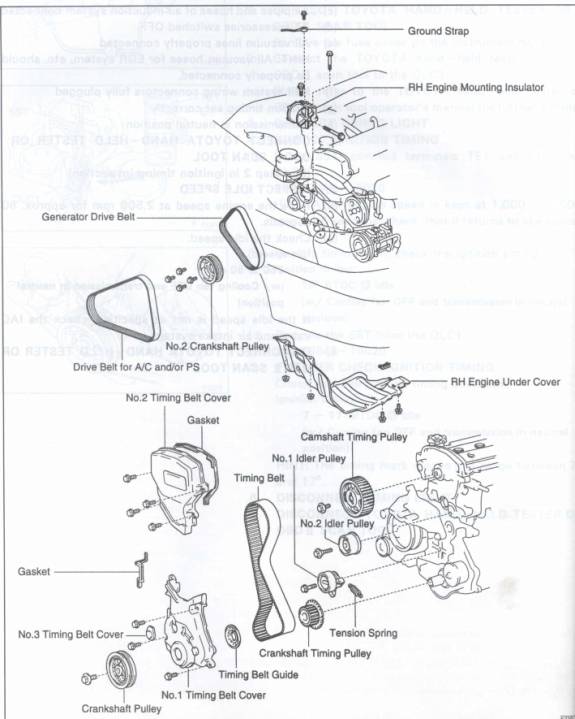
Figure 1
Procedure
- Jack up right side of car, and support with jack stands.
- Remove right front wheel.
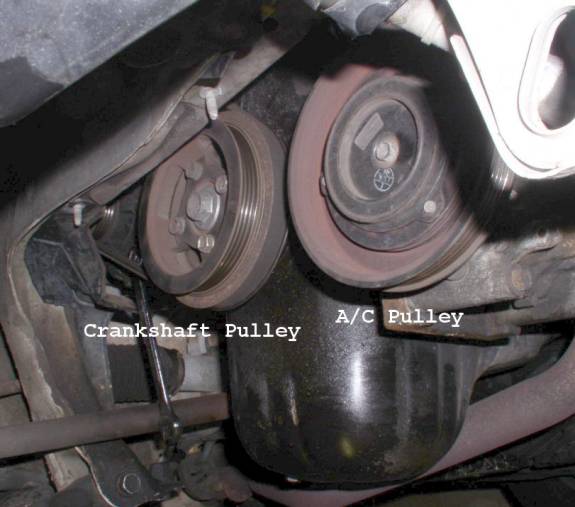
- Remove A/C and Power Steering (P/S) Belt
- There are two bolts underneath the P/S Pump.
- One bolt has a foot on it that presses against the pump body. This is how you set the belt tension. Back this bolt out first. Use a 12mm socket on a 1/4" ratchet. Come in from underneath the front of the P/S pump.
- The other bolt rides in a channel that is located behind the P/S pump pulley. Use the 14mm deep socket to break the bolt free, but don’t back the bolt out or your wrench will get stuck. Switch over to a 1/4" ratchet with a U-joint to remove the bolt.
- Now loosen the bolt on the top of P/S pump where the pump bolts to the engine. Now pivot the pump in to relieve the belt tension and remove the belt.
- Remove the Generator (Alternator) belt
- Loosen adjustment bolt on top of generator
- Go underneath the car, and
loosen the bolt the generator pivots on:

- Slip the belt off of the crankshaft pulley
- Remove the belt from the top of the car
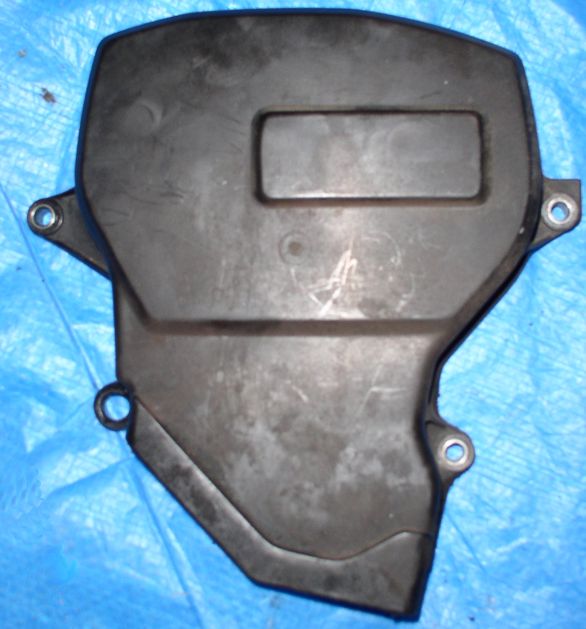
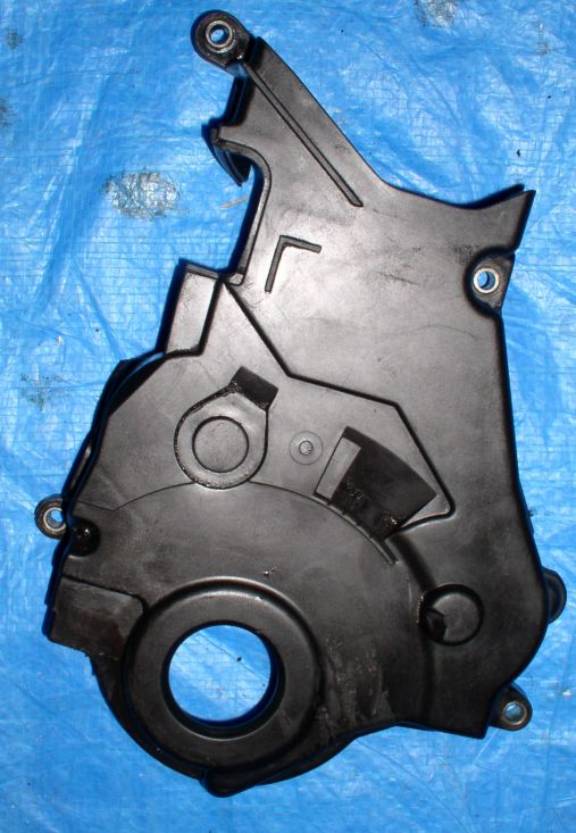
- Remove the #2 timing belt cover (upper cover). Be careful not to lose the gasket that sits inside the cover:
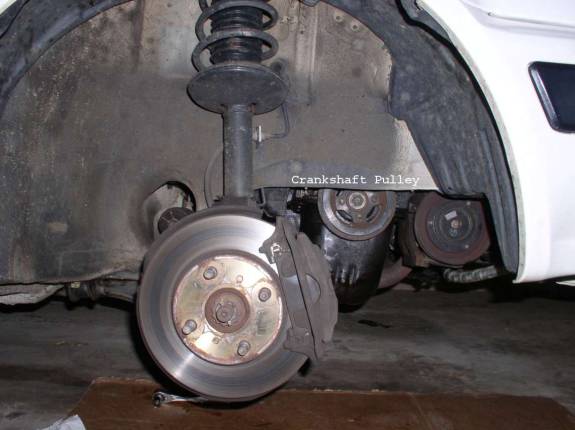
- Remove the right-side engine under-cover (2 bolts and 2 nuts). See figure 1.
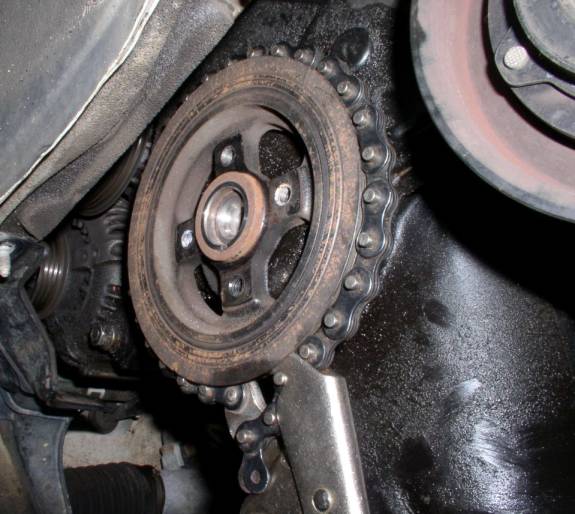
- Now you can see the crankshaft pulley from the wheel well:
- To ensure the engine does not fire while you are working on it, make sure the keys are out of the car, and disconnect both ignition coils.
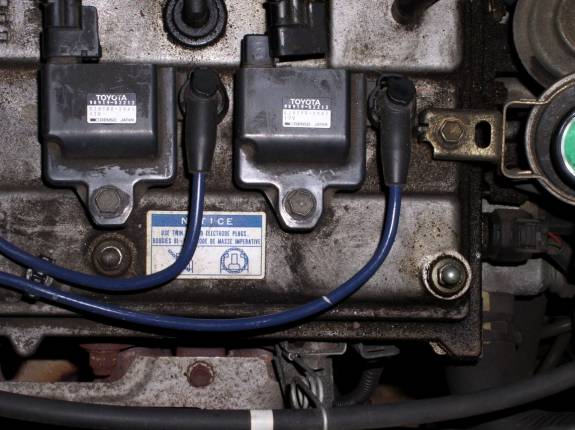
In this picture, only the coil on the right is disconnected. Make sure you disconnect both!
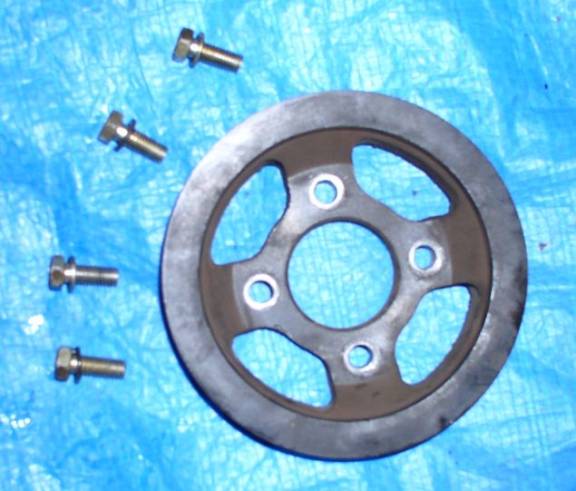
- Remove the 4 bolts that hold the #2 crankshaft pulley to the inner crankshaft pulley.
- To keep the engine from turning while removing the 4 bolts, put your 1/2" ratchet with a 19mm socket on the center bolt. Do not let the engine turn counterclockwise while removing the 4 small bolts.
- To get at all 4 bolts, you will need to turn the crankshaft clockwise half a turn, because the car body is in the way. Be careful when turning the engine. The valve springs tend to kick back, so sometimes you can not stop exactly where you would like. Be cautious of the wrench snapping out of your hand.
- You should now have the #2 pulley off:
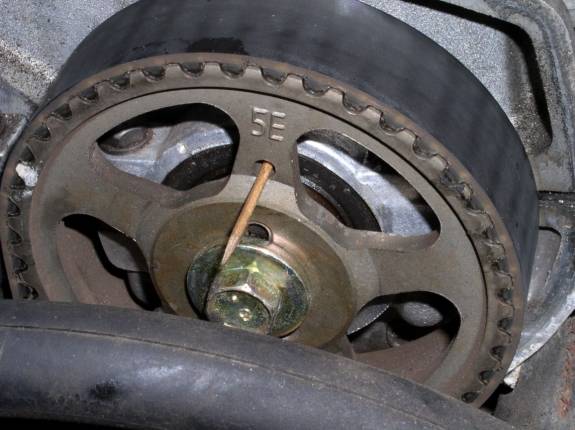
- Turn the crankshaft clockwise until the notch in the pulley lines up with the 0 degree mark on the lower timing belt cover. Note, you will probably have to wipe grime off the cover to find the timing marks. To find the marks, look down from the engine compartment.
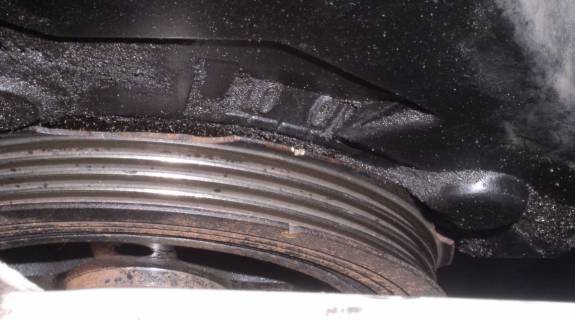
Note also, the pulley on my car is missing a chunk out of its side (to the left of the 10 degree mark). Do not confuse this with the V-shape notch that is the timing mark.
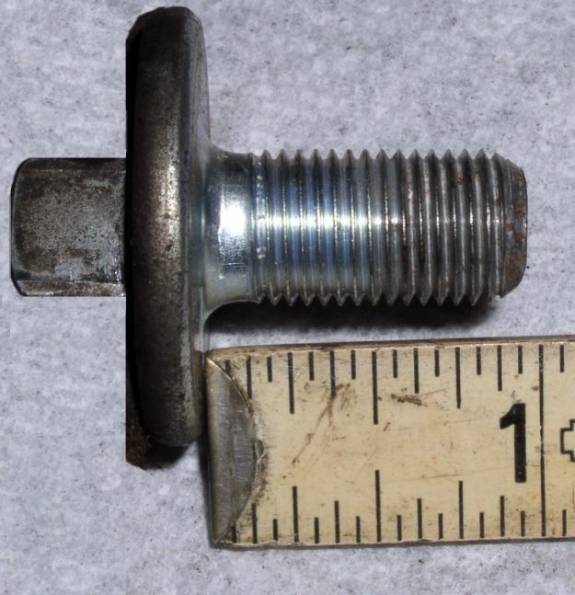
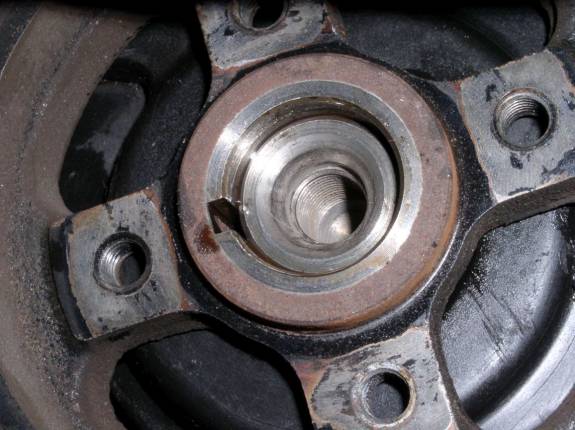
- Remove the center bolt from the crankshaft pulley. To keep the engine from turning while removing the bolt, place the chain wrench around the pulley:
Note that in this picture the bolt has already been removed. It is important that the engine not turn counterclockwise while you are removing the bolt. Make sure the chain wrench does not slip as you apply torque to the bolt. This is what the bolt looks like:
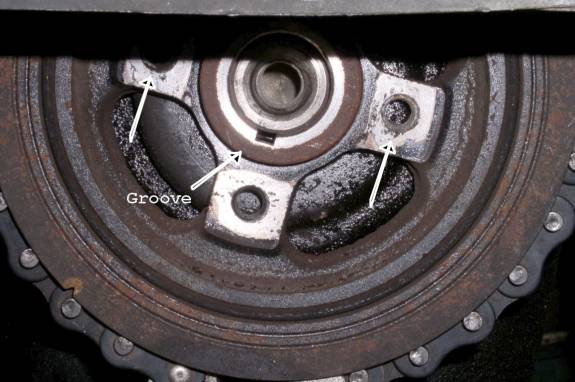
Here is another view of the pulley with the bolt out, that shows the groove that aligns the pulley with the crankshaft:
- Remove the pulley from the crankshaft using the gear puller. Center the gear puller foot over the center of the crankshaft. Depending on the size of the foot, you may need to put a washer (or maybe a quarter) between the gear puller and the crank. You don’t want the gear puller to mangle the threads in the crankshaft. Thread two 8mm bolts through the puller and into the holes shown in the above figure. Hold the chain wrench to keep the engine from turning, turn the center bolt of the puller until the pulley comes off:
- Remove the #1 timing belt cover (lower cover). Be careful not to lose the gasket that sits inside the cover:
- Remove the timing belt guide:
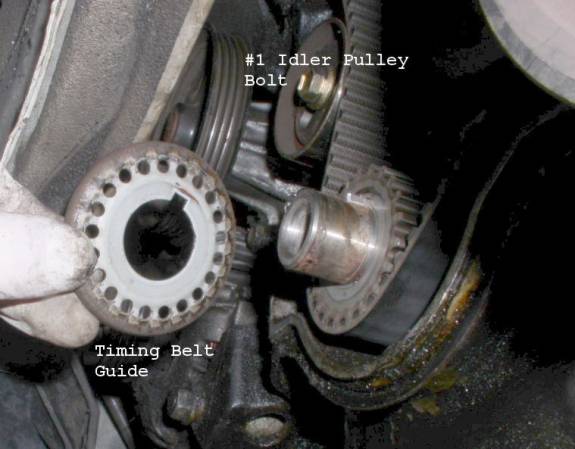
- Remove tension spring from the #1 Idler Pulley. This figure also shows the belt routing:

- Check spring length. It should be 1.512” long. If grossly off, replace the spring.
- Loosen the #1 Idler Pulley Bolt, and swing the idler pulley to the left. Tighten the bolt.
- If all has gone well, you will find that the camshaft and crankshaft are both at the 0 degree Top Dead Center (TDC) marks.
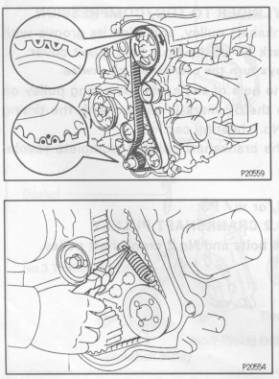
Camshaft
timing alignment. There is a divot in the engine block that the toothpick is
inserted into. Please note, the camshaft pulley may have a second timing hole
labeled ‘4E’. Do not use that one.
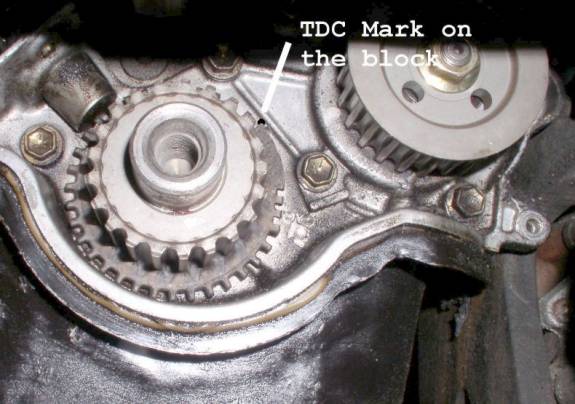
This
is the crankshaft timing gear. There is a nipple that sticks out from the
block. The gear has a flat spot on it where there are no teeth. The upper-left
corner of this spot should coincide with the nipple.
- If you are not on the marks, or the old belt was broken, don’t panic. The Toyota 4-cylinder 5EFE engine is a non-interfering design, which means the pistons won’t smash the valves, even if the belt is broken or not on correctly.
- Put a little motor oil on the crankshaft bolt threads, and reinstall the bolt (but not the pulley) onto the crank.
- If necessary, turn the crankshaft clockwise until the camshaft pulley is on its timing mark.
- Remove the old belt.
- If necessary, turn the crankshaft clockwise by itself to get the crankshaft lined up with its timing mark. Note, it is ok to turn the crankshaft separately from the camshaft because this is a non-interfering engine. Never do this on an interfering engine (i.e. some other make/model).
- Wash your hands / put on clean latex gloves.
- Check the idler pulleys. They should spin freely, and not have excessive play in them. The oil seals should not show any signs of leakage. Replace if needed.
- Wipe any dirt / grease / oil off the idler pulleys.
- Install the new belt. Try to keep the belt clean (avoid contact with grease, dirt, oil, etc).
- I recommend you set the belt on the camshaft, but don’t slide it back all the way.
- Then work the belt to the inside of the #2 idler pulley.
- Go around the oil pump
- Take up as much slack as you can
- Get part-way onto the crankshaft gear, but don’t slide it on all the way
- Now clear the #1 idler pulley.
- Slide the belt all the way onto the crankshaft gear and camshaft gear.
- If the belt looks like it is going to rub the engine block between the crankshaft gear and oil pump gear, don’t worry because the belt hasn’t been tensioned yet.
- Using the crankshaft bolt, turn the crankshaft clockwise 2 turns until the camshaft has made a complete revolution. Line the crankshaft up with its timing mark, and see if the camshaft is also on its mark.
- Don’t be surprised if you find the camshaft is forward or behind by one tooth. Go back to step 22.
- Repeat the process until you have both crankshaft and camshaft on their timing marks, can make 2 revolutions of the crankshaft (which is one revolution of the camshaft) and wind up with both gears back on their timing marks.
- Loosen the #1 idler pulley and push it to the right. Tighten it back up.
- Reinstall the tension spring.
- Insert the spring into the hole on the idler pulley from the bottom side of the hole.
- Use a short flat-blade screwdriver to stretch the spring over to the other hook. Angle the screwdriver to get the spring to slide off the screwdriver and onto the hook. This will probably take several tries.
- Loosen the #1 idler pulley and allow the spring to set the belt tension.
- Turn the crankshaft 2 revolutions, and check you are still on the timing marks.
- Now tighten the #1 idler pulley bolt to 13 ft-lbs.
- Remove all the tools from around the engine.
- With the ignition coils still disconnected, crank the starter for a few seconds while having your friend watch the engine. Everything should turn smoothly.
- If so, reconnect the ignition coils, and start the engine up for a few seconds. It should run smoothly. The belt should travel over all the gears / pulleys smoothly. If the engine won’t run, or runs very roughly, the timing is probably not right.
- Place the timing belt guide back on the crankshaft.
- Install the lower timing belt cover. Be careful that gasket is not knocked out as you line up the cover with the engine block.
- Remove the crankshaft bolt from the crank. This can be difficult, since there is no good way to hold the engine from turning while removing the bolt. I wedged a screwdriver between the camshaft pulley and the engine block. Again, be careful not to let the engine turn counterclockwise.
- Put a little motor on oil the crankshaft end. Place the crankshaft pulley on the crank, lining up the groove. Slide the pulley on as far as possible, using only hand pressure. Do not use a mallet or hammer to force the pulley on.
- Put a little motor oil on the flange of the crank bolt where it will meet the pulley face. Install the crankshaft bolt until it is hand tight.
- Put the chain wrench back on the pulley. Holding the chain wrench, turn the crank bolt, pressing the pulley back on in the process. When the pulley is all the way on, torque the bolt to 112 ft-lbs.
- Install the #2 crankshaft pulley using the 4 bolts.
- Install the upper timing belt cover. Check that the gasket is in place while installing.
- Install the generator belt. Tighten the upper adjusting bolt first. Tighten the pivot bolt underneath the generator second.
- Install the Power Steering Belt. Use the bolt underneath the P/S pump with the foot on it to set the belt tension. Then tighten the bolt behind the P/S pulley that rides in the channel.
- Start the engine and check that both belts are running smoothly.
- Reinstall the engine under cover.
- Reinstall the right front tire.
- Total time: 6 hours if you’ve never done a timing belt before. 3-4 hours if you’re experienced.
Use these directions at your own risk. The author assumes no liability for damage to your car, or injury to yourself or others.
If you use these directions, and found them to be helpful (or not), drop me a line at: jsiegel5 AT netzero.net (replace the AT with @)